Guide to WordPress Themes
WordPress is an excellent Content Management System (CMS) for building a website for a business or hobby. Its popularity has allowed numerous themes to be created, either free or a paid upgrade, and even premium ones.
What is a theme?
A theme is a pre-designed template used to create the design and overall look of your website. These can be found directly from WordPress.org's repository (your WordPress Dashboard) or third-party websites.
Regardless of whether the theme is free or paid, there are two ways in which you can add or install a theme to your WordPress site - via the WordPress Dashboard or manual install.
This article will discuss the following topics.
- Searching and activating a WordPress theme ⤵
- Downloading a WordPress theme ⤵
- Uploading a WordPress theme ⤵
- Additional Information ⤵
Here is a video to guide you in choosing and installing your WordPress theme.
Searching and activating a WordPress theme
WordPress allows you to search for themes within WordPress.org's repository based on specific keywords and/or features, then activate it on your website.
To search and activate a theme from your WordPress Dashboard:
- Log in to your WordPress Dashboard. Please visit the following article for the instructions.
- On the left menu, hover over Appearance and select Themes in the sub-menu.
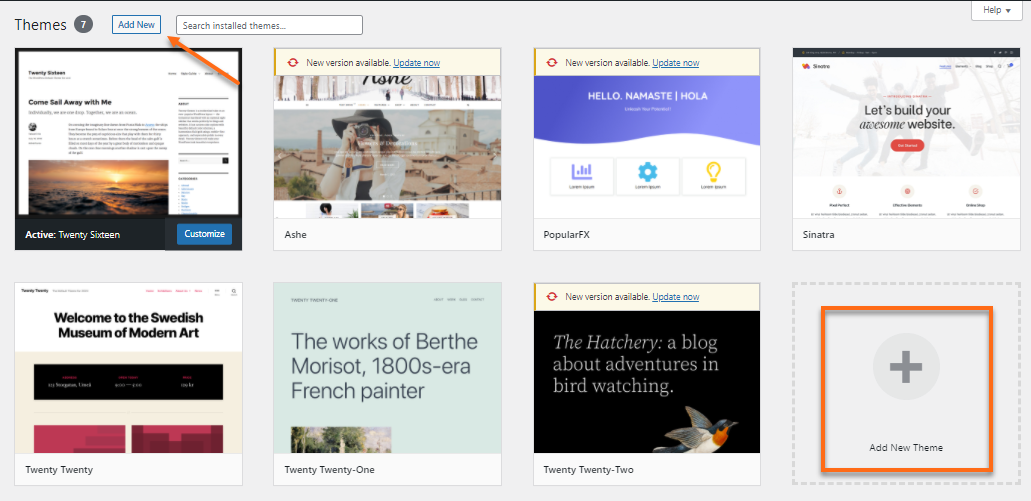
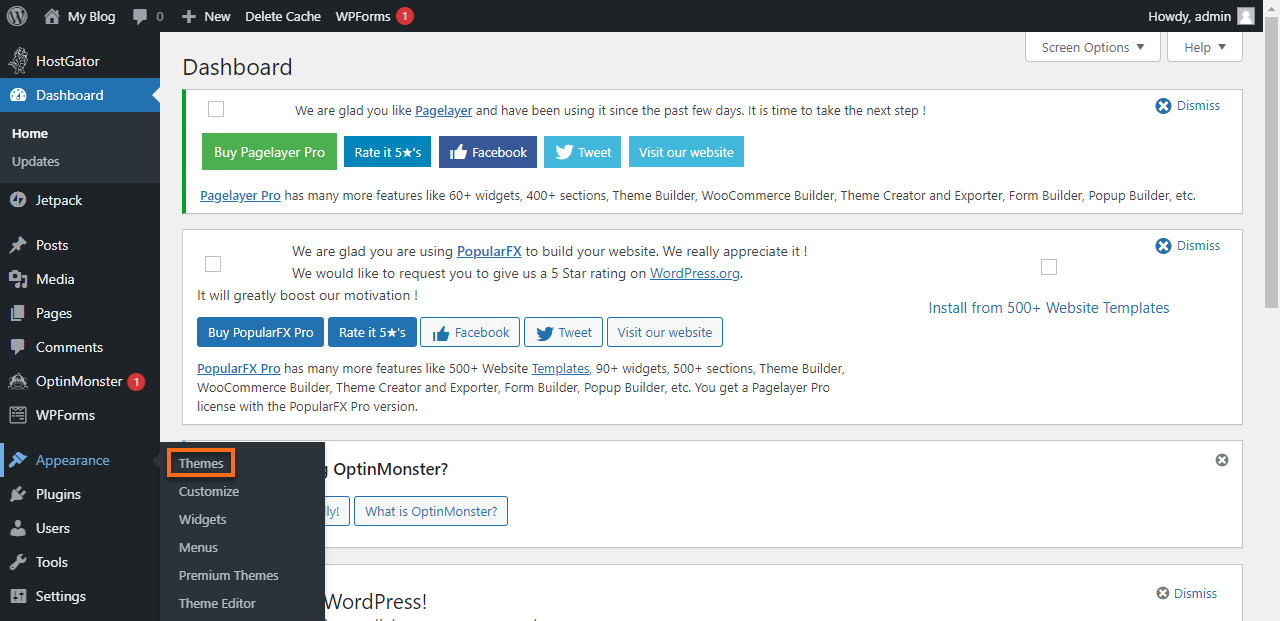 The Themes page shows the installed themes you can apply to your WordPress site. Only one active theme is allowed within a single WordPress installation.
 -
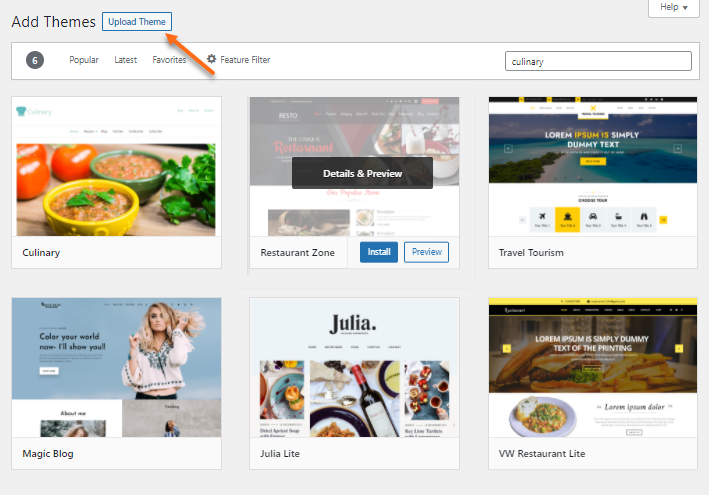
Use the search box at the top menu to search for your installed theme. If you're looking for a specific theme not included in the list, click the Add New button or the Add New Theme block at the bottom page.
-
You can select from the Popular, Latest, or Favorites tabs or use the search box to look for a specific theme.
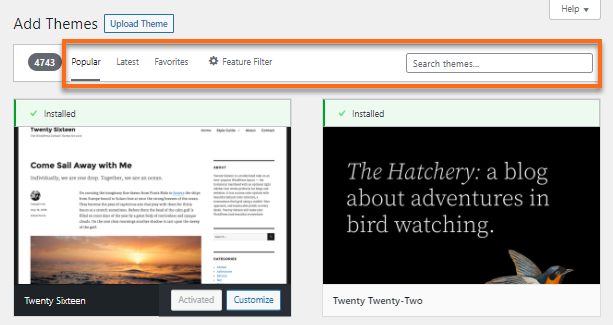 Many of these themes are free or offer upgrade options for purchase. You can browse all available WordPress themes or search by a specific keyword, author, or tag with the top menu options.
To install and activate the theme:
- Once you've chosen your preferred theme, hover your mouse over its thumbnail to install, preview the theme, or read its details.

- Click on the Install button to download the theme right away. You can also Preview to see what it would look like on your website, then click Install.
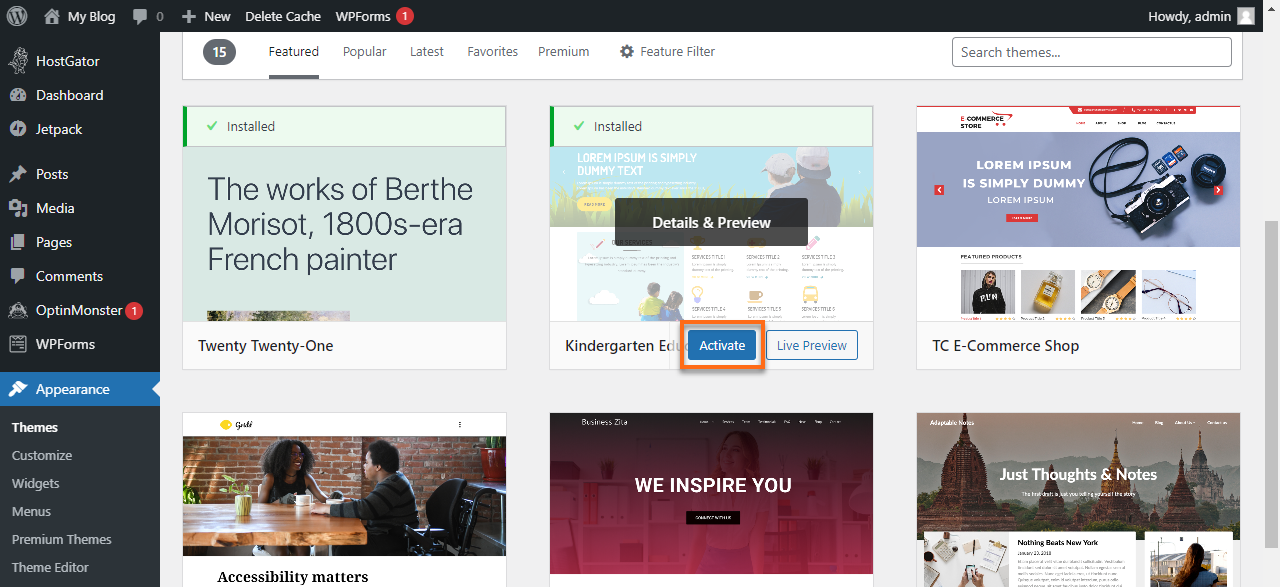
- Once installed, click Activate to apply the new theme on your site.
Downloading a WordPress theme
Let's say you saw a cool theme from a third-party website or bought one from a theme developer. You now want to apply it to your website. There are a few steps you need to do to use this cool theme.
- Download the theme in a .zip file from a reliable source to ensure it has all of its components.
- Once the theme's .zip file is downloaded, you need to upload it into your WordPress Dashboard to get it activated. See instructions below.
Uploading a WordPress theme
If you purchased a WordPress theme from a third-party website, you first need to upload it to your WordPress Dashboard, then activate it. There are two ways to upload a WordPress theme:
via WordPress Dashboard
To upload a theme via your Dashboard:
- Log in to the WordPress Dashboard.
- From the left-side navigation menu, hover over Appearance and click Themes in the sub-menu.
- On the Themes page, click Add New located at the top menu or click the Add New Theme block at the bottom page.
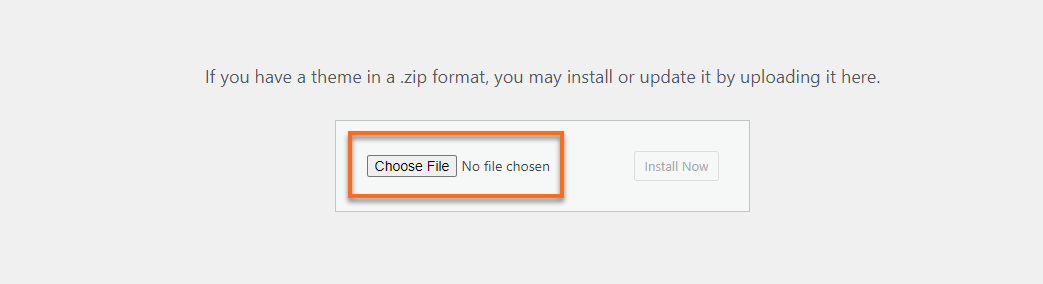
- On the Add Themes page, click Upload Theme at the top menu.
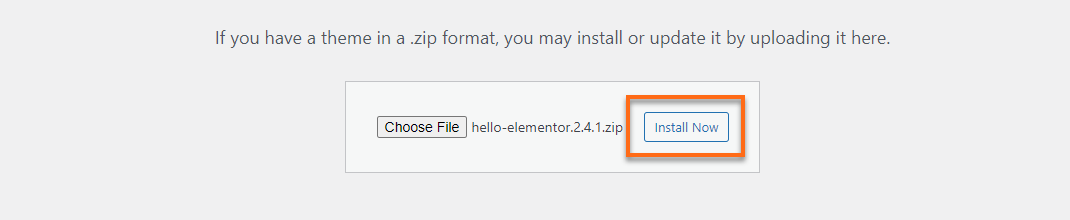
- Click Choose File and upload your theme's .zip file from your computer.
- Click Install Now.
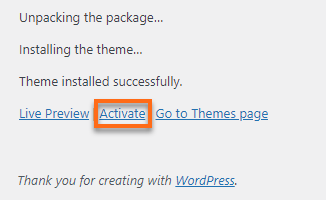
- Once installed, click Activate.
via manual upload
If you cannot upload the theme via the first method, you can manually upload it to your WordPress theme's directory, then activate the theme via the Dashboard.
To manually upload a WordPress theme:
- Log in to cPanel or connect to your server with an FTP client.
- Navigate to your WordPress site's document root in the File Manager.
- Click the wp-content folder, then select the themes directory.
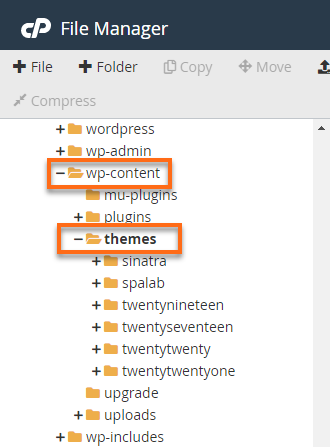
- Upload your theme's compressed (.zip) file into the /wp-content/themes folder. You may upload it directly using the File Manager or an FTP client, such as FileZilla. Please visit these articles for the instructions.
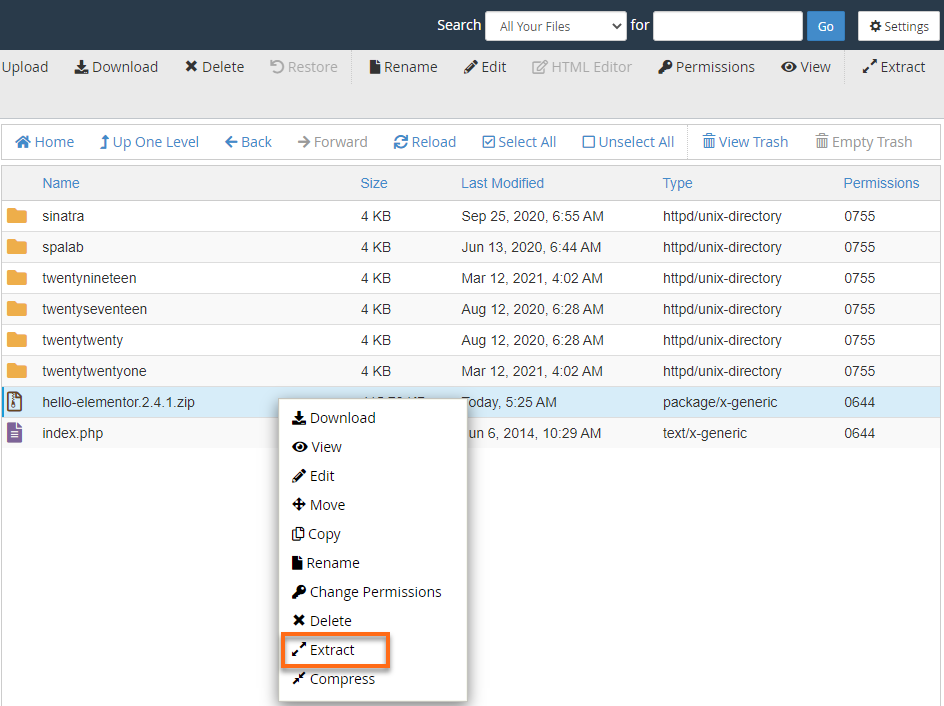
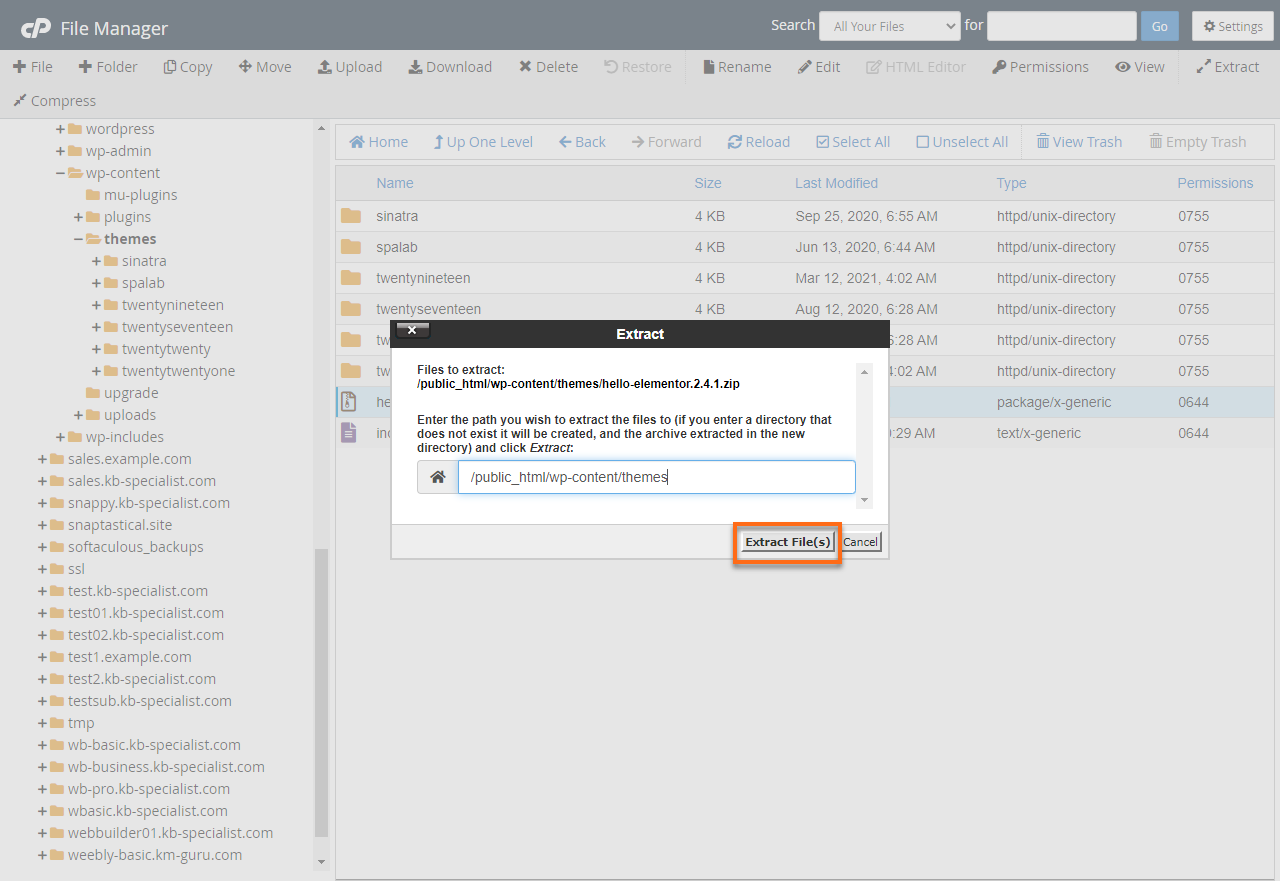
- Extract your .zip file within the /wp-content/themes folder.
To extract/uncompress your WordPress theme's files:
- Right-click on the .zip file and select Extract.
- Click Extract Files(s).
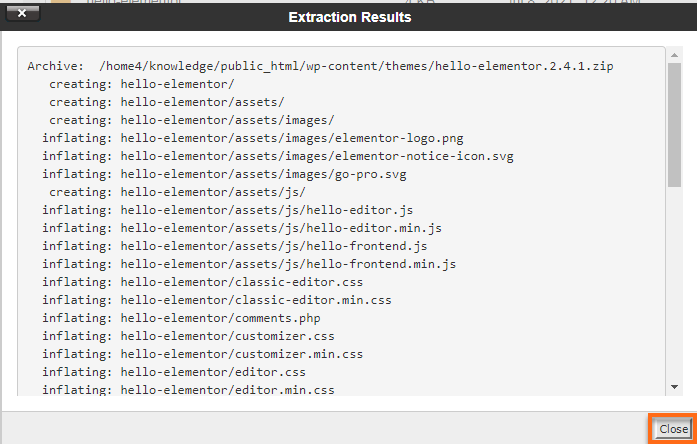
- Wait for the Extraction Results, then click Close.
- Right-click on the .zip file and select Extract.
- After successfully uncompressing your theme into the WordPress themes folder, log in to the WordPress Dashboard.
- Hover over Appearance in the left-hand menu and select Themes.
- Look for the uploaded theme, then hover over the theme's thumbnail image and click the Activate button.
Congratulations! Your WordPress website is now using the new theme.
Additional Information
Do you see blank pages after installing a new theme? Check out this article for more details.
Want to know more about managing WordPress themes? This article is a good read:
Are you new to WordPress or would like to familiarize yourself with the basics and how-tos in WordPress? We've got you covered! Here are the links to our "Building your First WordPress Website" videos to get you started.
- How to Choose and Install a WordPress Theme - Ep 1 Workin' with WordPress
- How to Customize a WordPress Theme - Ep 2 Workin' with WordPress- Done installing your theme? Awesome! This video will guide you on customizing your WordPress theme.
- How to Create and Edit a Page in WordPress - Ep 3 Workin' with WordPress
- WordPress Navigation Menu and Widgets - Ep 4 Workin' with WordPress
- Building your Homepage with WordPress Block Editor - Ep 5 Workin' with WordPress
- How to Install and Activate WordPress Plugins - Ep 6 Workin' with WordPress
- How to Create WordPress Blog Post - Ep 7 Workin' with WordPress
- How to Build an Online Store with WooCommerce - Ep 8 Workin' with WordPress