Configuring Servers - WHM (Part 1)
If you are new to WHM, you may find yourself lost when setting up your server. This extensive video* (1 of 2 parts) walks you through some of your server's most vital first steps and initial configurations.
*Your control panel interface may look or be organized differently from what is shown in this video above, depending on the WHM/cPanel version, theme, and operating system you are using. However, their functionalities should still be the same.
This tutorial will show you how to set up the initial configuration of a new cPanel account. Click the links below for more information.
- How to log in and access WHM ⤵
- Configure server settings ⤵
- Reset the root password ⤵
- Initial quota setup ⤵
- Server time ⤵
- Tweak settings ⤵
- Configure WHM/ cPanel updates ⤵
- Set Hostname in networking setup ⤵
- Name server IPs⤵
- Resolver configuration ⤵
- Security password options ⤵
- Create Packages ⤵
- DNS Zone Template ⤵
How to log in and access WHM
This article will guide you on how to get into your WHM:
Configure server settings
You may want to configure many settings on the server that will not be covered in this tutorial. Below are the settings you need to configure before adding accounts to the server. The other settings can be configured easily, even when accounts have already been added to the server.
Basic cPanel/WHM Setup
Here are many of the basic settings for the server configuration.
- Main Shared Virtual Host IP
- The primary IP address of the server is set as the Main Shared Virtual Host IP and is a common configuration for servers. It also can be changed to use a different IP address.
- The "root" user will still have access to all accounts on that IP address despite the delegation to the user with reseller privileges.
- WHM only allows one IP address to be shared per WHM user. If you wish to have multiple addresses configured to be shared, you will need to configure a user with reseller privileges for each one and assign the IP address to that user's shared IP address.
- Server contact email address
- Here, we can specify a different contact email address that the server will use to notify us if any issues arise with the server.
- Email accounts using the primary domain will need to be created in the cPanel for that domain after the account is added.
- Setting the default name servers
- Here, we can specify the names that this server will use for name servers. These should already be set for the primary and secondary name servers.
- Your name servers will need to be registered to point to IP addresses on the server through your registrar. WHM gives you the option to specify four (4) name servers. However, most of the time, only two are used.
Reset the root password
Here is our support article on resetting the WHM password:
Initial quota setup
Quota should already be enabled for the servers' accounts.
Server time
The server should already be pre-configured for Central Standard Time (CST). You can use this option to change the timezone for the system time.
Tweak settings
Here, you can customize many of the server's global settings.
- Setting the catch-all/default address behavior to "fail" will cause mail sent from non-existing addresses to your domains to be rejected by default by the server.
- This will reduce server load due to attacks from spammers.
- Shell Access/Jailshell
- For accounts that you choose to grant shell access to, this option will make the default settings grant a jailed shell account instead of the normal shell account for that user.
- Jailed shell accounts are chrooted, so directories and processes outside the chrooted environment will not be visible to the user, which adds extra security to the system. Normal shell accounts will be able to see other users' directories and processes even if they do not have permission to access them.
- For accounts that you choose to grant shell access to, this option will make the default settings grant a jailed shell account instead of the normal shell account for that user.
For more information about what you can do in the Tweak Settings section, please visit the following article.
Configure WHM/cPanel updates
These settings control updates to cPanel and other software packages on the server. By default, the server is set to the Stable build and automatically updated.
You can visit these cPanel documentation:
Set Hostname in the networking setup
Your hostname is the Fully Qualified Domain Name (FQDN) used to uniquely identify your server across the internet. If your hosting has WHM, a generic hostname is assigned to it. For more information about changing hostnames, you can check the following WHM external documentation:
To set up a hostname in WHM:
- Log in to WHM.
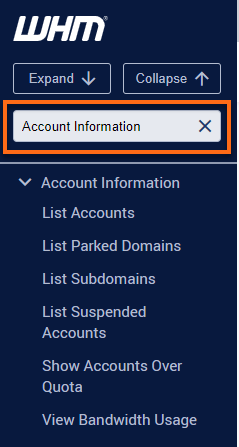
- Go to the Change Hostname section. The quickest way is to type the keyword in the Search box on the left-side panel.
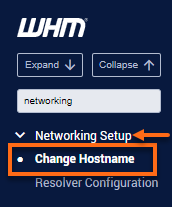
- You can also manually locate and expand the Networking Setup section in the left-side panel, then click on Change Hostname from the list.
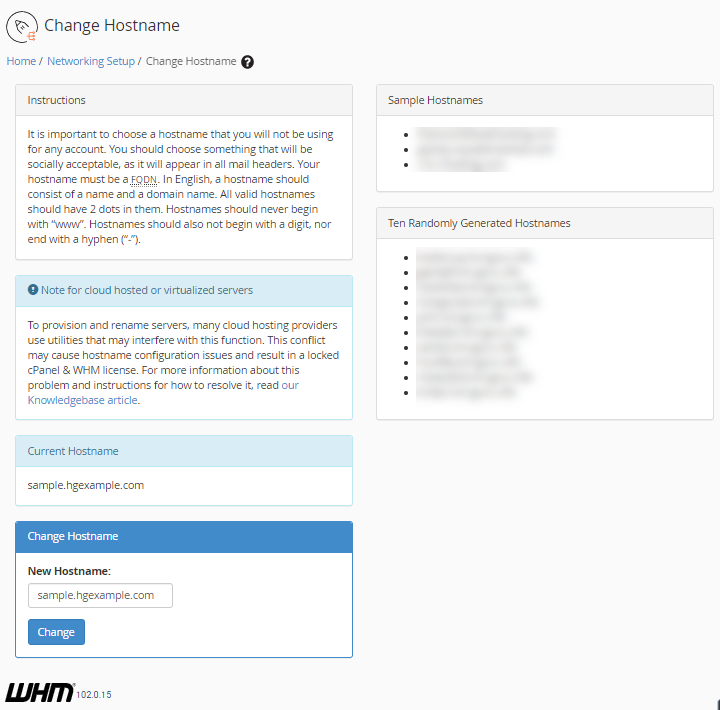
- On the right panel, you will see the notes, sample hostnames, randomly generated hostnames, your server's current hostname, and your server's current hostname.
- Enter the new hostname in the New Hostname field.
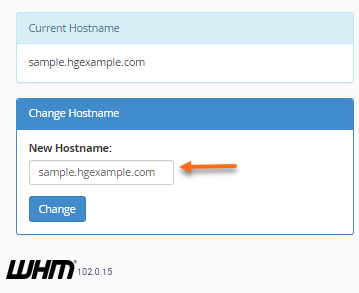
- Click the Change button.
Name server IPs
The name server IPs should already be assigned unless you changed the name servers in the Basic cPanel/WHM Setup above and didn't use the option to assign the IP address to the new name servers.
Resolver configuration
The Resolvers should already be configured to use the resolvers located at the data center. For more information, you can visit WHM's documentation.
Security password options
Next, we are going to configure some security options.
There are several security features here that can be enabled and configured to help maintain the security of your server. Before we create accounts for users who will be able to reset their own passwords, we will set a threshold that will ensure that the passwords they select are secure and not easily hacked.
To set up security in WHM:
- Log in to WHM.
- Go to the Password Strength Configuration section. The quickest way is to type the keyword in the Search box on the left-side panel.

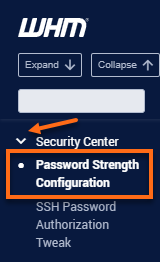
- You can also manually locate and expand the Security Center section in the left-side panel, then click on Password Strength Configuration from the list.
- On the right panel of the Password Strength Configuration page, adjust the Default Required Password Strength bar.
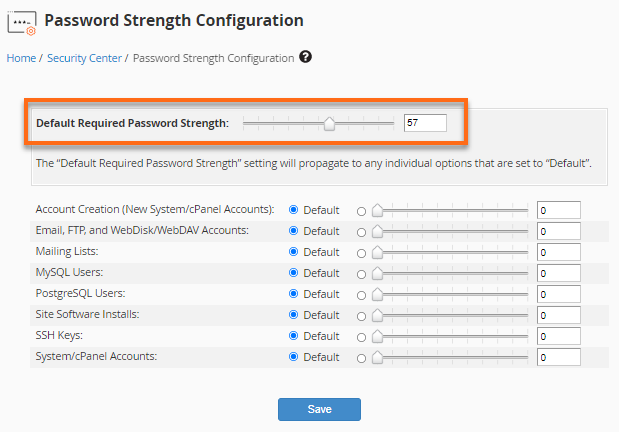
You can also enter a numeric value from 0 to 100.
- Click the Save button.
Create Packages
Packages are a preset list of limits and settings that can be applied to the accounts you create. Since this package will be for our primary domain, we will be creating a package without limits that will only be used for the primary domain.
For instructions on creating a new Package within WHM, please visit the following article.
Let's change the following settings in the Package's Resources and Settings sections to allow unlimited parked and addon domains and access to specific features in the cPanel.
- Max Parked Domains - Set it to unlimited.
- Max Addon Domains - Set it to unlimited.
- Feature List.- Set it to default. The "default" list has every option enabled unless you customize it within the Feature Manager section in WHM.
You will likely want to repeat this procedure to configure more specific packages with the limits and settings you want to assign to future accounts prior to adding them to your clients' accounts.
DNS Zone Template
Next, we will look at the zone template used to create DNS records for our primary domain when we add it.
The most common DNS records have already been entered into the DNS Zone. However, we can edit the template here so the WHM will automatically generate the zone with the records we want whenever an account is created.
Since the DNS records for our name servers and hostname will only be in the zone for our primary domain, we will not add A records for these in the template. Instead, we will modify the zone after it is created to add these records.
To access the DNS Zone Template in WHM:
- Log in to WHM.
- Go to the Edit Zone Templates section. The quickest way is to type the keyword in the Search box on the left-side panel.

- You can also manually locate and expand the DNS Functions section in the left-side panel, then click on Edit Zone Templates from the list.
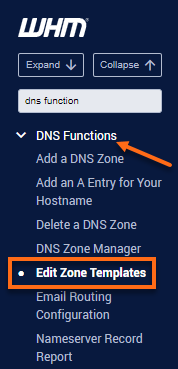
- In the Edit Zone Templates section, click on the standard link.

- Click the Save button to save any changes. (No changes were needed here unless you have a unique configuration.)
Sender Policy Framework (SPF)
You will likely want to add the information to create an SPF record.
The Sender Policy Framework (SPF) is a system developed for mail servers where DNS administrators can define what servers have been authorized to deliver mail for a particular domain. Email servers configured to check SPF will often reject email from a source if the relaying server isn't explicitly authorized in an SPF record for the sender's domain.
Instructions on how to add and manage DNS records in WHM are discussed in the following article:
That concludes the first part of our tutorial. In Part 2, we will continue with the initial configuration of a cPanel server.