How to Get and Enable Your Free SSL Certificate
This article regarding HostGator's Free SSL (Secure Sockets Layer) certificates will cover the following topics:
- How to get a free SSL certificate ⤵
- Step-by-step guide to enable free SSL ⤵
- How to upgrade from free SSL to paid SSL ⤵
- How to opt out of the free SSL ⤵
- Frequently asked questions (FAQs) ⤵
How to get a free SSL certificate
Getting HostGator's Free SSL is easy. The Free SSL certificate will automatically be available to every domain and subdomain for new and existing cPanel platform customers. It lasts for 90 days from issuance and renews automatically at no cost to you, so your site hosted with HostGator should never be without an SSL certificate.
Terms to remember:
- Enable is the process of activating the SSL certificate.
- Enforcing is the process of forcing the website traffic from HTTP to HTTPS using 301 redirects.
Step-by-step guide to enable free SSL
- Step 1: Connect your domain to your HostGator hosting account ⤵
- Step 2: Enable the free SSL ⤵
- Step 3: Force the website traffic from HTTP to HTTPS ⤵
Step 1: Connect your domain to your HostGator hosting account
To get your Free SSL certificate, connect your website to your HostGator account. If it's already linked, your SSL is ready to use. Then, direct your customers from HTTP to HTTPS (go to the next step).
If another provider manages your domain, make sure to create an A record in your provider's DNS dashboard. After that, link that domain to your HostGator account to enable the Free SSL certificate. Without this, you can't use the Free SSL.
For more information on how to point (connect) your domain to HostGator, please check out the following articles:
Step 2: Enable the free SSL
- Log in to your Customer Portal.
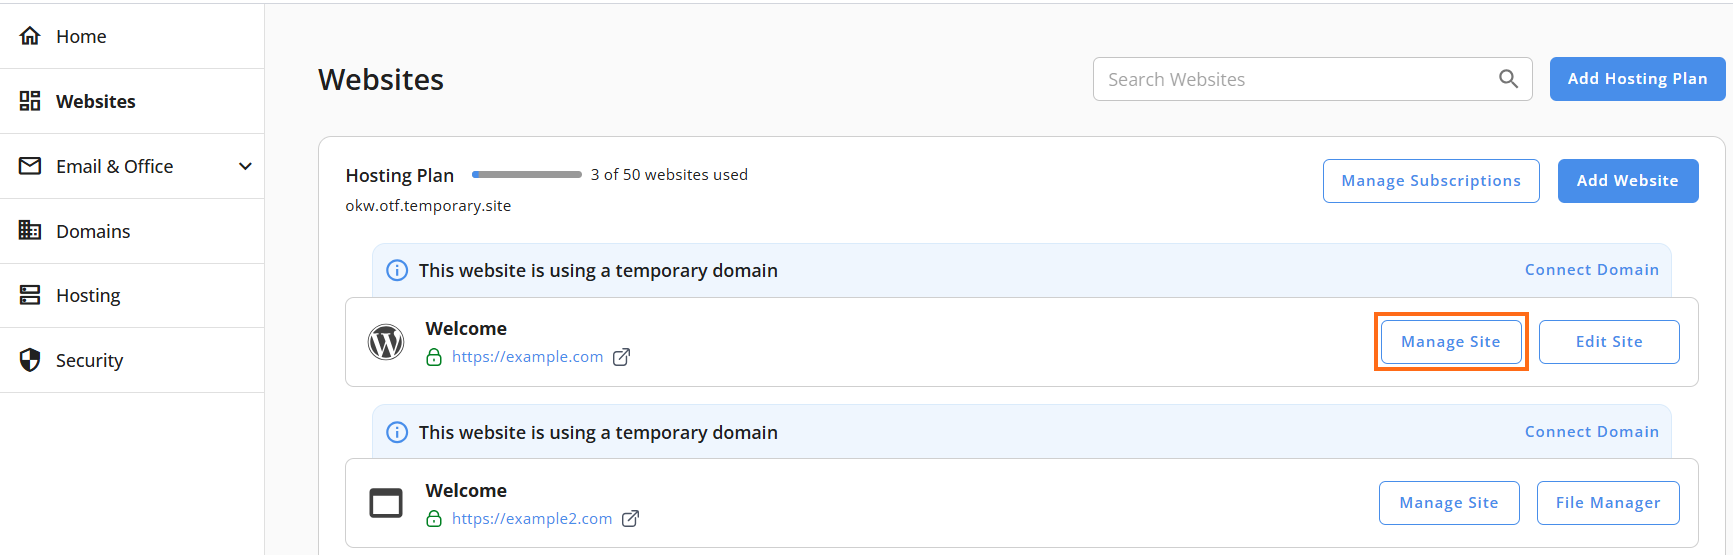
- Go to Websites from the left navigation menu.
- Click Manage Site next to the website you want to manage.
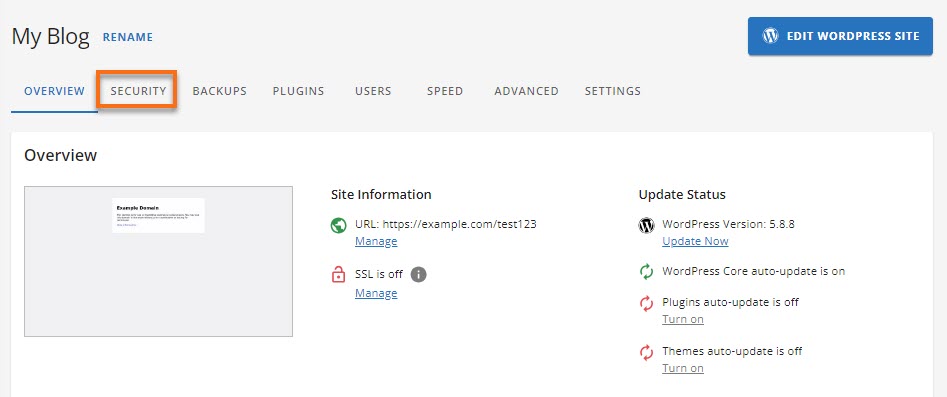
- Navigate to the Security tab.
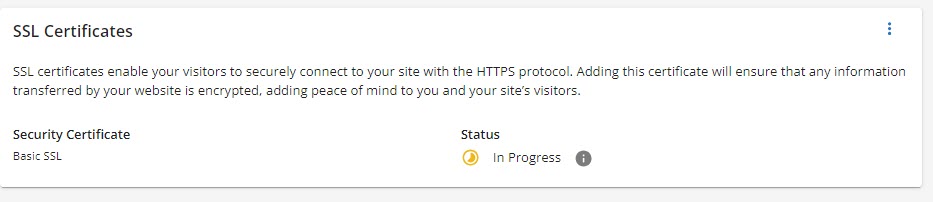
- If the SSL is set properly, it will show an Active status.
- If the SSL shows as In Progress, you should have received an email with instructions for activating your SSL.
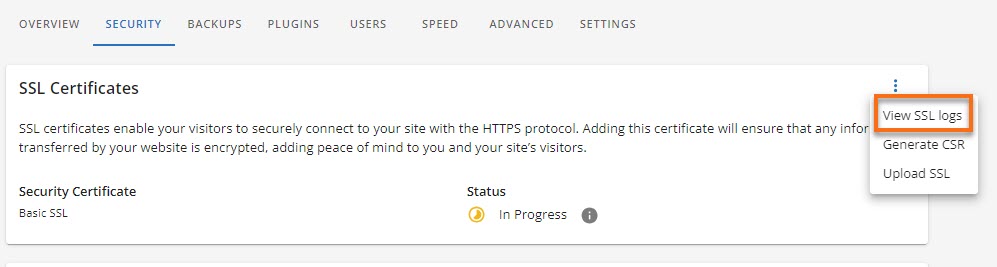
- If you do not see an active SSL, proceed to the next step.
- Click the three-dot icon, then select View SSL logs.
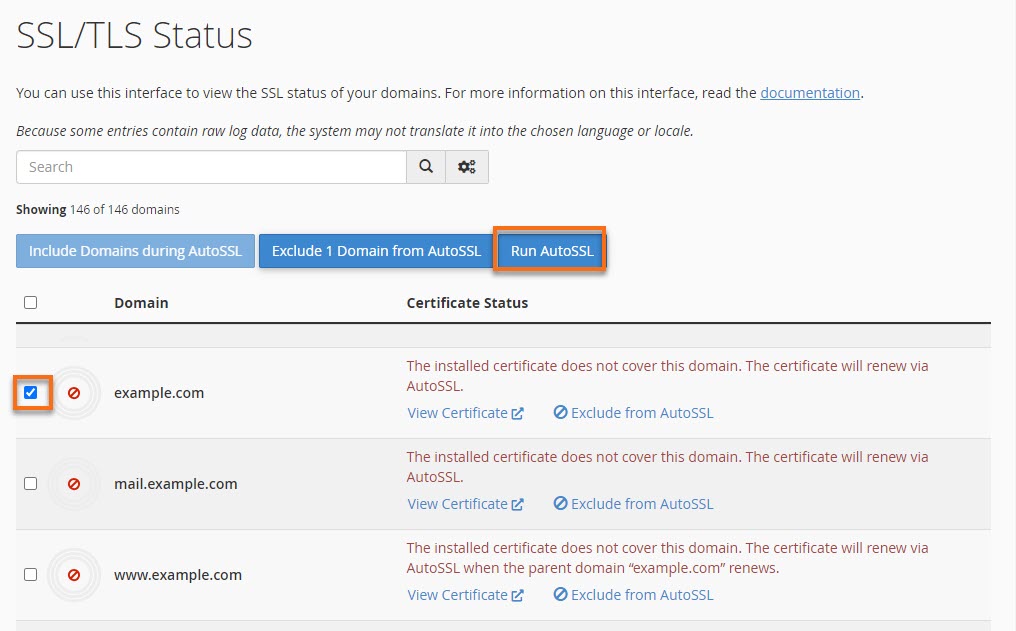
- You'll be redirected to your cPanel. Select your domain name and then click on the Run AutoSSL button.
Step 3: Force the website traffic from "HTTP" to "HTTPS"
The Free SSL does not automatically force HTTPS onto the domain or subdomain. It needs to be activated manually. This can be completed by editing the .htaccess to force HTTPS on every page.
The instructions for enabling Free SSL may vary depending on how you created your website. For more information on how to do this for popular applications or Content Management Systems (CMS), please click the expandable sections below.
How to enable SSL in WordPress
Here is a video tutorial on how to force HTTPS using the Simple SSL WordPress plugin.
To enable HTTPS on your WordPress installation, HostGator recommends using the WordPress Simple SSL plugin.
For more information regarding HTTPS in WordPress, please visit the following article:
- Do not forget to back up your WordPress site before installing any plugins.
- HostGator cannot offer direct support for any recommended plugins.
How to enable SSL in Joomla
To force HTTPS onto a Joomla site:
- Log in to your cPanel.
- Under the Files section, click on File Manager.
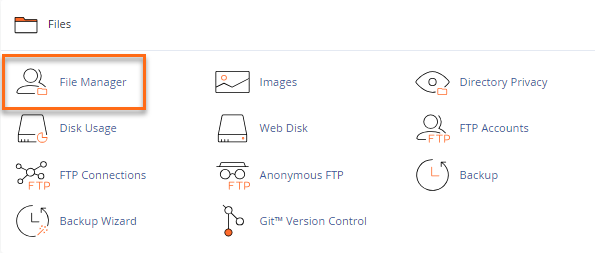
- In the File Manager, navigate to your domain's document root (directory) and locate the configuration.php file.
- In the configuration.php file, look for the line that contains
$live_site ='';
- Update the line to add your domain, including HTTPS,
Example:$live_site = 'https://www.example.com';
- Locate the associated .htaccess file for the domain and add the following code:
RewriteEngine On

	RewriteCond %{HTTPS} OFF

RewriteRule (.*) https://%{HTTP_HOST}%{REQUEST_URI} - Open your Joomla admin panel, then click Global Configuration.
- Go to the Server tab, then click on Server Settings.
- You will be presented with three options for how HTTPS should function for your Joomla installation. Select preferred settings.
- None: HTTPS will be disabled.
- Administrator-only: Forces the administrator page to use HTTPS.
- Entire site: All pages will use HTTPS.
- Click Apply/Save to update your Joomla site.
How to enable SSL in Magento
To force HTTPS onto a Magento site:
Magento 1.x
- Log in to your Magento admin panel.
- Navigate to System, then Configuration.
- In the General section, select Web.
- Open the Secure section and update the Base URL to:
https://yourdomain.ext - The Use Secure URLs in Frontend and Use Secure URLs in Admin options must be set to Yes.
- Click Save Config.
- To see the changes appear, you will need to clear the Magento cache.
Magento 2.x
- Log in to your Magento admin panel.
- Navigate to Stores> Configuration> Web.
- Open the Base URLs (Secure) section and update the URL in the Secure Base URL to:
https://yourdomain.ext - The Use Secure URLs on Storefront and Use Secure URLs in Admin options must be set to Yes.
- Click Save Config.
- To see the changes appear, you will need to clear the Magento cache.
How to enable SSL in Drupal
To force HTTPS onto a Drupal site, add the following code to your .htaccess file:
RewriteCond %{HTTPS} off [OR]
RewriteCond %{HTTP_HOST} ^www\.example\.com*
RewriteRule ^(.*)$ https://example.com/$1 [L,R=301]
For instructions on editing the .htaccess, please visit the How to Edit Your .htaccess File article.
How to enable SSL for Website Builder
To force HTTPS onto the Website Builder site, add the following code to your .htaccess file:
RewriteEngine On
RewriteRule (.*) https://%{HTTP_HOST}%{REQUEST_URI}
For instructions on editing the .htaccess, please visit the How to Edit Your .htaccess File article.
How to manually enable and force HTTPS in cPanel
To manually force HTTPS on a site:
- Add the following script to the top of the .htaccess file.
RewriteEngine On RewriteCond %{HTTPS} !=on RewriteRule ^ https://%{HTTP_HOST}%{REQUEST_URI} [L,R=301] - Additionally, you can input the following script to fix the Mixed Content warning on your site.
RewriteOptions inherit
RewriteEngine on
Header set content-Security-Policy: upgrade-insecure-requests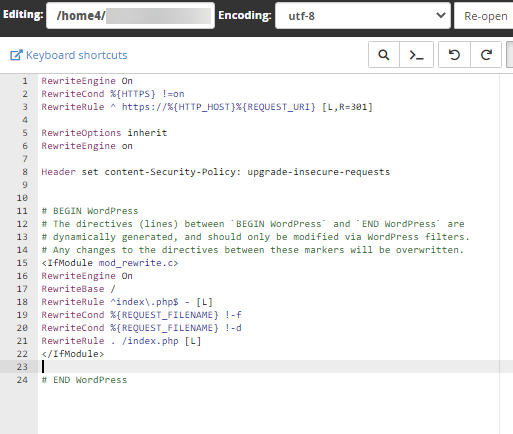
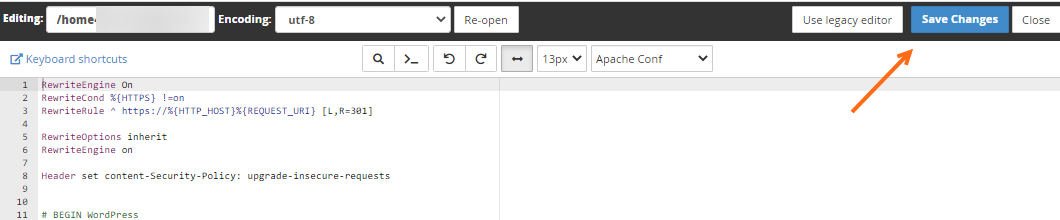
- Once done, click the Save Changes button in the upper-right corner.
- Clear your cache, and your WordPress site will automatically redirect to HTTPS without a plugin.
For instructions on editing the .htaccess, please visit the How to Edit Your .htaccess File article.
Workaround: Please try these additional steps if the site is not redirected to HTTPS after adding the above script to your .htaccess file.
- Log in to your WordPress Dashboard.
- On the left pane, look for Settings.
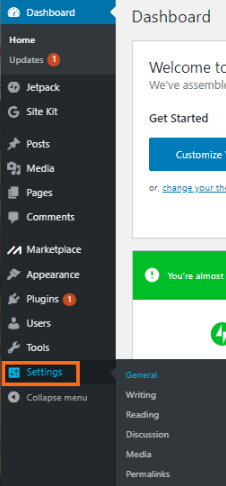
- Hover over Settings, then select General.
- Under General Settings, look for the WordPress Address (URL) and Site Address (URL) fields.
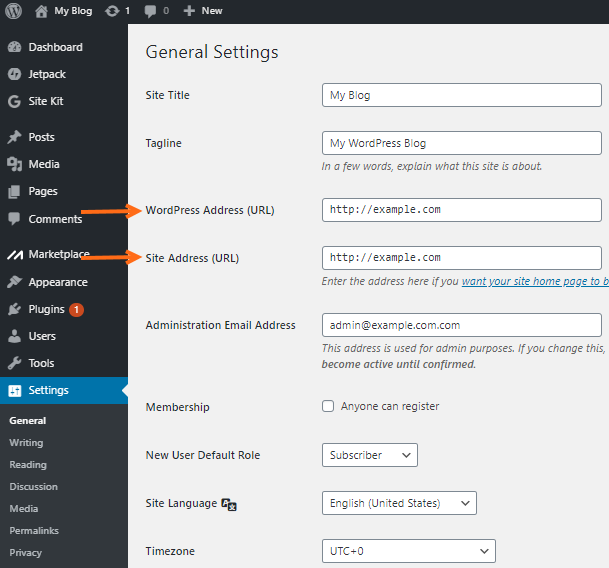
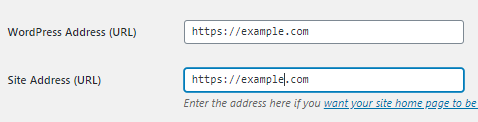
- Update both URLs to reflect https (https://yourdomain.ext).
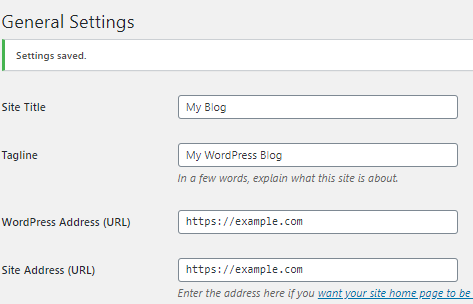
- Scroll down and click Save Changes.
- You will receive a successful confirmation prompt at the top of the page.
How to enable the free SSL and manually force HTTPS in Plesk
To enable the Free SSL and force HTTPS in Plesk for a domain:
Step 1: Enable the free SSL
Please note that the "www." subdomain will not be covered unless you include a www subdomain for the domain and each selected alias option is selected.
- Log in to the Plesk Control Panel.
- Go to the Websites & Domains tab.
- Locate and click SSL/TLS Certificates.
- Click Let's Encrypt under the domain.
- Confirm the email address is valid.
- Click Install.
A notification will be sent to the email address specified before the SSL expires. The SSL will automatically renew 30 days before it expires, or it can be renewed manually at any time.
Step 2: Force HTTPS
- Log in to the Plesk Control Panel.
- Go to the Websites & Domains tab.
- Click on Hosting Settings under the domain.
- Under Security, select the checkbox labeled "Permanent SEO-safe 301 redirect from HTTP to HTTPS."
- Scroll down and click OK to save.
- Return to Websites and Domains or click Apply to save and stay in the Hosting Settings.
- Navigate to your website to test the SSL certificate. The SSL certificate will work correctly if you are redirected to the secure HTTPS:// version of your site.
How to upgrade from free SSL to paid SSL
If you're using a Free SSL and you want to upgrade to a paid SSL, it's easy to do so through your Customer Portal. HostGator offers different types of SSL certificates, and it's important to understand the differences before making a decision. You can find this information in the following support article:
Once you're ready to upgrade, simply visit the article:
How to opt out of the free SSL
To opt out of the Free SSL certificate:
- Log in to your Customer Portal.
- Go to Websites from the left navigation menu.
- Click Manage Site next to the website you want to manage.
- Click on the Settings button of the website you are working on.
- Navigate to the Security tab.
- Click the three-dot icon on the right, then select View SSL Logs.
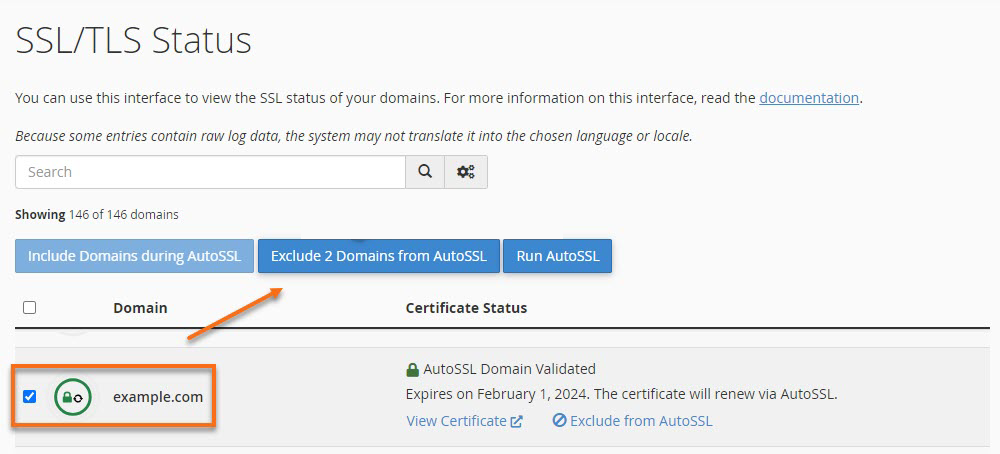
- Click on the checkbox next to the domain name for which you are opting out of the free SSL, then select Exclude Domain from AutoSSL.
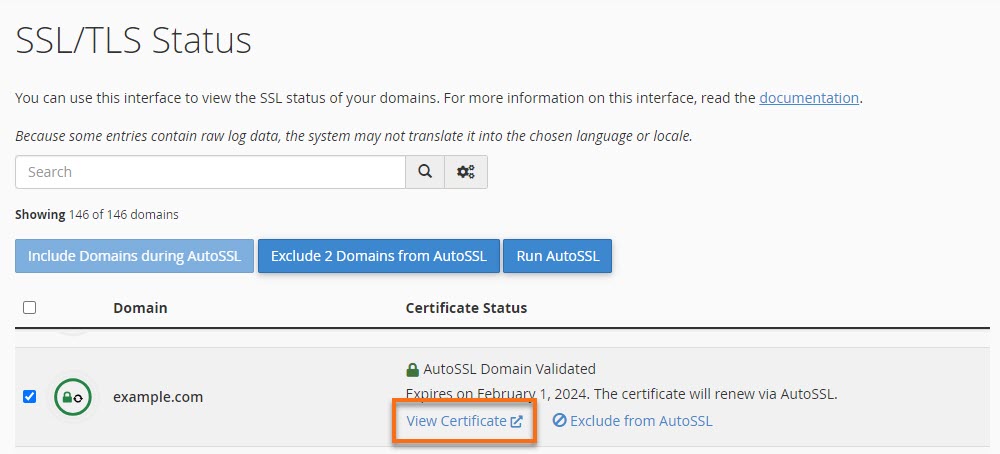
- Click on View Certificate.
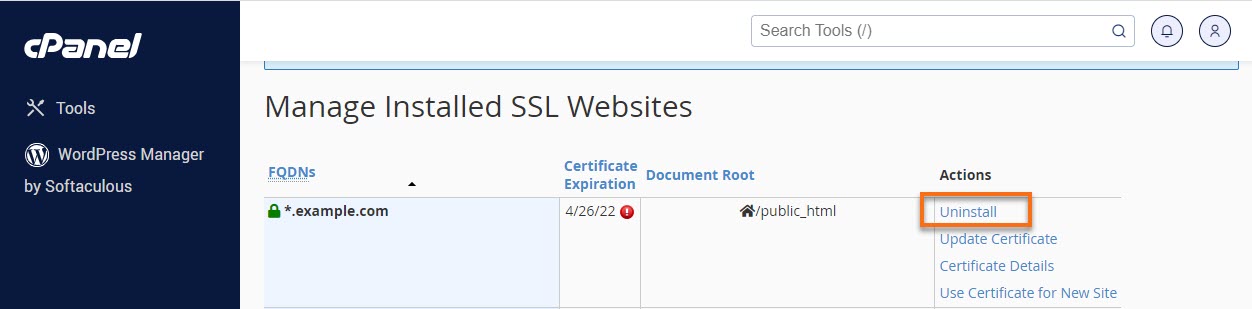
- Locate the domain you are opting out of for the free SSL certificate and click on Uninstall.
Frequently asked questions (FAQs)
Do I have to activate the Free SSL on my subdomain if it is already activated on my primary domain?
First, what's the difference between a domain and a subdomain?
A domain name is the address of a website. It is the URL that a visitor types into a browser.
A subdomain is an add-on to your primary domain name. Essentially, a subdomain is a separate part of your website that operates under the same primary domain name.
Domain: example.com
Subdomain: sales.example.com
To answer the main question: Yes, you need to activate the Free SSL on your subdomain, even if your primary domain already has an active Free SSL. Both are considered separate websites with their own website content and .htaccess files. The steps for activating the subdomain's Free SSL are the same as for the primary domain, as discussed above.
When viewing my domain over HTTPS, why does it say I don't have a certificate on my site?
- You must have an actively shared cPanel package with HostGator.
- The domain must be pointed to your HostGator hosting via an A record.
- Clear your browser cache and try viewing the site on another device after you enable the SSL certificate. Sometimes the old version of the website will be cached in your browser.
Which hosting plan includes free SSL?
All HostGator hosting packages include free SSL certificates for all domains hosted within the account and pointed by an A record.
Advanced hosting users with a VPS or Dedicated plan may enable it for their servers by following the guide below.
What do I have to do once I get the Free SSL?
Once the Free SSL is installed, you will likely need to direct your visitors from HTTP to HTTPS to ensure they use the most secure path to access your site. Please see the instructions above.