Troubleshooting Common WordPress Login Issues
Have issues with your WordPress login page? Can't seem to access your WordPress dashboard? These WordPress login issues can be frustrating, especially when you want to update your WordPress site quickly.
Here are some common WordPress login errors and how to troubleshoot them.
Basic Troubleshooting for WordPress Login Issues
- Cache and cookies ⤵
- Incorrect WordPress login credentials ⤵
- Blocked IP address ⤵
- Security plugins ⤵
- Incorrect site URL ⤵
- File permissions ⤵
Cache and cookies
Deleting your cache and cookies is recommended before troubleshooting to rule out simple issues. Believe it or not, many website issues are resolved by simply deleting cache and cookies!
You may check these articles if you need a guide in deleting your cache and cookies.
Incorrect WordPress login credentials
An incorrect username and/or password is one of the most common reasons why you can't access WordPress. You will usually see that little prompt on your WordPress login page that either the username or the password is incorrect.
If it's a username, you may want to try using the email address you used during your WordPress setup.
If WordPress says it's your password, you can reset your WordPress password using the Lost Your Password? link on the login page. There are also other ways to reset your WordPress password. Please check out this article for the instructions.
Blocked IP address
There may be a time when you get an error message similar to:
ERROR: Access from your IP address has been blocked for security reasons. Please contact the administrator.
This error normally appears when a security plugin is installed, and its security feature blocks your current IP address. To whitelist (unblock) your IP, you first need to get the IP address you're using.
- To find your computer's IP Address, use Google to search for 'what is my IP' or go to https://www.google.com/search?q=what+is+my+ip. Google will display your IP Address in the search results. Please note this feature is only available in English.
Once you have your IP, log in to your WordPress dashboard using a different computer or device. Access the settings of the security plugin and whitelist your IP address.
Security plugins
Of course, you will want to give your site extra protection. One way of securing your site is by using security plugins. If you are using a WordPress security plugin, you might have accidentally blocked yourself. This may happen if, for example, you hit the maximum limit of login attempts. The security feature will kick in, causing you to lose access to your website. You may also see this error:
ERROR: Access from your IP address has been blocked for security reasons. Please contact the administrator.
For this, you may want to try disabling your security plugins. Here are some ways to disable your security plugin if you are unable to access your WordPress dashboard.
- Disable your plugin via the database - Please check out the article, Enable/Disable WordPress Plugins using Database, for the instructions. This can be done via your control panel's phpMyAdmin.
- Disable your plugin via FTP For this method, you will need to launch your FTP so you can get access to your WordPress core files on your server.
- Connect to your server using your FTP client.
- Click the folder of your WordPress files.
- Navigate to the folder named wp-content, then click the plugins folder.
- Locate your security plugin (for example, jetpack-security), then rename its folder to something else (for example, jetpack-security-disable). This will disable your security plugin.
- Go ahead and try logging in to your WordPress dashboard.
- Once logged in, you may rename your security plugin to its original file name (jetpack-security).
- Disable your plugin via cPanel (if you have one) - This method requires access to your cPanel.
- Log in to cPanel. There are two ways to access your cPanel.
- Option 1: Access your cPanel directly.
- Option 2: Access your cPanel via your Customer Portal.
- Log in to your Customer Portal.
- Click Hosting in the left-side menu.
- If you have a single hosting package in your account, scroll down to the Quick Links section.
If you have multiple hosting packages in your account, locate the hosting package you want to manage on the Hosting Packages page, then click its Manage button.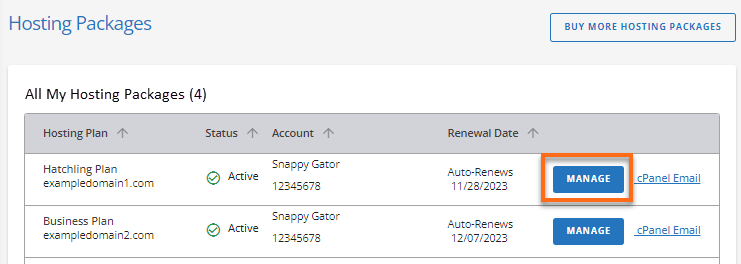
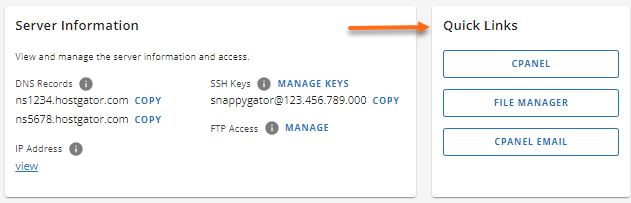
- Under the Quick Links section, click the cPanel button.
- Click the File Manager icon.
- Go to your WordPress folder, then click the wp-content folder.
- Navigate inside the plugins folder, then locate your security plugin (sucuri-plugin).
- Right-click on the security plugin folder and select Rename.
- Rename the security plugin's folder to something else (sucuri-plugin-disable). This will disable your security plugin.
- Try logging in to your WordPress dashboard.
- Once logged in, you may then rename your security plugin back to its original file name (for example, sucuri-plugin).
You can check these helpful guides to learn more about WordPress security plugins.
- Log in to cPanel. There are two ways to access your cPanel.
Incorrect site URL
If you made changes to your WordPress site and, for some reason, your site URL was changed, you may get an error page when trying to access the WordPress dashboard. For example, if your site https://thisismysite.com redirects you to https://example-site.com/wp-login.php, your site URL is wrong.
To fix your site URL:
- Connect to your FTP client or cPanel. (See options above on how to log into your cPanel).
- Click the File Manager icon.
- Go to your WordPress folder and locate the wp-config.php file.
- Right-click the wp-config.php file, then select Edit.
- Add this script just above the line "/* That's all, stop editing! Happy publishing. */":
define('WP_HOME','https://thisismysite.com');
define('WP_SITEURL','https://thisismysite.com');
Please make sure to replace "thisismysite.com" with your actual domain name.
Important Note: Once you add these lines to your wp-config.php file, you won't be able to edit them on the General Settings of your WordPress dashboard. - Click Save.
- Try logging in to your WordPress dashboard. Once logged in, remove the new scripts from the wp-config.php file, then click Save.
File permissions
Every file on your website has file permissions that grant different levels of access. If you changed your file permissions, you might have incorrectly set up permissions on your wp-login.php file and/or wp-admin folder.
To check your file permissions:
- Connect to your FTP client or cPanel. (See options above on how to log into your cPanel).
- Click the File Manager icon.
- Go to your WordPress folder and locate the wp-login.php file and wp-admin folder.
- Look for the Permissions column.
- Make sure that wp-login.php is set to 664 and the wp-admin folder is set to 775.
Please check out the article How to Change Permissions (chmod) of a File for the complete details.
Advanced Troubleshooting for WordPress Login Problems
Still unable to access your WordPress login page? The cause may be one of the following.
.htaccess file
The .htaccess file is one of your WordPress core files, and any change in it may directly affect or break your site, like redirecting your website's admin page to your main page, causing you to lose access to your WordPress dashboard. In this case, you may need to check the scripts of your .htaccess file in your document root.
Here are some helpful articles to get you started.
Missing wp-login.php file
If the wp-login.php file was accidentally moved or deleted, the WordPress dashboard will not be accessible and may return an error page. You may need to reupload your wp-login.php file to your document root. We strongly recommend creating a backup of your website first before making any changes and contacting your web developer if you're uncomfortable working on your WordPress core files directly.
- How To Backup A WordPress Site Without A Plugin (Blog)
- How To Create a Backup of Installation With Softaculous - If you installed your WordPress using Softaculous, you could also create a backup within Softaculous.