Google Workspace (Formerly G Suite) Setup Part 2
After agreeing to the Terms of Service, verifying your domain, and setting up your Google Workspace DNS, you will be able to access the full suite of Google Workspace Tools available to you. This article will address the additional setup required within your Google Workspace admin account to take advantage of its full functionality.
This article will walk you through the Google Workspace Setup Wizard.
- Accessing the Setup Wizard ⤵
- Welcome ⤵
- Users and Groups ⤵
- Set up your Apps ⤵
- Mobile Management ⤵
- Extend and Customize ⤵
- Training and Support ⤵
Need help with the Google Workspace MX records? See the Google Workspace MX Records section below.
We have consolidated helpful articles to guide you in ordering and managing Google Workspace.
- Google Workspace Setup Part 1 - Setup with Internal Domains - This article walks you through setting up Google Workspace with domains you've registered with HostGator.
- Guide to Using Google Workspace with an External Domain - This article will guide you through purchasing and setting up Google Workspace with domains not registered with HostGator.
- How to Transfer a Google Workspace (Formerly G Suite) Account - This article will guide you through transferring your existing Google Workspace account to HostGator.
Accessing the Setup Wizard
When you log in to your Google Admin Console, it will require the admin email and password you provided during the final step of the Google Workspace order process. After you log in, you may be prompted to set up your email; however, this prompt takes you to the middle of the Setup Wizard.
To use the Setup Wizard:
- Within the Setup Wizard, click on the < symbol to access the right-hand side menu.
- Click on Admin Console Setup under Tools.
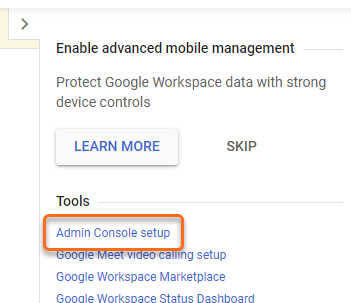
This will take you directly to the Welcome ⤵ section of the Setup Wizard.
Welcome
The Welcome section will provide you with a warm welcome to your new application, as well as links to a video tour and upcoming webinars to learn more about your tools.
You can return to this page anytime or view the video and sign up for a webinar now. Click Next when you are ready to proceed.
Users and Groups
If you have purchased multiple seats for your Google Workspace license to allow additional users to take advantage of your services, you'll need to set them up before continuing. If you do not yet have additional users, please select the appropriate radio button and click the Next button.
Please indicate that you would like to set up additional users before clicking Next. If you have purchased additional seats, you will be prompted to perform the following actions:
- Add users: This is required to allow additional users to use your services.
- Set up Google Groups: Google Groups can be used as mailing lists, user forums, or for sharing and collaborating between your users.
- Create email aliases: This will allow you to set up alias email addresses for users who want to receive an email at more than one address.
- Announce your upcoming switch: This will help inform your users of the upcoming changes to your services.
Select the actions you would like to perform in addition to setting your users and click the Next button. You will be provided with step-by-step instructions for the most up-to-date process for each action. Once you have completed the desired steps and set up any users who will be using your services, please click Next again to set up your apps.
Set up your apps
This section will walk you through the setup of all the apps you intend to use.
- On the first page, please select the apps you would like to set up at this time.
- Click Next.
- Select Gmail at a minimum (recommended):
- Gmail
- Drive
- Calendar
- Sites
- The next page will display a list of features; click Next again to continue.
- Select the setup options you would like to use with your new Gmail account:
- Access Gmail in a web browser: Required. This is always an option.
- Use other mail clients (e.g., Outlook): Set up Gmail to work with your third-party email software.
- Restrict email delivery: This will allow users with qualifying accounts to restrict mail to an internal email.
- Set up Gmail: This is a required step.
- Migrate old mail: This step will let you migrate email from your old account at this time.
- Access contacts
- Help prevent spoofing: Perform easy steps to prevent spammers from forging your email address.
Most of the options above will include complete setup tutorials with the following exceptions:
Set up Gmail
To use Google servers to route your email, indicate during the setup process that you are already done with the required DNS changes for your domain.
If you made the change very recently, Google might not be able to identify the changes yet and will attempt to provide tutorials on how to make the change. Please disregard these and indicate that you wish to continue. If you have not made the change, you must follow the steps to update your DNS before your email may be completed.
Migrate old mail
In this phase, you will be provided with many options ranging from migrations for individual users to admin-managed migration. Please select the options that match how you wish to manage your migration.
Once you have selected your preferred migration method, you will receive either a tutorial on how your users will need to migrate their email or the migration tool. Make sure to use your old server name whenever you're asked for the mail server of your previous email host.
Help prevent spoofing
The required DNS changes for your domain outlined in Part 1 include an SPF record update. This update will need to be made at your DNS hosting provider. If you're using HostGator name servers, this will be done within your cPanel Zone Editor.
Mobile Management
You and your users will also want to access apps from your mobile device. Google Workspace works great in any mobile phone browser, where you can access your mail, contacts, and calendar as you do on a desktop. In some cases, you can keep using the phone's default apps to access these services.
From here, you can select how restrictively you wish to manage your user's access to your services via mobile. Once you have selected your level of management, this screen will only provide setup tutorials in the future.
Selecting the desired device type and clicking Next will provide instructions on setting up services on that device.
Extend and Customize
This section will walk you through a variety of customizable options. Select from among the following and click Next to be guided to the desired tutorials.
- Add Marketplace Apps: This will let you add even more apps from the Google Workspace Marketplace. You'll be able to choose from business apps for project management, finance, CRM, and more.
- Use the Chrome browser: This will help you set up and use the Chrome browser for a more unified experience.
- Create custom web addresses: Create custom URLs for your apps. The DNS changes made in Part 1 of this tutorial series will have already assisted with setting up many of these.
- Add domains: Add additional domains you own for hosting email on multiple domains.
- Tailor who uses which apps: Place restrictions on which types of users can access which apps.
Training and Support
Congratulations! If you've gone through the entire setup wizard, your Google Workspace is now fully set up. The Training and Support section provides resources for your deployment and getting support when you need help.
You can view these resources now or even return later for additional tutorials for the user-level experience, administrator resources, and additional support options.
Google Workspace MX Records
Here are the MX records you should use when setting up your Google Workspace.
For setting up Google Workspace with a domain registered with HostGator (internal domain):
The MX records are automatically configured during the purchase and setup processes.
For setting up Google Workspace with a domain NOT registered with HostGator (external domains):
If you signed up for Google Workspace ON or AFTER April 2023, here is the MX record you need:
| Name/Host/Alias | Priority | Value/Answer/Destination |
|---|---|---|
| Blank or @ | 1 | SMTP.GOOGLE.COM |
If you signed up for Google Workspace BEFORE April 2023, your MX records look like these:
| Name/Host/Alias | Priority | Value/Answer/Destination |
|---|---|---|
| Blank or @ | 1 | ASPMX.L.GOOGLE.COM |
| Blank or @ | 5 | ALT1.ASPMX.L.GOOGLE.COM |
| Blank or @ | 5 | ALT2.ASPMX.L.GOOGLE.COM |
| Blank or @ | 10 | ALT3.ASPMX.L.GOOGLE.COM |
| Blank or @ | 10 | ALT4.ASPMX.L.GOOGLE.COM |