YITH - Booking and Appointment (WooCommerce)
You can manage Bookings and Appointments for WooCommerce using YITH. This allows you to set up a variety of bookable products, such as accommodations and equipment, as well as services like salon visits, medical appointments, and personal or business consultations.
- How to Enable the Modules You Need ⤵
- How to Create a Bookable Product ⤵
- How to Add a Bookable Product to a Custom Page ⤵
- Plugin Options ⤵
Additionally, HostGator offers YITH WooCommerce products through the Marketplace in your Customer Portal. To learn how to add these products to your WordPress website, please visit the following article.
How to Enable the Modules You Need
Some features are disabled by default to have a better plugin performance. Within YITH's Booking and Appointment section, you can find the modules that you can enable for additional options.
- Adding “People Types” to Assign to a Bookable Product ⤵
- Adding "Resources" to Assign to a Bookable Product ⤵
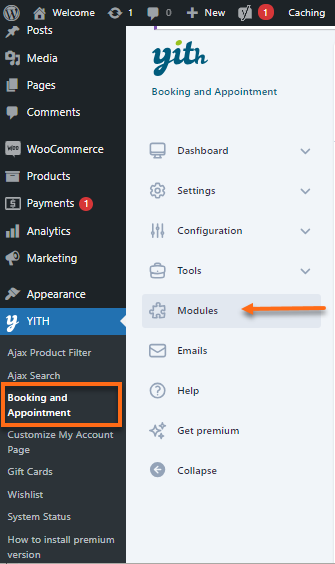
To access YITH Booking and Appointment's Modules:
- Log in to your WordPress Dashboard.
- Click YITH on the left-hand menu, then select Booking and Appointment.
- You will see the YITH Dashboard on the right-hand panel. Click Modules.
- Under Modules, you can enable the following features:
- People - Enable the People module to create unlimited “people types” and set specific prices or rules for them.
- Resources - Enable the Resources module to create unlimited “resources” associated with your bookable products (e.g., equipment, staff, technology, software, etc.).
- Google Calendar - Enable the Google Calendar module to synchronize your bookings with your Google Calendar.
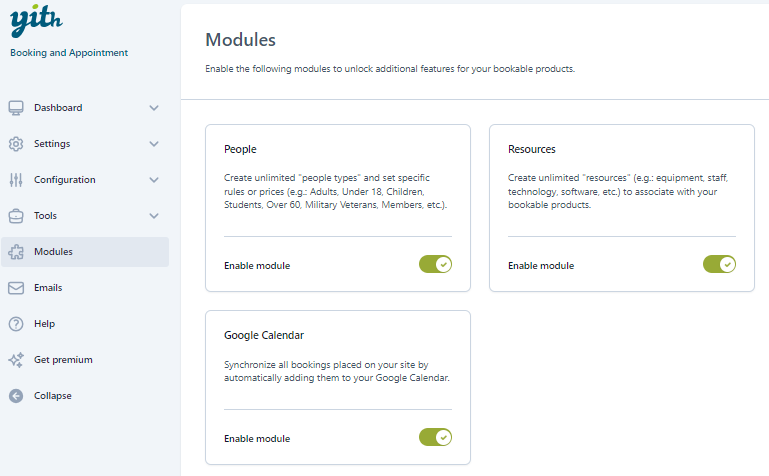
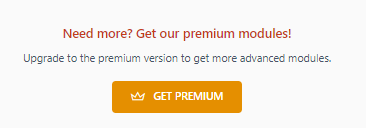
The premium version includes modules like discounts, services, extra costs, Google Maps, and others. Click the Get Premium button for more information about the available modules in the premium version.
Adding “People Types” to Assign to a Bookable Product
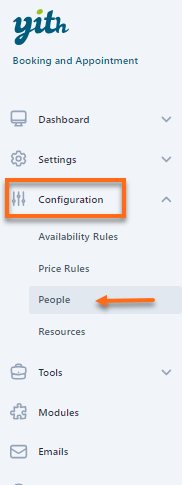
- Once the People module is Enabled, click the Configuration on the left-hand side, then select the People tab.
- You can create unlimited "people types" for each type. Enter the name and short description (optional) in this section.
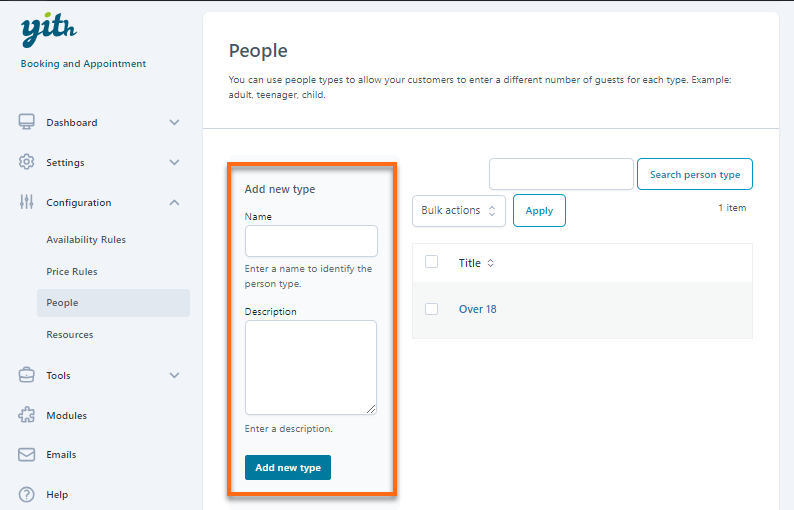
- Select the Add new type button to add the new "people type."
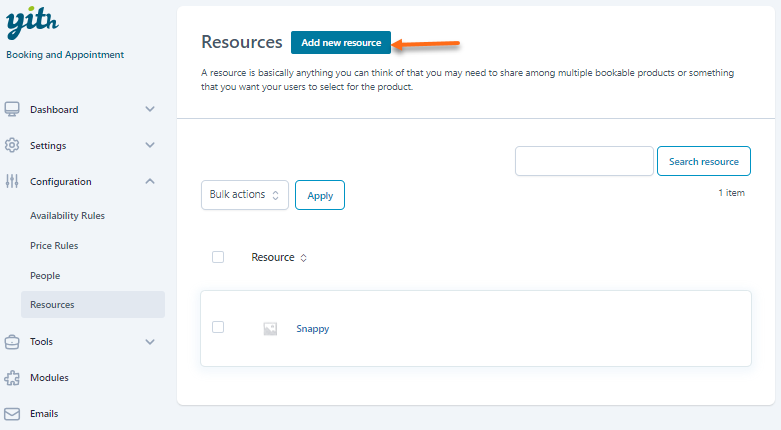
Adding "Resources" to Assign to a Bookable Product
After enabling the Resources module, you should also find Resources under the Configuration tab of the plugin.
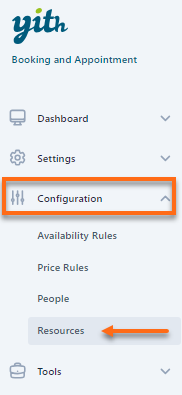
Under the Resources section, do the following:
- Select the Add new resource button to create unlimited resources.
- Under the New resource section, provide the following details:
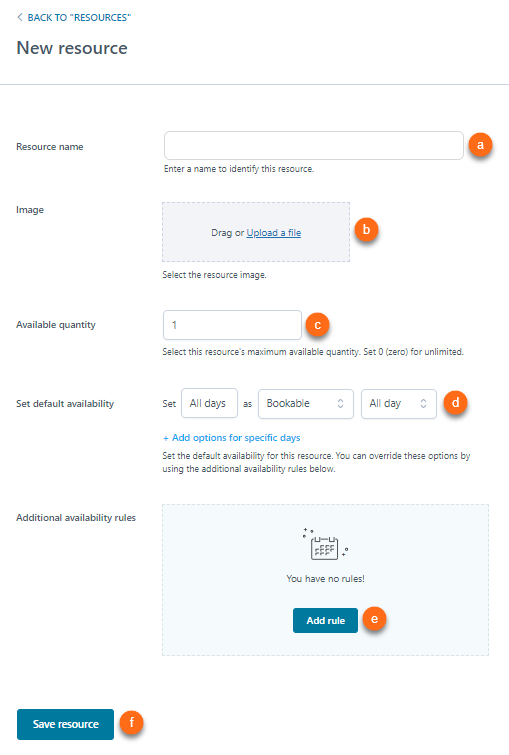
- Create a Resource name.
- Upload an Image (a photo or icon to identify the resource).
- Set the Available quantity.
- Set the Default availability.
- Set Additional availability rule.
- Click the Save resource button.
Example 1: You rent out equipment, and you only have three sets of ski equipment available. Also, for some reason, you want to set some limits for this resource: the ski equipment will be available only from 8 AM to 5 PM on Saturdays, and it will not be available on Sundays.
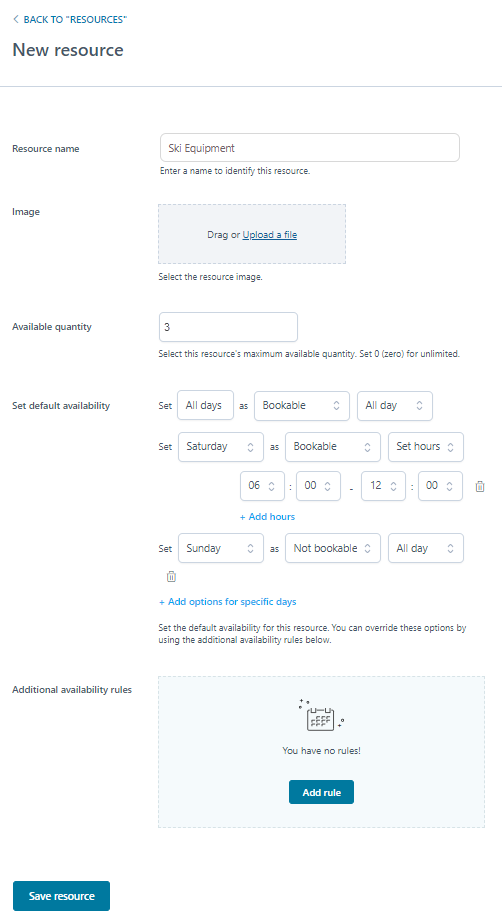
- Create the Equipment resource, and set the quantity to 3.
- Set the resource as Bookable, All days for All day.
- Click on + Add options for specific days.
- Set Saturdays as Bookable only from 8 AM to 5 PM.
- Click again on + Add options for specific days.
- Set Sundays as Not bookable for All day.
Example 2: You have a Pet Grooming service with five pet groomers employed. Your customers will have the option to choose the pet groomer when they book an appointment for their pets, and you need to manage the pet groomer’s availability in an advanced way.
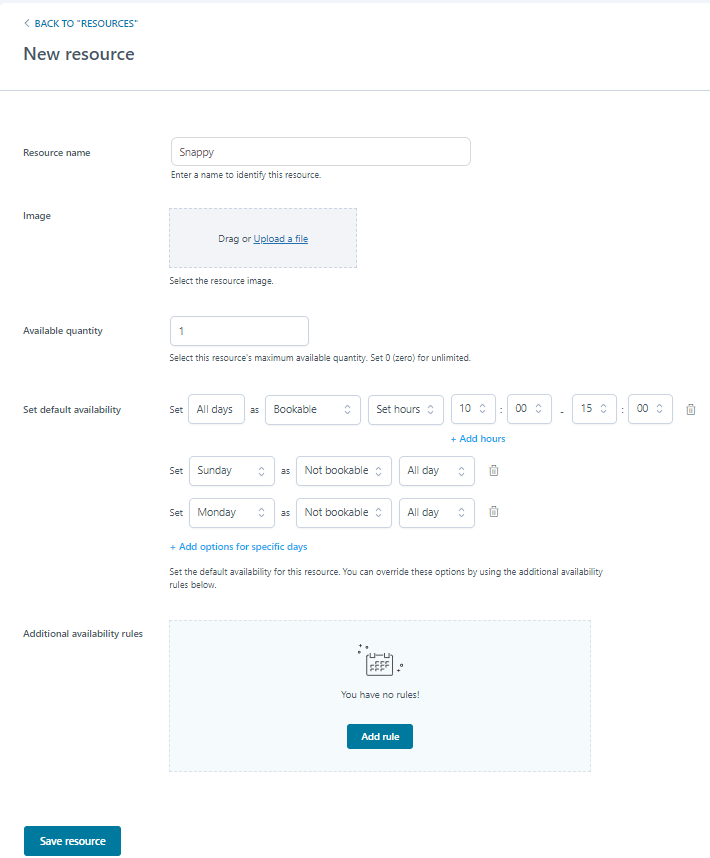
- Create a resource for each pet groomer. For example, let’s create the resource “Snappy”. Add a photo to identify him.
- Set 1 as the available quantity.
- Set Snappy's availability according to his work shifts. For example, you have set his availability to All days from 10 AM to 3 PM. He is not available on Sundays and Mondays, so you set those days as not bookable.
Now that you have set up the resources for every bookable product, proceed to the How to Create a Bookable Product section.
How to Create a Bookable Product
All products and services you offer are managed on WooCommerce as a “bookable product.” To receive bookings on the services you offer, the first thing to do is to add a bookable product in WooCommerce.
Adding a new bookable product
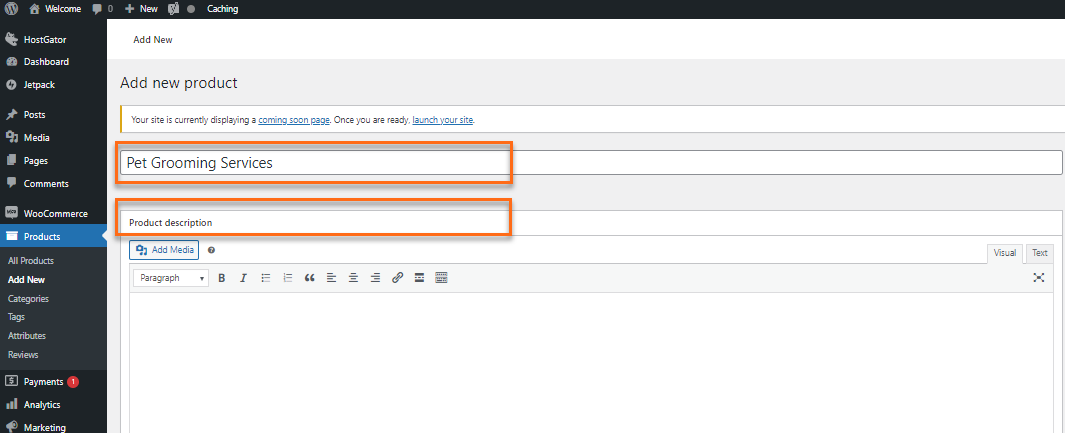
- Click Add New Product in WooCommerce.

- Setup the Product Name and Description.
- In the Product Data section, set the product as Bookable Product and set the product to Virtual.

- Publish the product.
Step 1: Setting up Booking settings
You can begin setting up the bookable product In the Booking Settings panel. Here’s how:
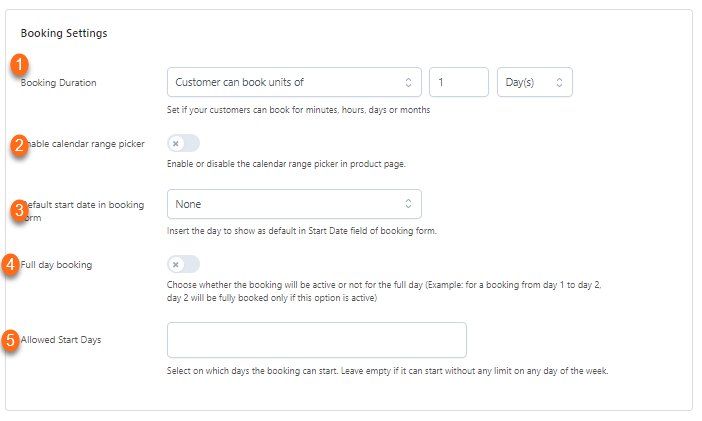
- Booking Duration - Customers have the option to book for days, months, minutes or hours for your products and services.
- Enable Calendar Range Picker - This feature should be enabled for the calendar to show in your product’s booking form.
- Default Start Date in Booking Form – This inserts the day to show as the default in the Start Date field in the booking form.
- Full Day Booking - Choose whether the booking will be active or not for the full day. (Example: for a booking from day 1 to day 2, day 2 will be fully booked only if this option is active.)
- Allowed Start Days - Select on which days the booking can start. Leave empty if it can start without any limit on any day of the week.
Once the Booking Settings is set up, the next step is to configure the Booking Terms. Here are the steps:
- Max bookings per unit - Select the maximum number of bookings allowed for each unit. Set 0 (zero) for unlimited.
- Min/Max booking duration- Set the minimum and the maximum booking duration that customers can select.
- Min/Max advance reservation- Insert the minimum and maximum advance reservation for the booking.
- Check-in/Check-out time- Insert check-in and check-out time for your customers.
- Buffer time- Time for preparation or cleanup between two bookings.
- Require confirmation- Enable if the admin has to confirm a booking before accepting it.
- Allow cancellation- Enable if the customer can cancel the booking.

Step 2 – Setting up People settings
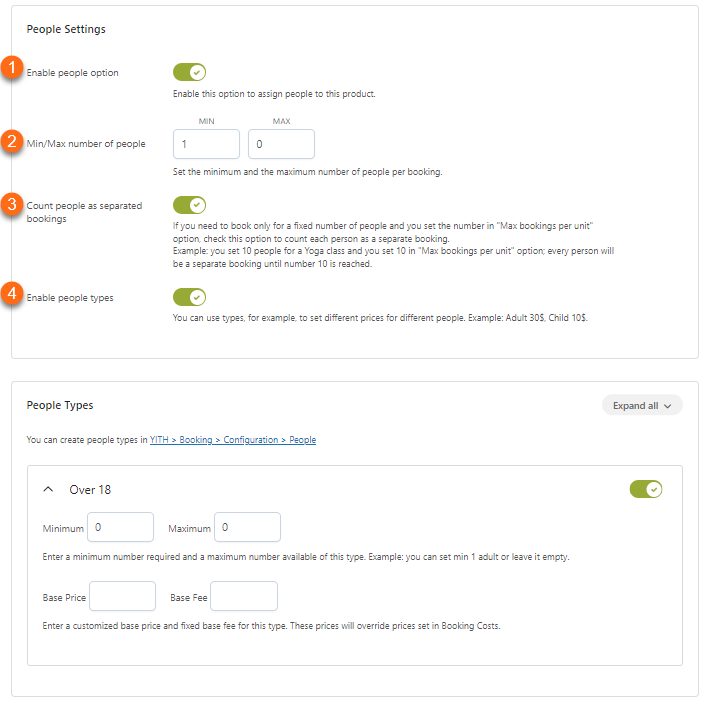
You can set all the options to the people types in this section. Please note that this section will only be available if the People module is enabled.
- Enable people option - Enable this option to assign people to this product.
- Min/Max number of people - Set the minimum and the maximum number of people per booking.
- Count people as separate bookings - If you need to book only for a fixed number of people and you set the number in the "Max bookings per unit" option, check this option to count each person as a separate booking.
Example: you set 10 people for a Yoga class, and you set 10 in "Max bookings per unit" option; every person will be a separate booking until number 10 is reached. - Enable people types- You can use types, for example, to set different prices for different people. Example: Adult 30$, Child 10$.
Step 3 – Costs
All the options related to the bookable product’s costs are found in the Costs section.
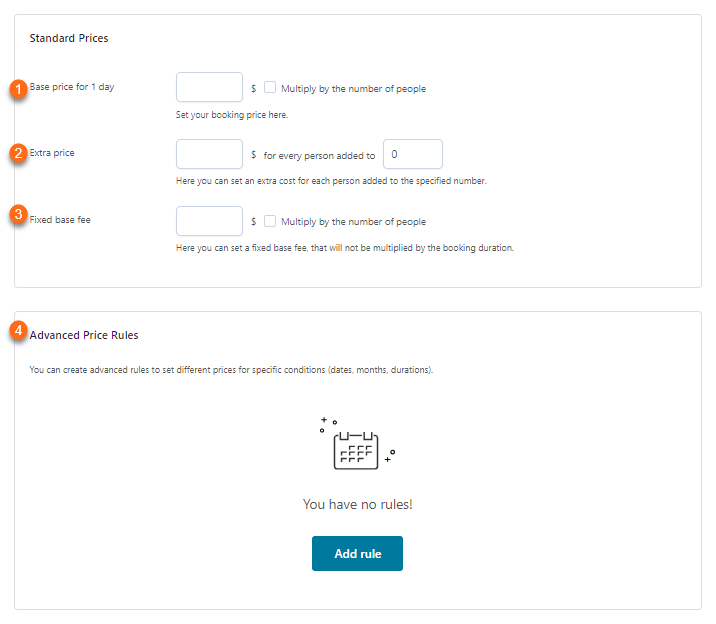
- Base price for 1 day - Set your booking price here.
- Extra price- Here, you can set an extra cost for each person added to the specified number.
- Fixed base fee- Here, you can set a fixed base fee that will not be multiplied by the booking duration.
- Advanced Price Rules- You can create advanced rules to set different prices for specific conditions (dates, months, durations).
Step 4 – Availability
You can set all the options related to a bookable product’s availability in this section.
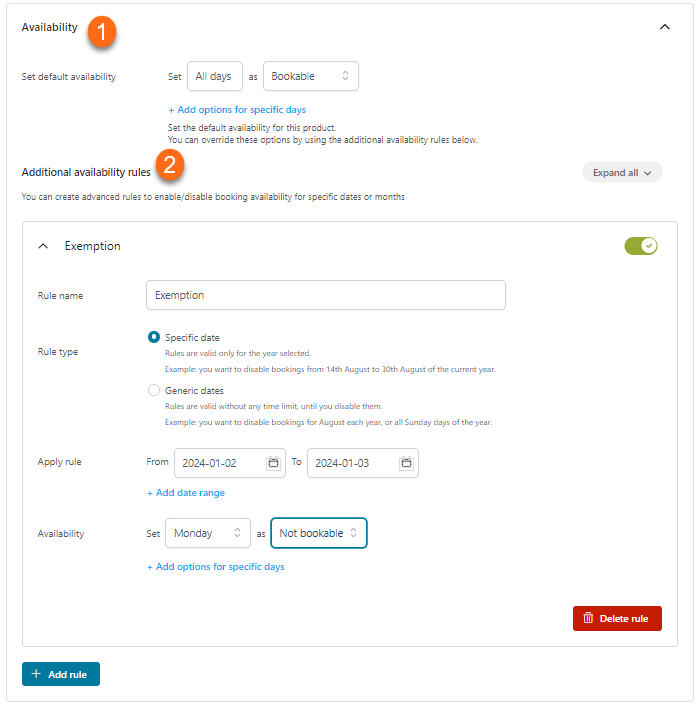
- Set default availability – the products can be set to be available for the entire day and on all days. Or you can be specific when and what time of day the product is available.
- Additional availability rules - You can create this rule if the rule only applies to a specific time and dates.
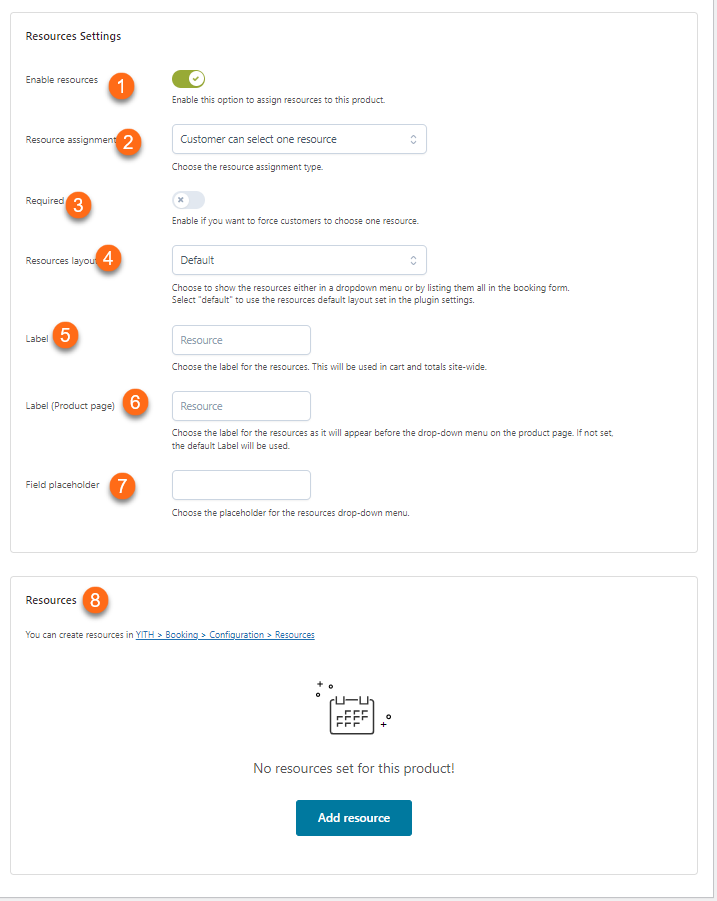
Step 5 – Resources
You can set all the options related to resources in this section. Please note that this is only available if the "Resources" module is enabled.
- Enable resources - Enable this option to assign resources to a product.
- Resource assignment - Enables customers to select one or more resources.
- Required- this forces the customers to choose one resource
- Resources layout - Choose to show the resources either in a dropdown menu or by listing them all in the booking form. Select "default" to use the resources' default layout set in the plugin settings.
- Label - Choose the label for the resources. This will be used in carts and totals site-wide.
- Label (Product page) - Choose the label for the resources, which will appear before the dropdown menu on the product page. If not set, the default Label will be used.
- Field placeholder - Choose the placeholder for the resources dropdown menu.
- Resources - You can add an existing resource to the product.
Final step
To complete the product setup, add a brief description and a high-quality image for identification, then publish on WooCommerce. Ensure accuracy and comprehensiveness for the best customer experience.
How to Add a Bookable Product to a Custom Page
You can use the Booking Form block to create a landing page and booking form from your homepage.
- On your new or existing page, click on the + symbol.
- Search for the Booking form.
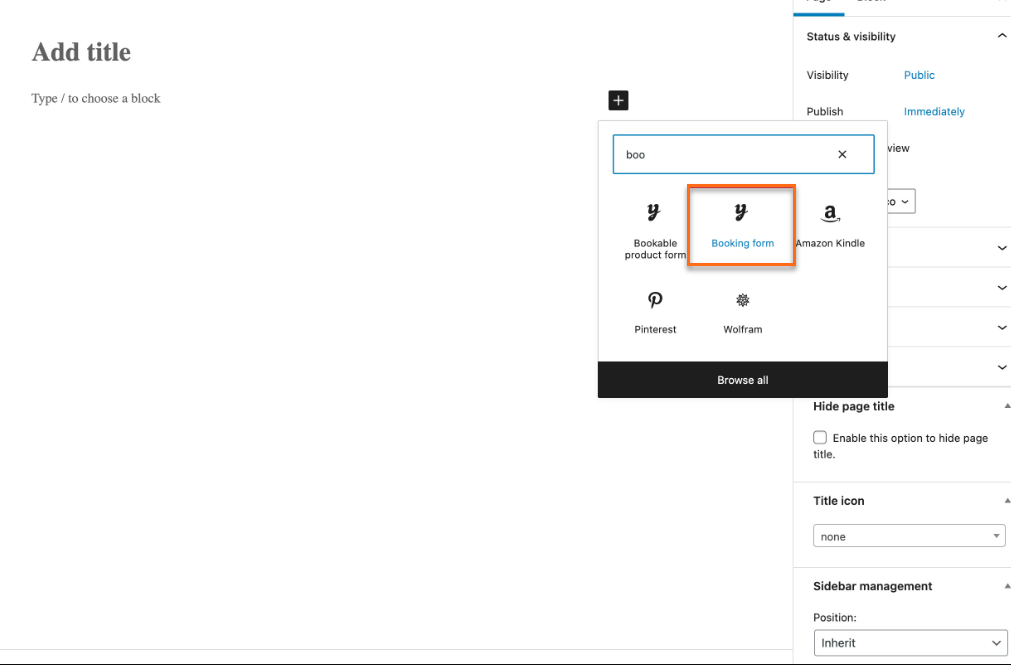
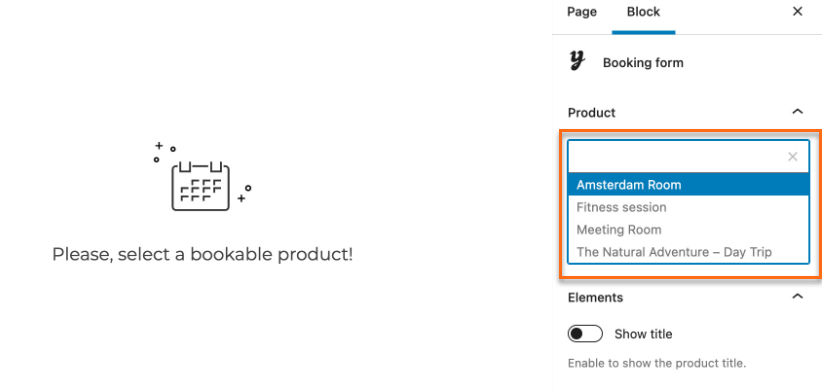
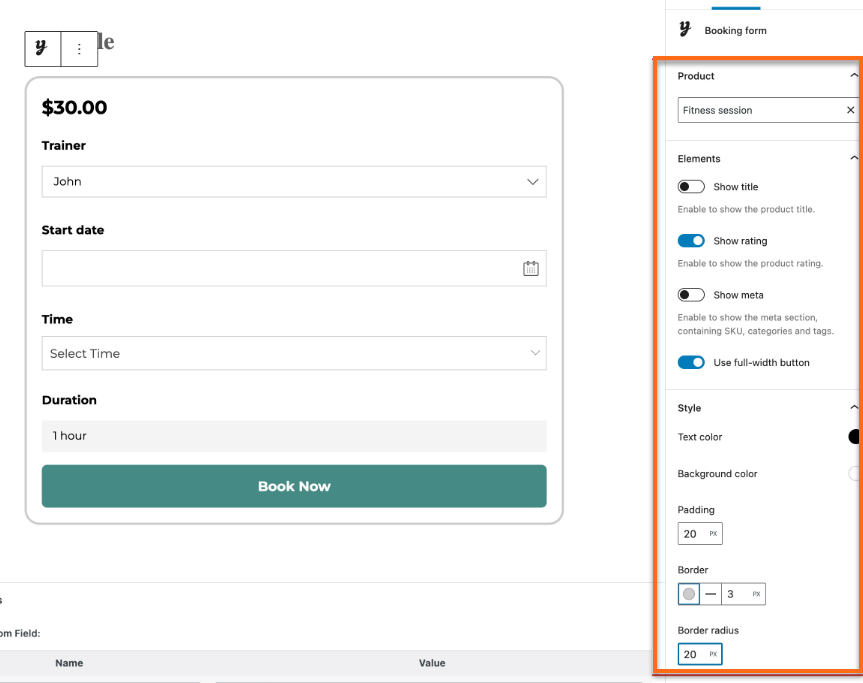
- Insert the block and select a specific bookable product.
- On the right side, you can also find some options to customize the form. You can choose which elements to show or hide (product title, rating, meta, etc.), customize the style (border-radius, padding, colors, etc.), and customize the Book button.
Plugin options
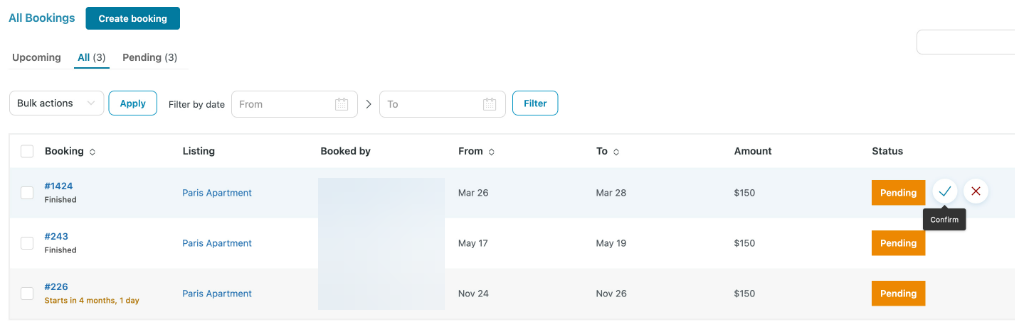
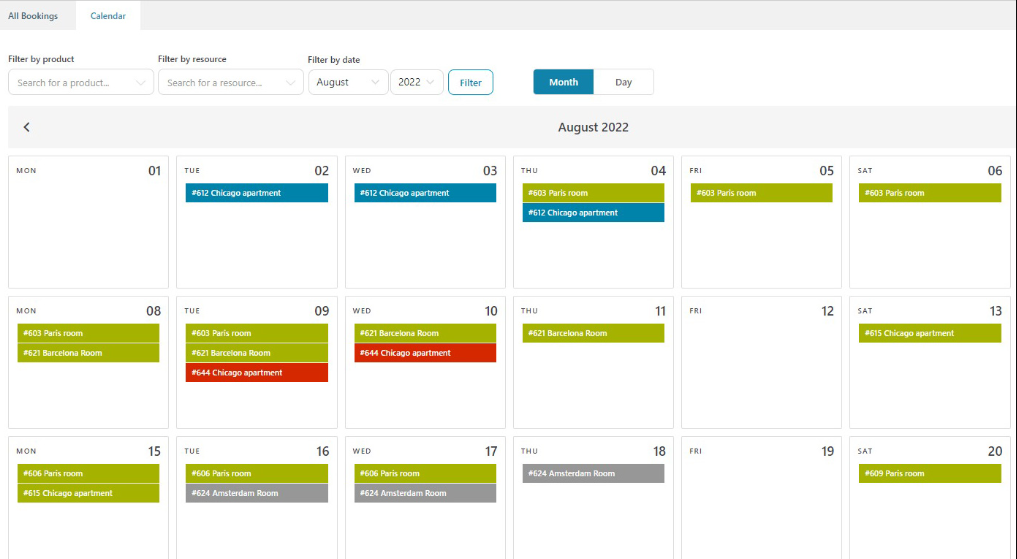
Dashboard and Calendar
- You can find all bookings on the Dashboard. All bookings can be manually edited, filtered by dates, exported into a .CSV or .ICS files.
- You can go to the Calendar for a different view of all bookings. It is a must to check the Resources calendar to check for availability.
Booking form options
- For the booking form, choose either the block feature or a fixed position on the product page (before/after the description or after the summary). The choice depends on preference and page layout.

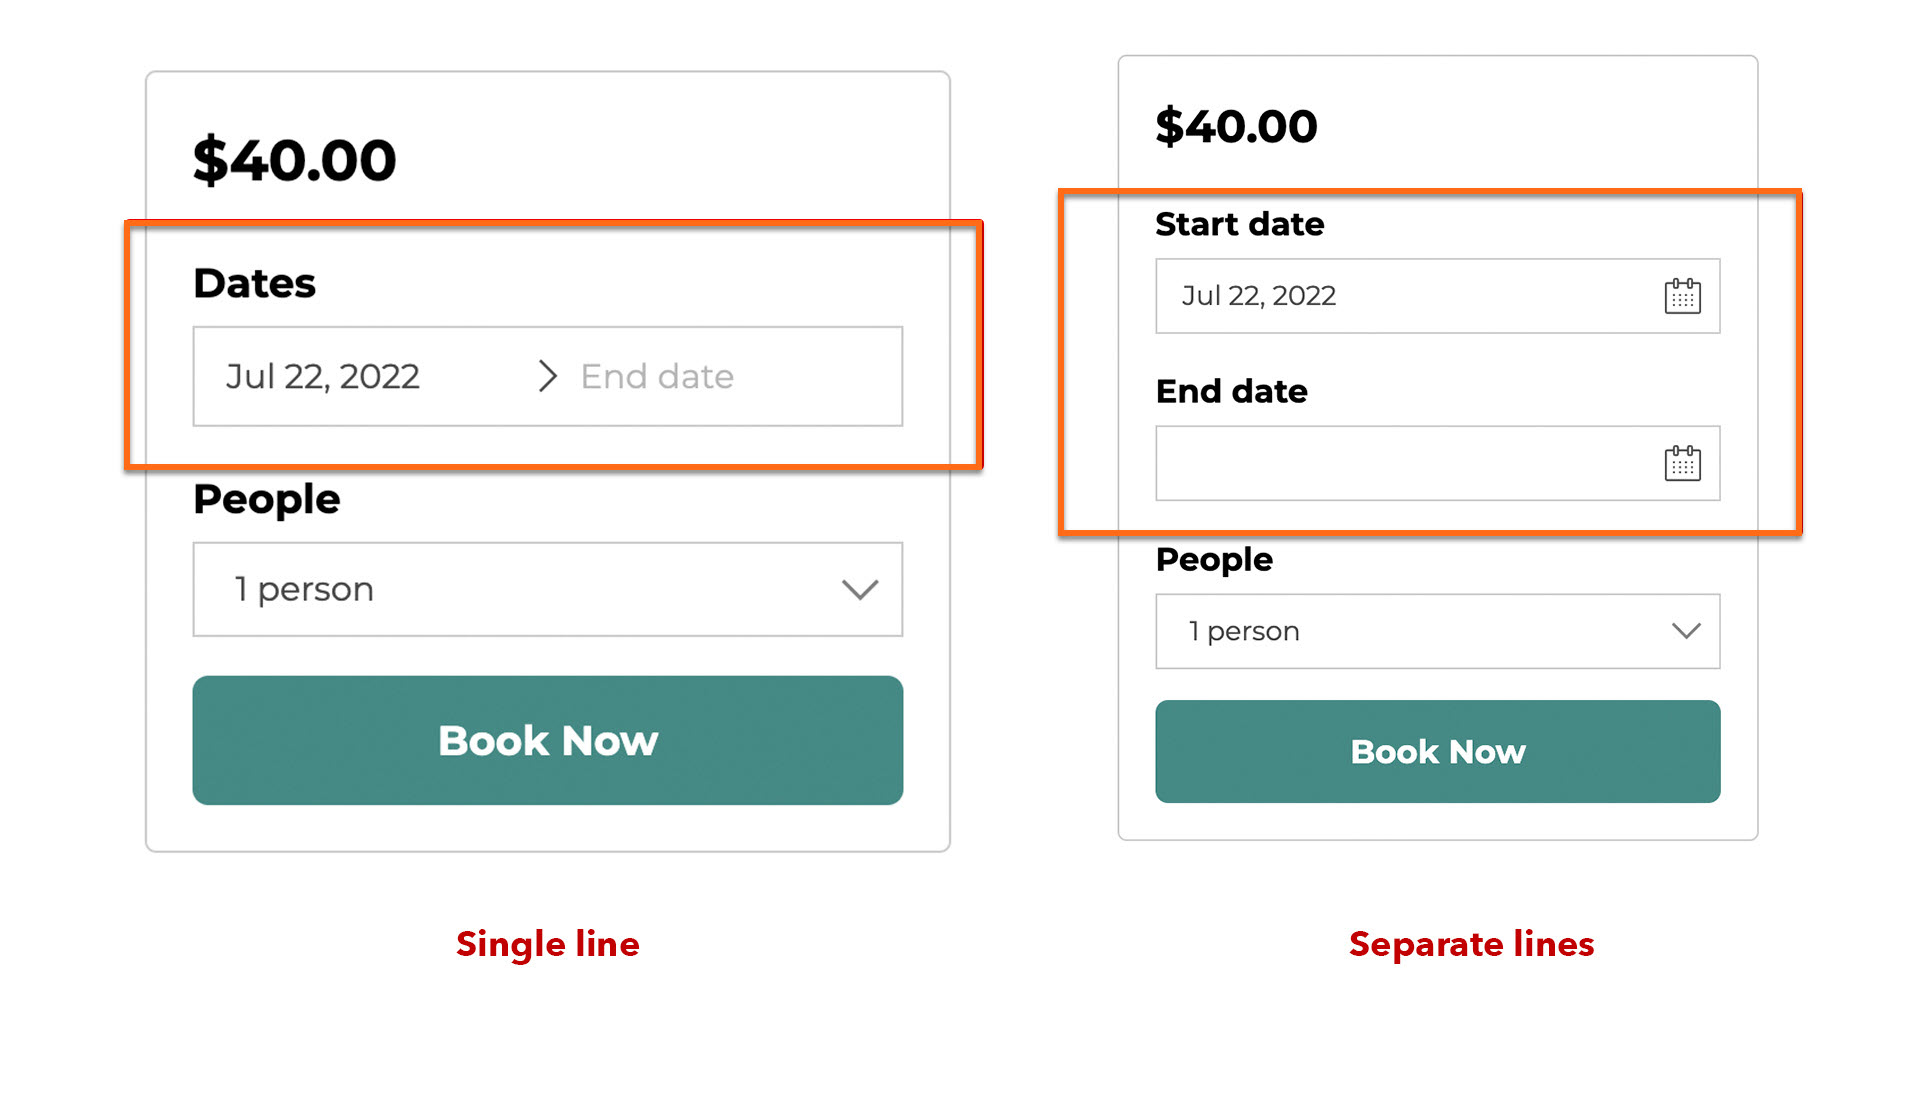
- For the date range layout, choose either a single or two separate fields. The choice depends on preference and the design of the booking form.

- Choose the calendar layout: you can choose to show the calendar in a dropdown or embed it directly into the page.
- For the booking form calendar, pick how many months to load. We suggest showing a maximum of three months to improve performance, with the remaining months loaded via AJAX.

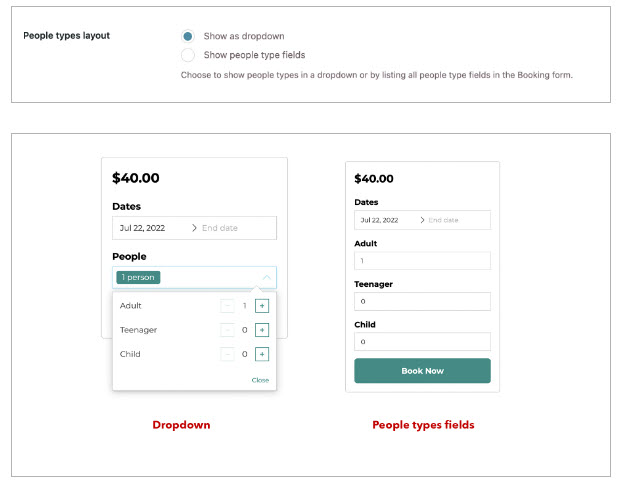
- For the people selector, choose between a dropdown or listing them directly on the page. The choice depends on preference and booking form design.
- Enable min/max duration control in the calendar to restrict date selection to meet the minimum and maximum duration requirements set in the bookable product.

- Choose whether to disable dates without available time slots in the booking form.

Calendar options
-
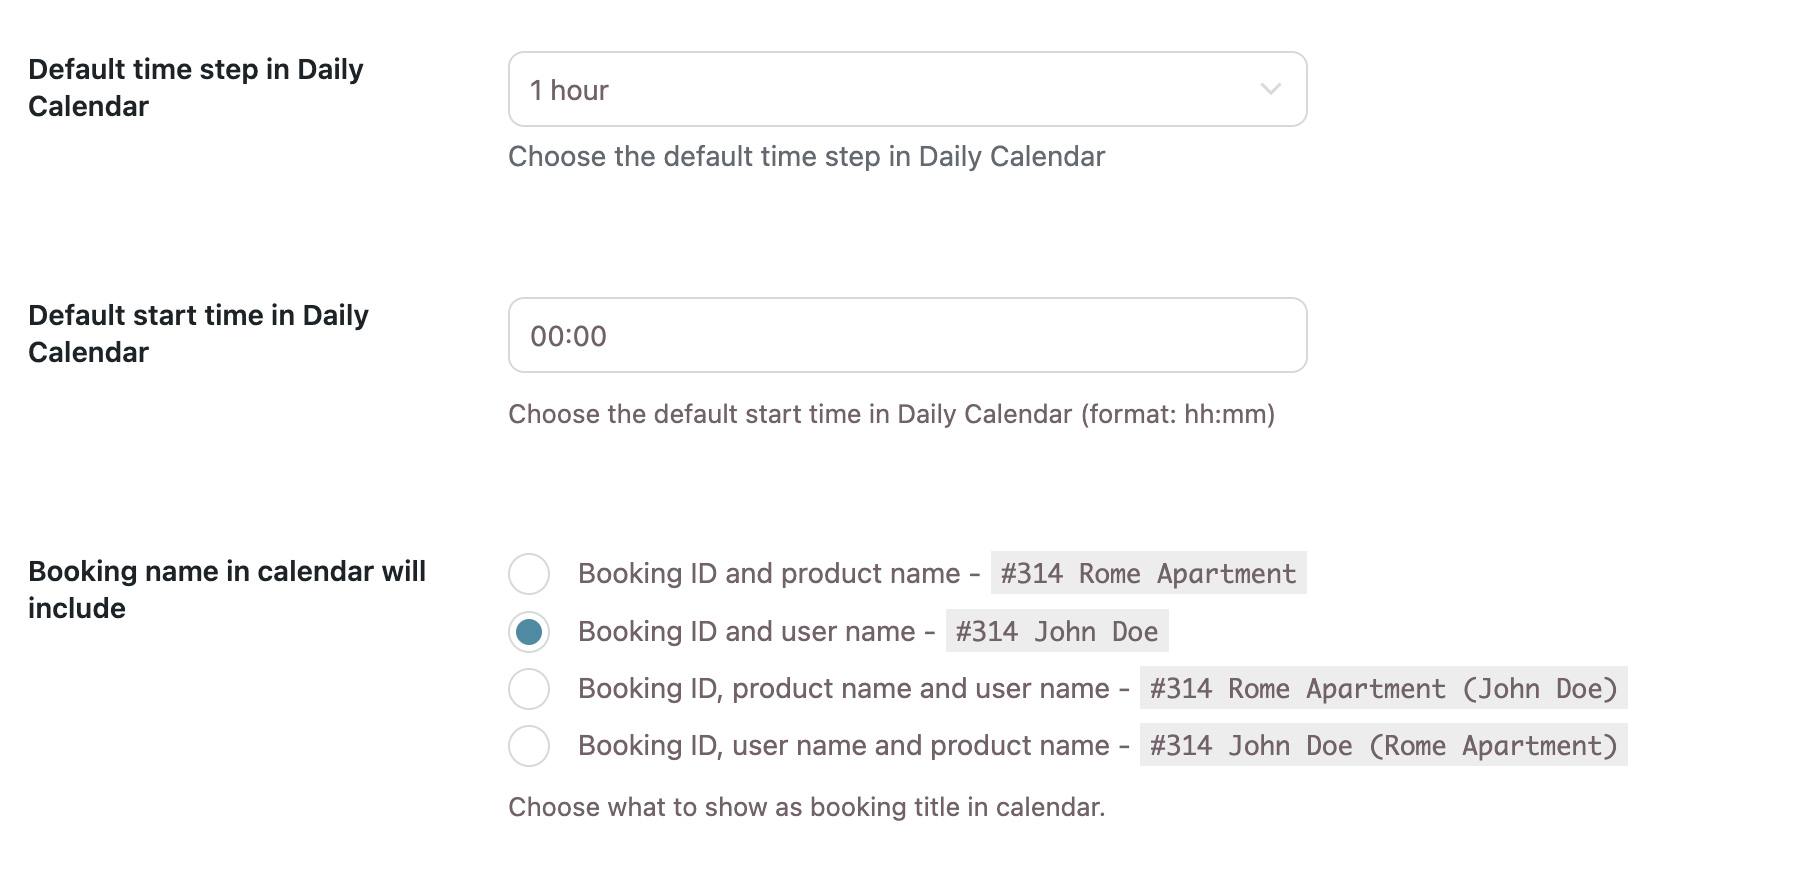
To customize the view of the calendar available in Dashboard > Calendar, go to the settings and choose the default start time and time step. Additionally, you can select which details to show to identify bookings in the calendar, such as the Booking ID, customer name, and bookable product name. This customization can help provide a clearer overview of your bookings and make it easier to manage your schedule.
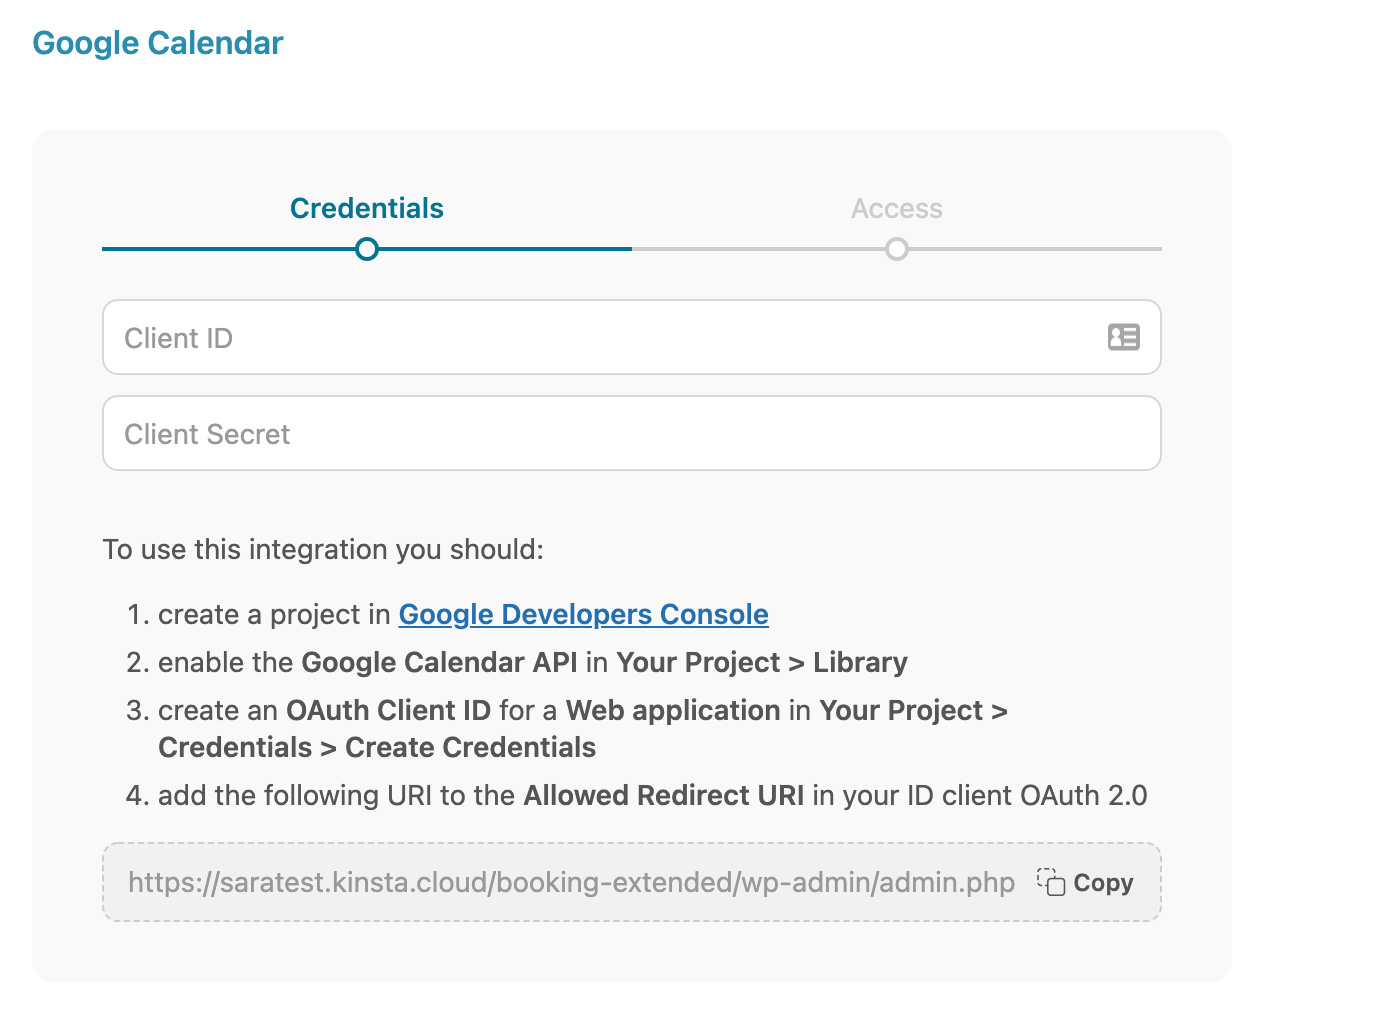
- If you have enabled the Google Calendar module, you can easily connect and synchronize your account by entering your Client ID and Client Secret. To find this information, follow the instructions available on the page. This integration can help streamline your calendar management and keep all of your bookings in one place.
Customization options
In this section, you can find additional options to customize the plugin according to your needs and the style of your shop.
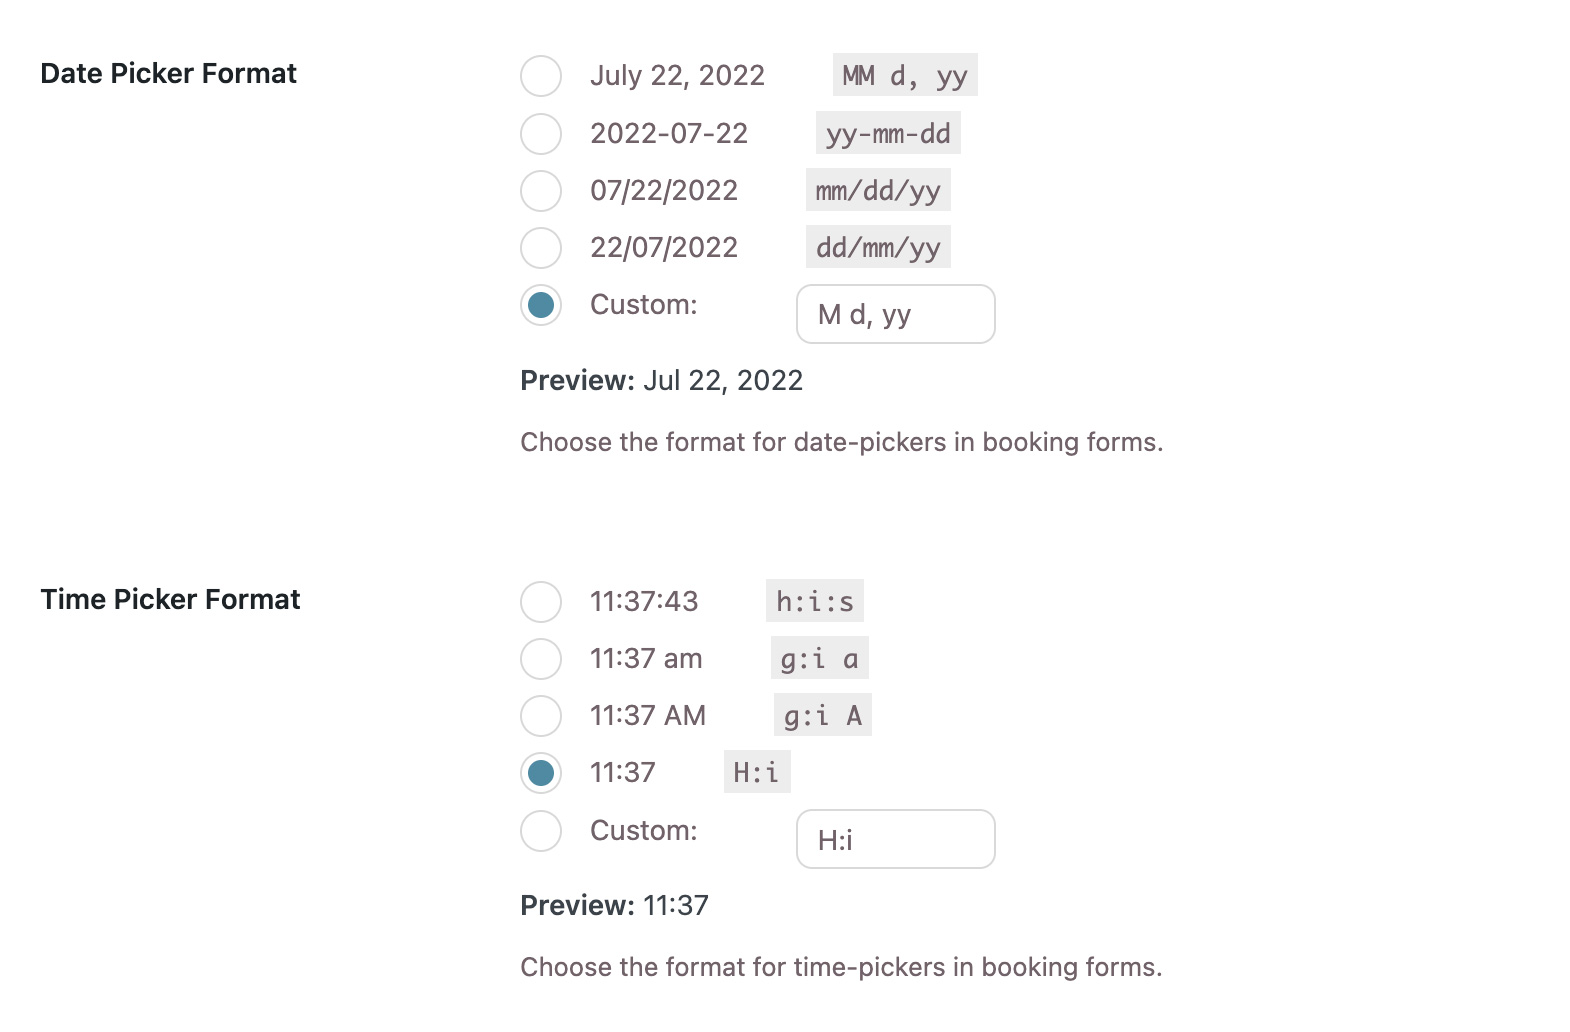
- Customize the date and time picker format of the booking forms
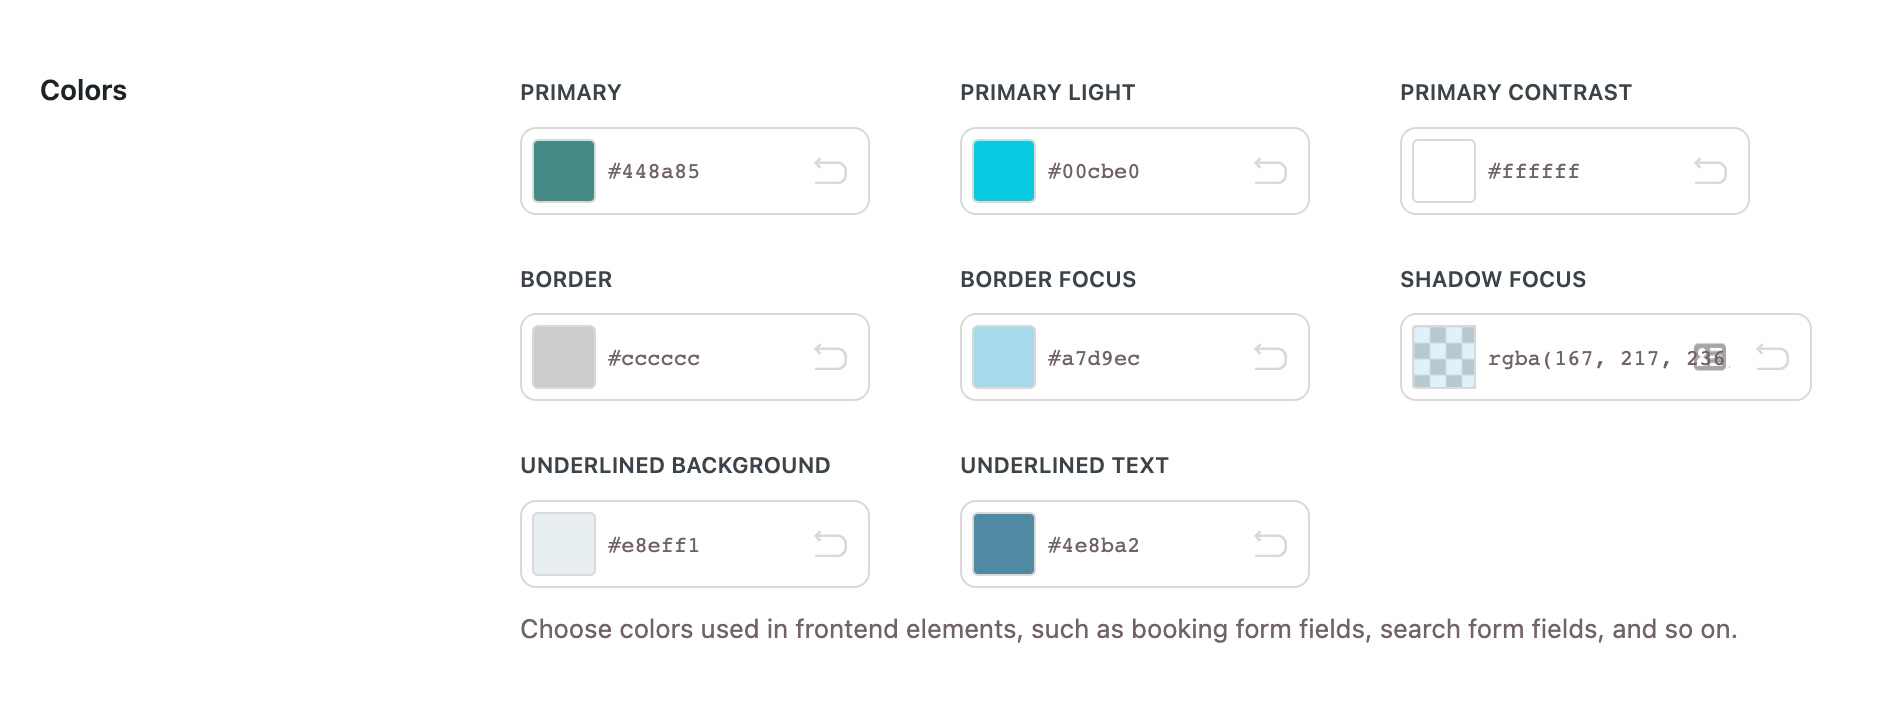
- Customize the colors of frontend elements
- Set the fields’ font size

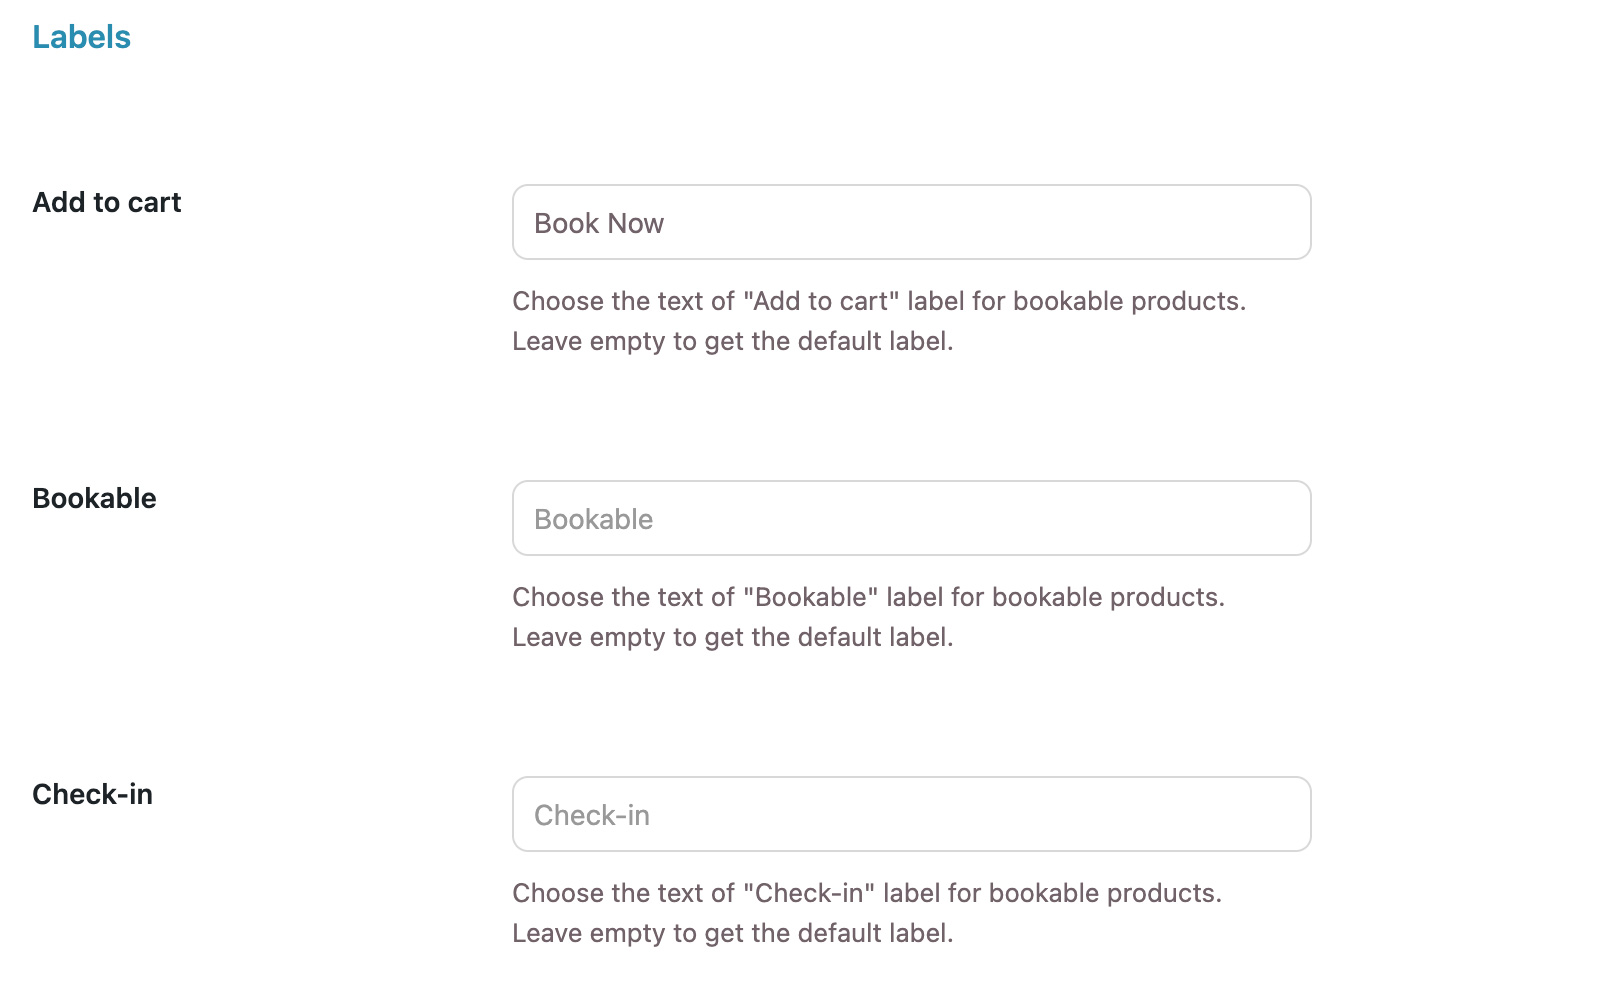
- Customize all plugin labels, including "Book Now," "Check-in," "Check-out," to create a personalized experience for customers. Go to the settings and select the labels you wish to change.
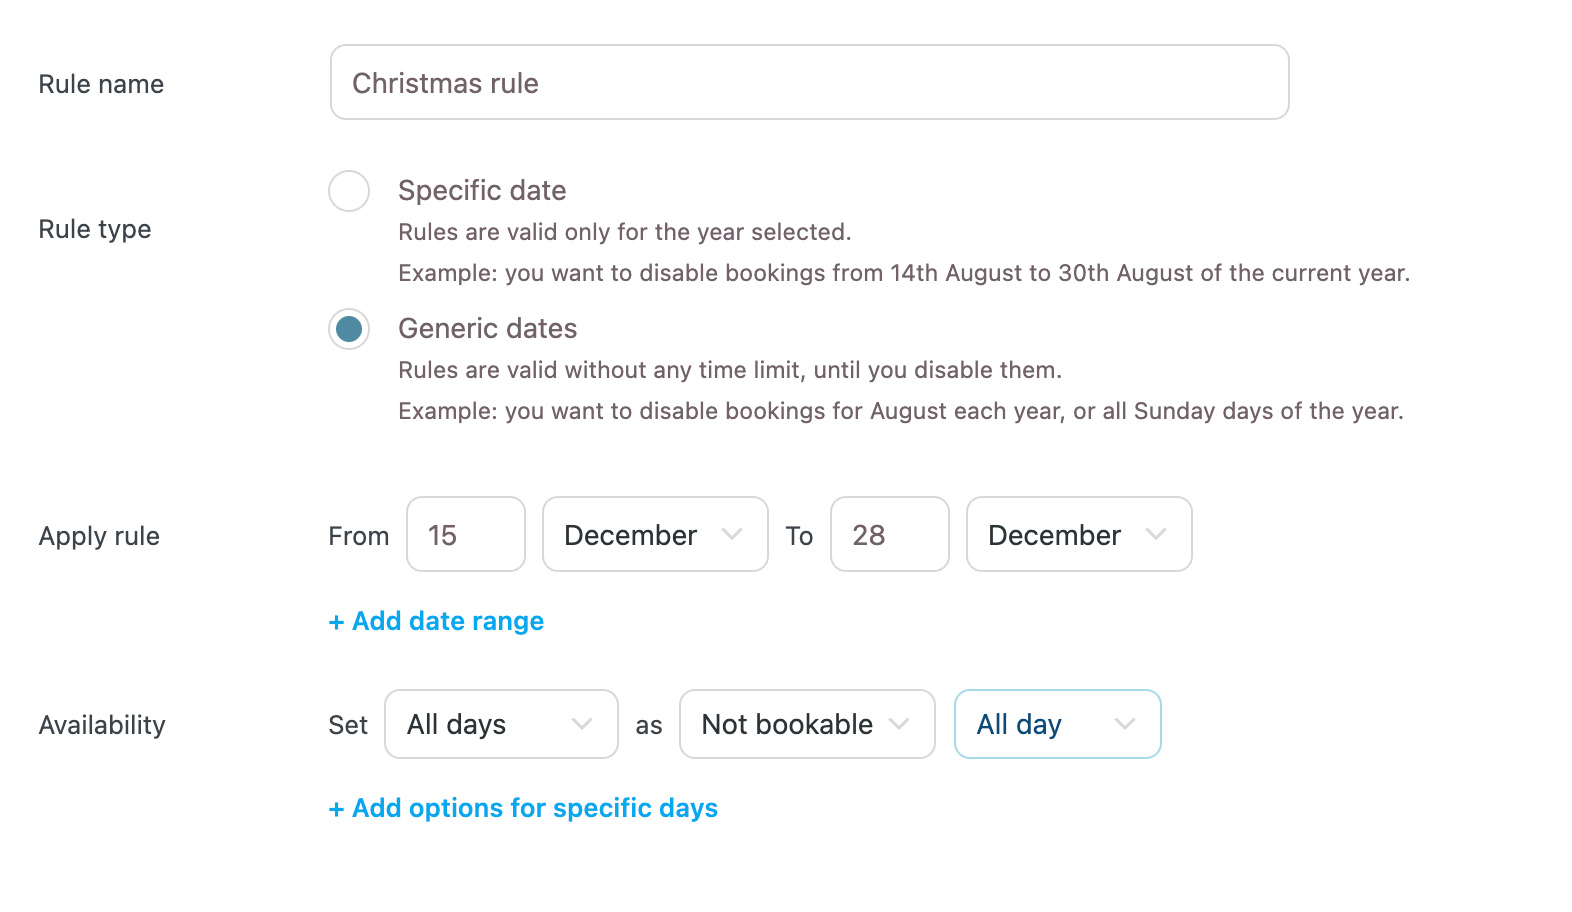
Availability rules
In the Configuration > Availability rules section, you can create global rules that will be applied by default to all of your bookable products. This includes setting products as non-bookable on specific days, such as Sundays, during the Christmas holidays, or during the summer. By implementing these global rules, you can save time and ensure that all of your bookable products follow the same availability rules.
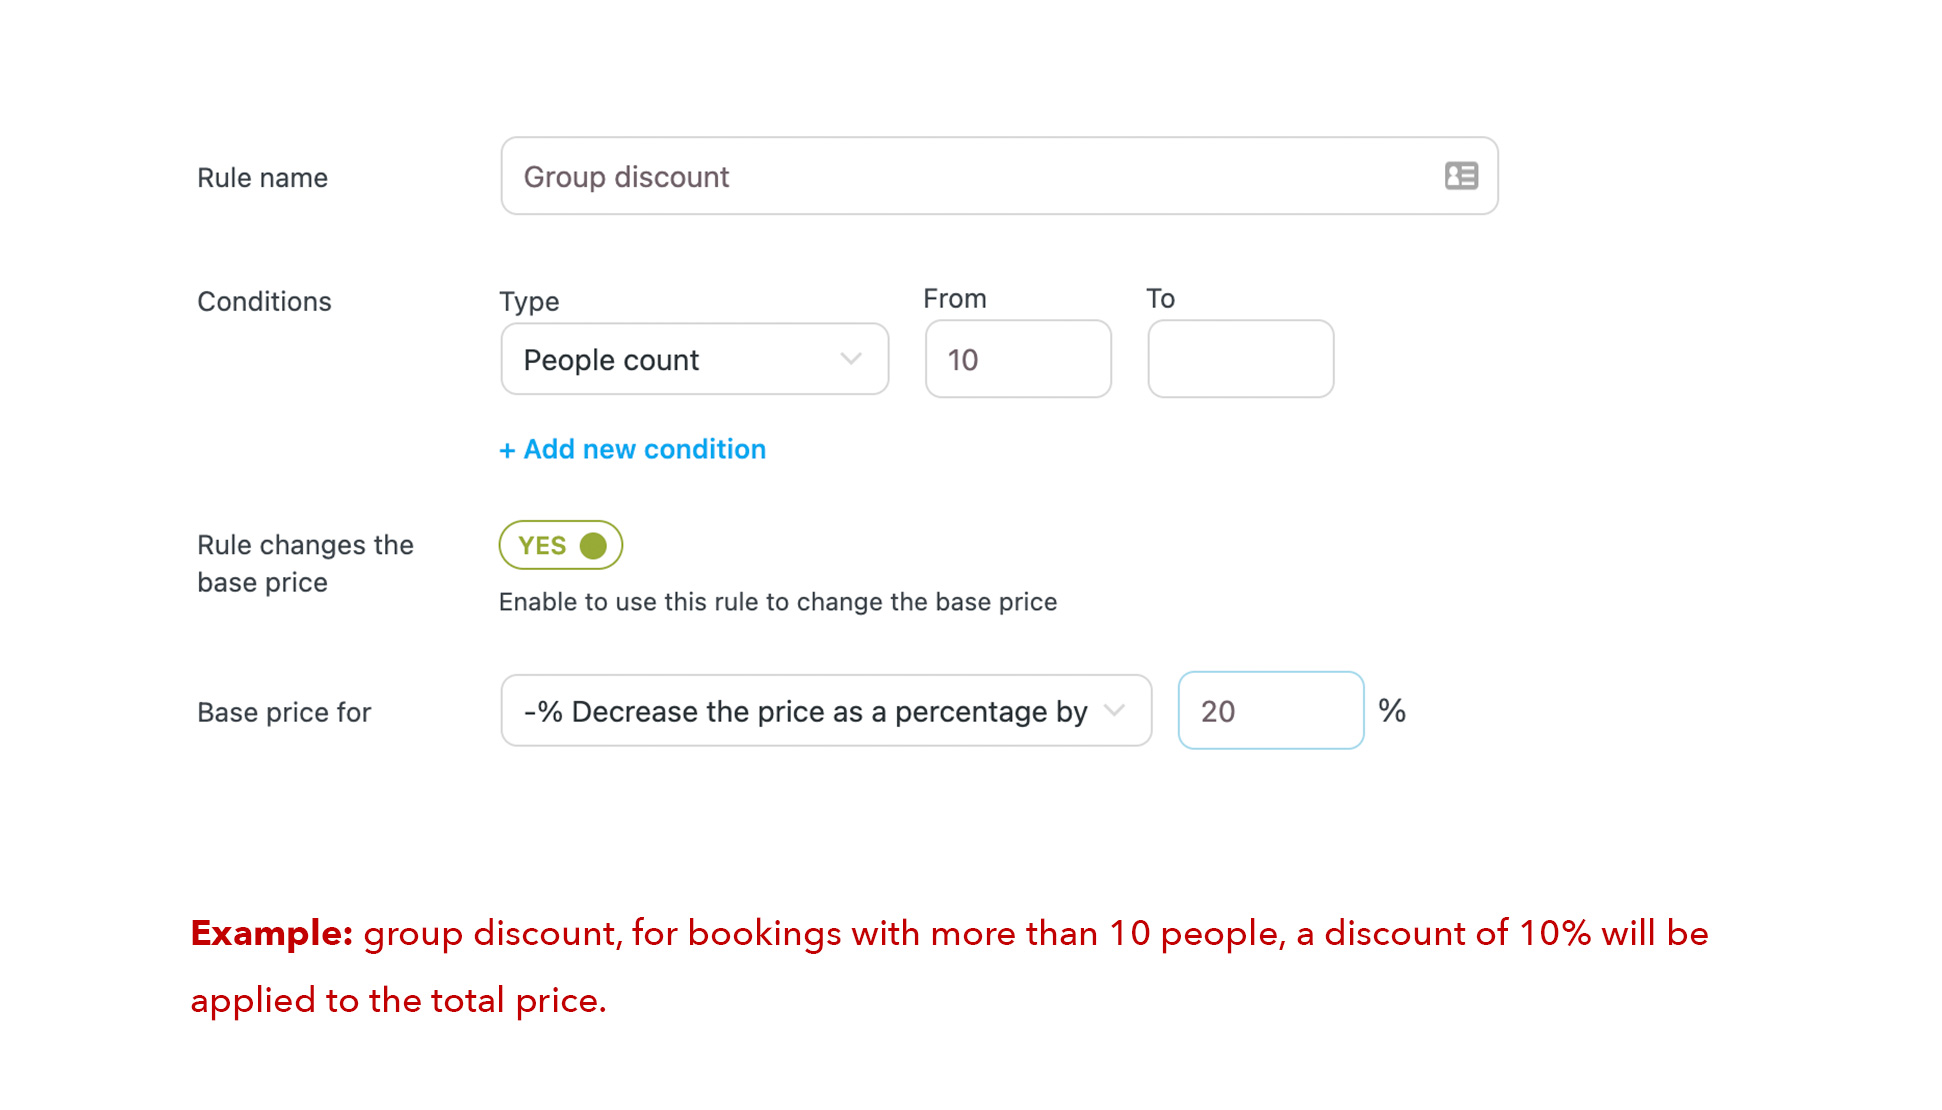
Price rules
In the Configuration » Price rules section, you can create global rules that will be applied by default to all of your bookable products. This includes setting rules for increasing or decreasing the prices of all products based on specific conditions, such as dates, months, booking duration, number of people, and more. By applying these global price rules, you can save time and ensure consistency across all of your bookable products.