Migrating WordPress Blog from One Host to Another Host
Before we proceed, it is important to note that website migration and domain transfer are two different processes. This article focuses on migrating your WordPress website from another hosting company to HostGator, which means you want HostGator to host your website. However, if you also want to move your domain name over to HostGator, which means you would like us to be your domain's registrar, we can help! You can visit our front-of-site, https://www.hostgator.com/domain-transfer so that we can begin the process. Think how awesome it would be to manage your domain and website in just one place!
Here are support articles to shed some light on the difference between these two processes.
I Want HostGator to Migrate My Site for Me
HostGator offers professional site migration services, which you can request from within your Customer Portal.
For instructions on how to request site migration from your Customer Portal, please visit the following article.
I Want to Migrate the Website Myself (Manual Migration)
On the other hand, if you are comfortable navigating your File Manager, database, and FTP and would like to migrate your website to your new host, please proceed with the manual migration process below, which comprises several steps.
- Step 1: Backup Your WordPress Database Using phpMyAdmin ⤵
- Step 2: Download and Upload All WordPress Files Using FTP ⤵
- Step 3: Create a New WordPress Database and Database User ⤵
- Step 4: Edit the wp-config.php File ⤵
- Step 5: Importing WordPress to the New Database ⤵
Step 1: Backup Your WordPress Database Using phpMyAdmin
Before migrating your WordPress blog, you must create a database backup using phpMyAdmin.
To create a database backup via phpMyAdmin:
- Log in to your host's phpMyAdmin.
- Select your WordPress blog's database name.
- Click Export in the top navigation menu.
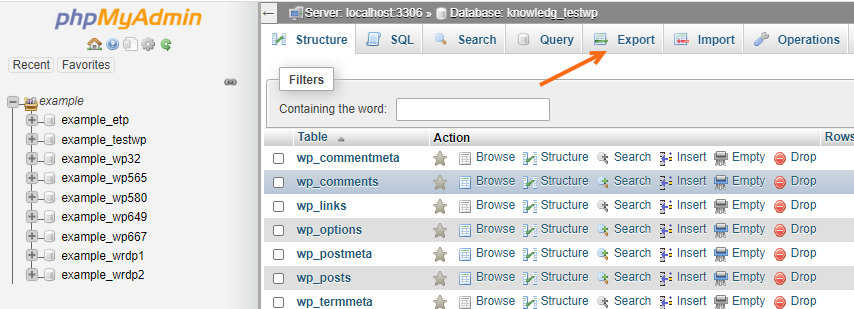
- Select the Quick option listed under the Export Method section.

- Keep the format section as SQL.
- Click Go.
- The database will start downloading. Once done, you will find a .sql file on our computer.
You have now successfully downloaded a backup of your database!
Step 2: Download and Upload All WordPress Files Using FTP
You must download ALL your files from your old host and upload them to your new host. This includes files from your themes folder and plugins folder. Make sure you also download any folders that were referenced outside of your blog's folder. For example, if you use a separate folder called 'images,' located outside the blog's folder, the images must be copied and uploaded to the new hosting location; otherwise, the site will contain many broken links to images within the blog post.
FileZilla is the recommended FTP client. By default, FileZilla does not display the .htaccess file for security reasons. To ensure your .htaccess file is included in the download, click Filezilla's Server tab and select Force to show hidden files.
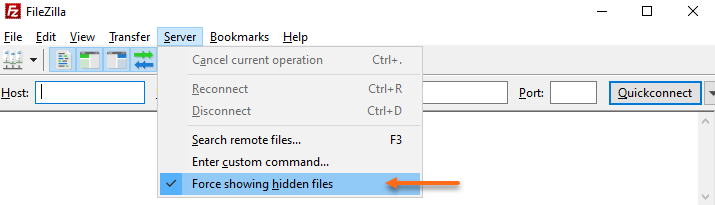
If you neglect to upload your .htaccess file, your permalinks will not work.
Please check out these FTP support articles for more information on using FileZilla, especially when uploading (or moving) your files to your HostGator hosting server.
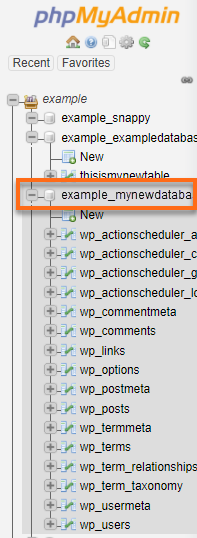
Step 3: Create a New WordPress Database and Database User
Once your WordPress core files are uploaded to your HostGator's server, you must upload the database (.sql) file you downloaded from your old host in Step 1 to your HostGator database. To do this, you must create a new database and database user within phpMyAdmin and assign privileges to your new database user.
Please visit the following articles for complete instructions on creating a new database and user within your destination control panel.
Once you create your new database name and user, grant All Privileges to your new user. For more details, please visit the following support article.
Okay! Now, you are ready to configure your wp-config.php file.
Step 4: Edit the wp-config.php File
After creating a new database, you must edit the wp-config.php file, which is the WordPress configuration file. This specific configuration file reads directly from your database.
To update the WordPress configuration file:
- From your control panel, click the File Manager icon.

- Navigate to your WordPress domain's document root.
- Locate the file named wp-config.php.
- Right-click to edit the file and locate the following lines to update them with the correct information.
/** The name of the database for WordPress */ define('DB_NAME', 'yourdatabasename'); /** MySQL database username */ define('DB_USER', 'yourdatabaseusername'); /** MySQL database password */ define('DB_PASSWORD', '**yourdatabasepassword**'); /** MySQL hostname */ define('DB_HOST', 'localhost');- If you did not edit the file on the server via the File Manager with your new database settings, upload it to the root of your blog folder.
- Ensure that the information you input here matches the database name, user, and password you created in Step 3.
The configuration file is now set up with the new database but contains no database tables. To correct this, you must import the information into the database described in Step 5 below.
Step 5: Importing WordPress to the New Database
You can use either phpMyAdmin or BigDump to import your database. BigDump is preferred with an extensive database (10MB or more). There is a step-by-step guide on how to use BigDump on its website.
To import your WordPress database via phpMyAdmin, here's a quick overview.
- Inside the phpMyAdmin, select the new database name from the left-hand menu.
- Click the Import tab in the top menu.
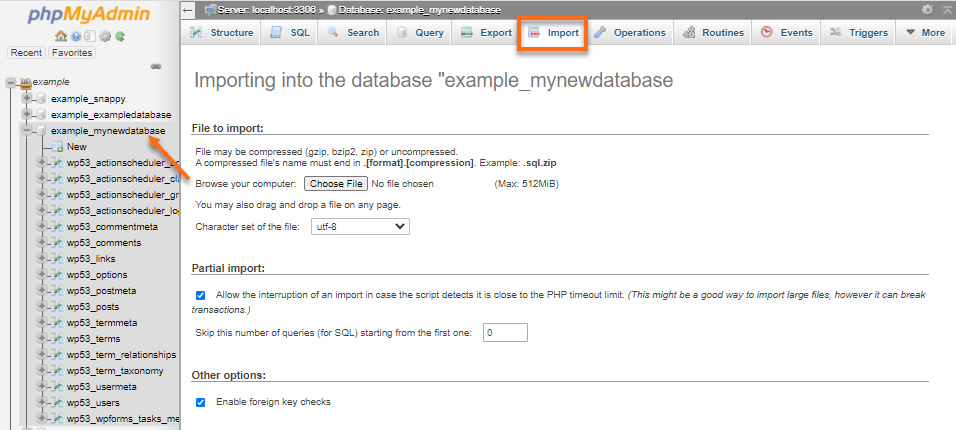
- Upload the .sql file using the Choose File button on your computer, then click Go.
You can visit the article, How to Import Your MySQL Database, for the complete instructions.
Once these steps are done, try accessing your site in a browser.