Configuring an SSL in SiteLock with an Existing Firewall
Keeping your online presence secure is important for businesses, and setting up SSL in SiteLock with an existing firewall is a key step. SSL certificates encrypt sensitive information, keeping it safe from unauthorized access and building trust with your users. SiteLock provides an easy way to configure SSL, even if you already have a firewall. By following the right steps, you can protect your site's data while ensuring your firewall still works effectively.
This article will detail how to configure SSL in SiteLock to ensure seamless compatibility with the SiteLock firewall.
Here are the topics discussed in this article.
Custom-Installed SSL
Prerequisites
Before the SSL can be installed on the Web Application Firewall (WAF), it must be installed and functioning on the host server first. To test this without de-configuring the WAF, you can modify your host file to force your computer to resolve the domain directly to the host IP, bypassing the WAF without changing anything.
Benefits
The most significant benefit of using the customer's SSL on the WAF is that anyone who wants to review the SSL information will see only the site's information. As the SSL has been issued to a specific domain, only that domain is visible to a third party looking at the SSL information.
Downside
When installing the SSL directly to the WAF, it will need to be reconfigured on the WAF if anything changes with the SSL. If the SSL is renewed or rekeyed to include another domain/subdomain or modified for any reason, it needs to be reconfigured on the WAF.
Summary
This is the ideal option for businesses or customers who are conscious about the information available to their visitors and are not put off because they will need to reconfigure the SSL if something changes.
Incapsula Shared SSL
Prerequisites
SiteLock partners with Incapsula for its firewall needs. We take advantage of how each of Incapsula's WAFs has an SSL assigned to it for this process. By verifying to Incapsula that the site admin would like to use the WAF SSL to protect their site, the site's domain is added to the WAF SSL as a secured domain.
Before the SSL can be installed on the WAF, it must be installed and functioning on the host server first. To test this without de-configuring the WAF, you can modify your host file to force your computer to resolve the domain directly to the host IP, bypassing the WAF without changing anything.
Benefits
This is an option that is geared towards convenience. By adding a TXT record to the site's DNS, we can verify to Incapsula that the site admin wishes to be included on the firewall's SSL. Once verification goes through, the site's domain is added to the existing WAF SSL. This is great because if the customer's SSL is renewed, rekeyed, or modified, it doesn't matter. As long as the SSL is updated correctly on the host side, the Incapsula SSL will continue to cover the site without a need to change anything on SiteLock's side.
Downside
When a site uses the WAF SSL, if someone wants to review the SSL information, the SSL will be assigned to Incapsula.com. The domain will be included as a SAN (Subject Alternative Name), which is essentially an additional domain covered by the SSL. Essentially, the site's domain will be among many other domains protected by the same SSL. This can give a sort of "unprofessional" look to a third party reviewing the SSL information and a ton of seemingly random domains attached to the same SSL.
Summary
This is an excellent option for bloggers or customers who don't care about including other domains on their SSL and appreciate that once they configure the SSL with SiteLock, they need not revisit the process.
Step 1: Manage SSL Certificate
To ensure that SSL traffic is routing through the SiteLock firewall, you will need to verify the domain ownership and ensure that an SSL certificate is installed in the SiteLock dashboard.
How to Validate Domain Ownership
Please note that DNS changes can take up to 24 to 48 hours to propagate.
- Access the SiteLock Dashboard through your Customer Portal.
- In the SiteLock Dashboard, navigate to the Setup Wizard section of the domain you need to manage.
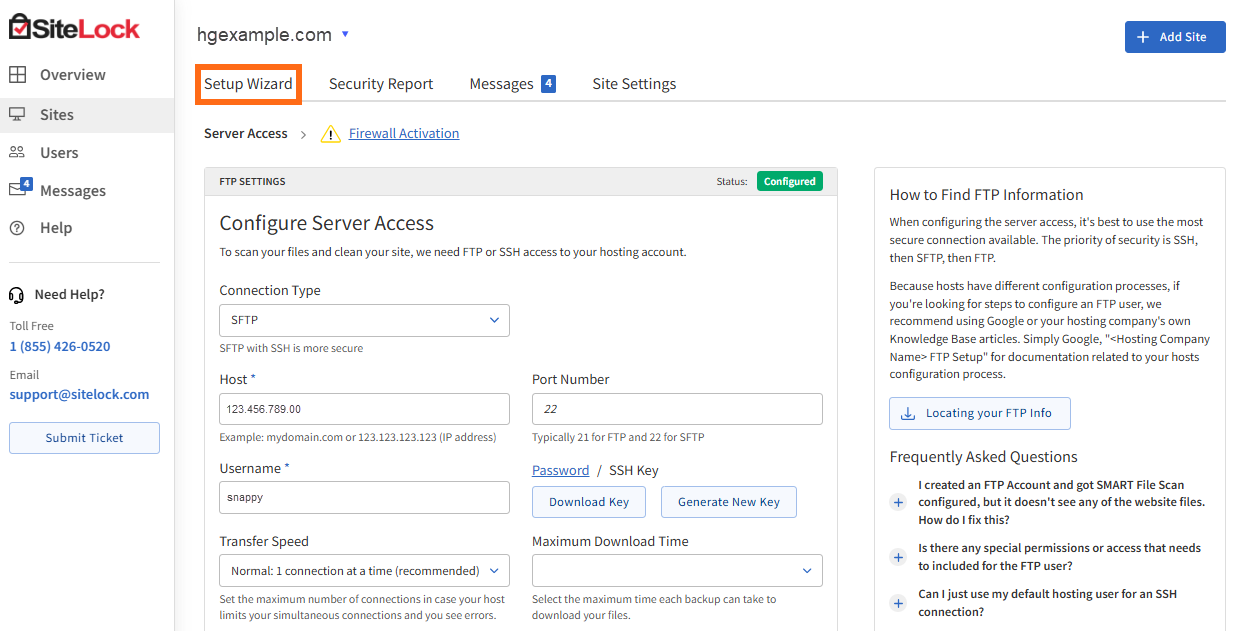
- Click the Firewall Activation tab.
- In the Validating Domain Ownership section, copy the TXT record.

- Navigate to your domain control panel and add the TXT record.
If your domain is managed by HostGator, go back to the Customer Portal and navigate to the Domains tab to add the TXT record. For instructions on how to manage your DNS, please refer to the Making DNS Changes to the Domain Bought from HostGator | Managing Domain's DNS Records article.
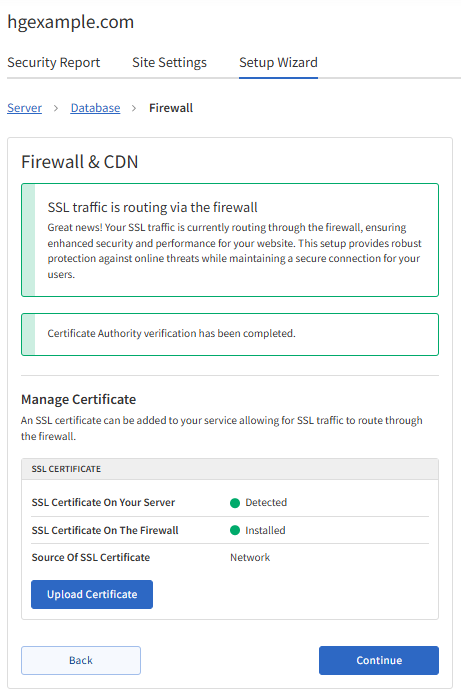
- Allow the DNS to propagate, which usually takes 24 hours. Once the verification goes through, the Firewall & CDN section will indicate that the "SSL traffic is routing via the firewall."
- Click Continue to proceed.
How to Install SSL into the SiteLock Dashboard
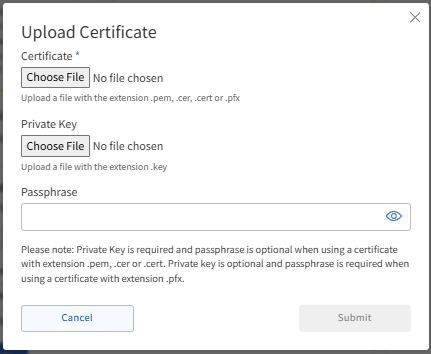
To install an SSL certificate into the SiteLock Dashboard, you need the Certificate (.crt) and Private Key (.rsa key) files. For instructions on finding these files, please refer to the article How to Configure SSL to Work with SiteLock CDN.
- Under the Firewall Activation tab, scroll down to the Manage Certificate section.
- Click the Upload Certificate button.
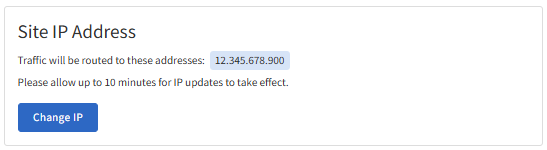
If you do not see this option, then the Web Application Firewall (WAF) cannot detect the SSL on the host server. You can go to the General Settings section under the Site Settings tab and check the Site IP to ensure your WAF points to the correct hosting IP where the SSL is installed.
- In the pop-up, click the Choose File button to browse for your Certificate (.crt) and Private Key (.rsa key) files, and then click Submit.
- When the pop-up window closes, click the Continue button to complete this step.
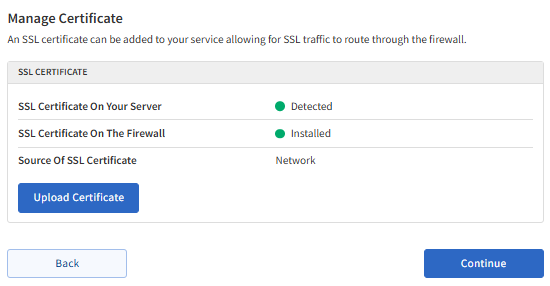
- After the verification is complete, the Manage Certificate section should indicate that the SSL is installed.
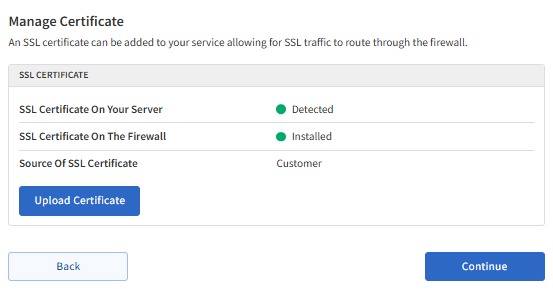
The "Source Of SSL Certificate" will tell you what setup you currently have. If you see the source is "Customer," the SSL has been installed on the WAF.
If you see the source is "Network," the site uses Incapsula's SSL.
- Click Continue to proceed.
Step 2: Manage Routing
To activate the firewall, you will need to modify your website's DNS records so that traffic routes through SiteLock's CDN.
- In the Setup Wizard, the Remove DNS records table will show the DNS records you need to remove for your domain.
- Add the DNS records shown in the Add DNS records table.
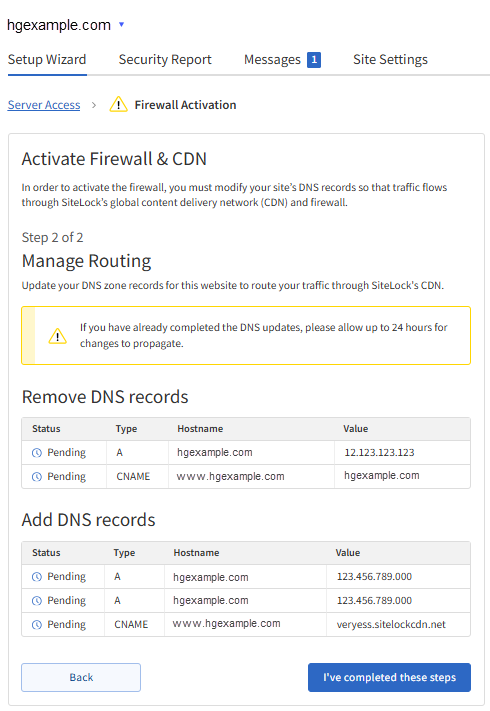
Please note that the values displayed in the tables in the image above are sample values only. Your SiteLock Dashboard will provide the exact DNS record values you need to remove and add to your domain.
- Click the I've completed these steps button once done. Allow your DNS records to fully propagate.
Tips & More!
- A very useful tool for testing SSL is https://www.sslshopper.com/ssl-checker.html. This tool lets you check the SSL installed on your domain, including expiration dates. If your domain points to SiteLock's WAF and the SSL isn't configured, the results won't be reliable.
- Don't force HTTPS on your site until it's configured and tested on the firewall. Forcing it without proper setup can cause the site to go down and show security errors. A common mistake is to set a secure URL in WordPress without having the WAF and SSL properly set up. An example of this issue is finding a site with a secure URL in their WordPress Site Home/Site URL location despite not having a fully functional WAF + SSL setup.
- To modify your host file, use the following article: How Do I Change My Hosts File? Please be aware that this can have hugely negative effects on your computer if not done right.
- Here is another article you can refer to for more information on working with SiteLock's firewall: How To Configure SSL To Work With SiteLock CDN.
At this point, you should be familiar with both processes SiteLock uses to install an SSL to the firewall. It's the same process as setting up a new firewall for the first time if an SSL is present. If you run into issues during any part of this process, give SiteLock's Support a quick call so that they can assist where possible.