How to Edit Your Hosts File on Windows, Mac, and Unix
A host file is a plain text file that maps domain names to IP addresses on your local computer. Editing the hosts file allows you to override DNS, preview how a website loads on a different server, and test updates before DNS propagation.
This guide covers the following topics:
How to recognize a hosts file?
The hosts file location varies by operating system, but the file is always named hosts. A standard hosts file includes entries such as:
127.0.0.1 localhost
123.45.67.89 www.example.com
#98.76.54.32 www.another-example.com
Editing the hosts file lets your computer view a website from a specific IP address, even if DNS has not updated yet.
Why change the hosts file?
Modifying your hosts file is useful when you need to:
- Preview your site on a new HostGator server
- Conduct website development or redesign work
- Test configurations without affecting live visitors
- Bypass DNS propagation delays
How to edit hosts file
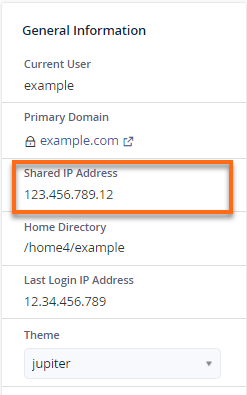
To change the host your domain loads from, you need to know your server's correct IP. HostGator servers will require you to use the IP address displayed in your cPanel.
Your Shared IP address is located in the General Information section on the right-hand side of your cPanel.
You may change the host your local computer loads your website from by directly editing your system's hosts file. This method will be more straightforward if you are an experienced user of your local PC's operating system.
All operating systems will have a hosts file like our example:
- 127.0.0.1 localhost
- 123.45.67.89 www.example.com
- #98.76.54.32 www.another-example.com
Add the second line in this example to your hosts file, with the following edits:
- Replace 123.45.67.89 with the IP address from your cPanel.
- Replace www.example.com with your actual domain name.
You may deactivate a line to undo this change by prefacing it with a # (as in the third line above). It will cause the line to be ignored.
Below are instructions for making this change in your operating system. We also created a video tutorial to guide you through the steps.
Here's a video tutorial on how to change the Hosts file on your local computer.
Editing the hosts file in Windows
Windows 8 and Windows 10
- To find the Windows hosts file location: Select the Start key and locate Notepad. (If you do not see it on your current Start page, begin typing Notepad, and a search box will appear on the right side of the screen with a list of programs under it. Notepad should be at the top of this list.
- Right-click on Notepad. You will see options appear on the bottom portion of the Start Page.
- Select Run as administrator.
Performing this action may cause Windows User Account Control to prompt you with a warning, or if you are logged in as another user, a request for the Administrator password. This step is necessary to modify system files such as the hosts file.
- Click File in the menu bar at the top of Notepad and select Open.
- Click the drop-down box in the lower right-hand corner that is set to Text Documents (*.txt) and select All Files (*.*)
- Browse the Windows Hosts File location: C:\Windows\System32\Drivers\etc and open the hosts file.
- Make the needed changes, as shown above, and close Notepad.
- Save when prompted.
Windows 7 or Vista
- To find the Windows hosts file location: Browse to Start > All Programs > Accessories.
- Right-click Notepad and select Run as administrator.
- Click Continue on the UAC prompt.
- Click File > Open.
- Browse to C:\Windows\System32\Drivers\etc.
- Change the file filter drop-down box from Text Documents (*.txt) to All Files (*.*).
- Select hosts, and click Open.
- Make the needed changes, as shown above, and close Notepad.
- Save when prompted.
Windows XP and earlier
- To find the Windows hosts file location: Browse to Start > Find > Files and Folders.
- Select the hosts file in your Windows directory (or WINNT\system32\drivers\etc).
- Verify that the file is not read-only by right-clicking it and choosing Properties.
- Open the file for editing with Notepad.
- There should already be an entry for localhost. Earlier versions of Windows have different formats for host file entries. Be sure to follow the same format as you find in your file when inserting the HostGator IP and the domain name:
On Windows 2000 and Windows ME, the order is IP address, hostname.
- Make the needed changes and close the Notepad.
- Save when prompted.
You may also need to reboot for the change to take effect. The next time you visit your domain, your browser will try to find the domain at the corresponding IP instead of looking up the IP through DNS.
Editing the hosts file in Mac
Follow the instructions below to edit your hosts file if you are running Mac OS X.
- To locate Mac hosts files location: Navigate to the Terminal application. Start by typing Terminal in the Spotlight or by going to Applications > Utilities > Terminal.
- Open the hosts file by typing in the Terminal that you have just opened:
sudo nano /private/etc/hostsSome versions of Mac OS X will lock permissions on the hosts file (the file is marked as immutable). If this happens, use the following command instead:sudo chflags nouchg /private/etc/hosts. - Type your user password when prompted.
- The hosts file contains some comments (lines starting with the # symbol) and some default hostname mappings (e.g., 127.0.0.1 localhost). Append your new mappings underneath the default ones. You can navigate the file using the arrow keys.
123.45.67.89 domain.com www.domain.com
- Replace 123.45.67.89 with the server IP that HostGator provided you in your cPanel.
- Replace domain.com with your actual domain name. Additional domains, subdomains, or addon domains (such as www.domain.com) can be added at the end of the line, separated by spaces.
- When done editing the hosts file, press Control-o to save the file.
- Press Enter on the filename prompt and Control-x to exit the editor.
Editing the hosts file in Unix
On Unix-based systems, you can find the hosts file at /etc/hosts. Most distributions of Unix will have a terminal located in the same location.
To open the terminal:
- Go to Menu.
- Select Applications.
- Choose Accessories.
- Select Terminal.
- Open the hosts file by typing in the Terminal that you have just opened:
sudo nano /etc/hosts - Type your user password when prompted.
- The hosts file contains some comments (lines starting with the # symbol) and some default hostname mappings (e.g., 127.0.0.1 localhost). Append your new mappings underneath the default ones. You can navigate the file using the arrow keys.
123.45.67.89 domain.com www.domain.com
Replace 123.45.67.89 with the server IP that HostGator provided you in your cPanel. Replace domain.com with your actual domain name. Additional domains, subdomains, or addon domains (such as www.domain.com) can be added at the end of the line, separated by spaces. - When done editing the hosts file, press Control-o to save the file.
- Press Enter on the filename prompt and Control-x to exit the editor.
Flush DNS
Once you have modified your hosts file, it is recommended that you flush your DNS so that the new changes can be implemented more swiftly. DNS flushing must be done using the command line. Depending on your computer's OS, there will be different commands.
For more information on Flush DNS, please see the following related article: