How to Disable or Manage WordPress Heartbeat API
What is Heartbeat?
The Heartbeat API included in WordPress version 3.6 and later is designed to provide fluid updates between your browser and the server to allow for autosaving, post locking, login expiration warnings, and much more. It works in the background to repeatedly send a regular pulse between the browser and the server. It can be used to keep them in sync.
However, the downside of Heartbeat is that it can cause high CPU usage on the server. (In fact, even if you simply log in to your WordPress Dashboard and minimize your browser while you work on other tasks, the API would, by default, still be updated at regular intervals in the background.)
If you have experienced heavy CPU loads and are using a version of WordPress with Heartbeat included, you can follow the steps below to disable or manage the WordPress Heartbeat API to reduce your server load.
Opening and editing files
Opening the File Manager and Locating the Target File
- Log in to cPanel.
- In the Files section, click on the File Manager icon.

- Locate the Document Root and select the domain name you wish to access from the dropdown menu.
- Find and double-click your target folder icon. (You may also navigate to the target folder using the directory tree of folders in the left sidebar.)
- In the folder, locate the target file. You may need to scroll to find it.
Editing a File
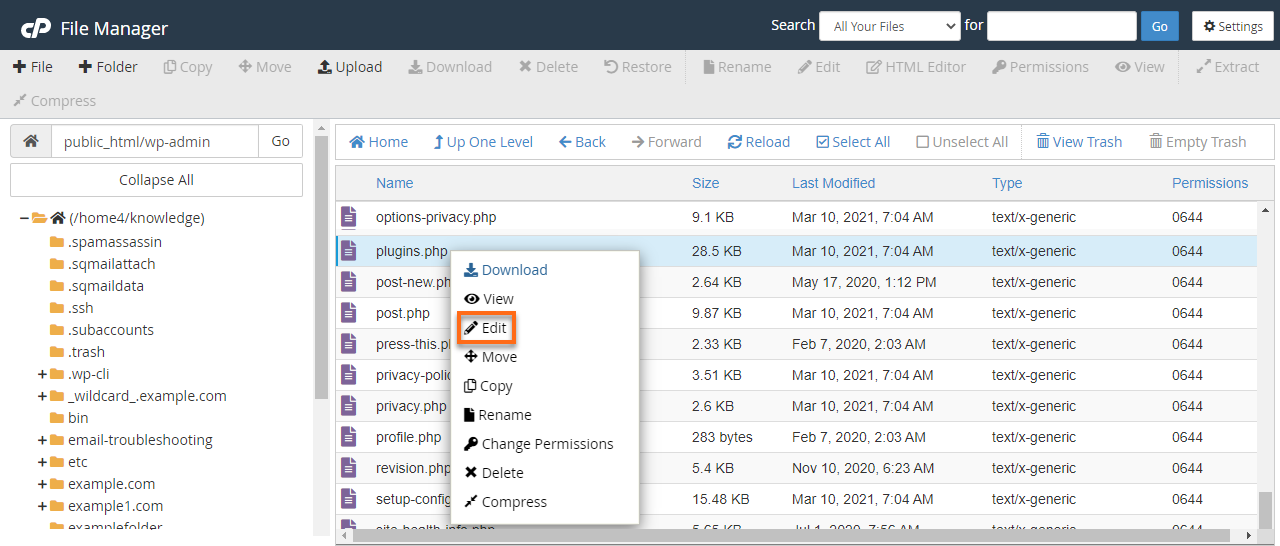
- Right-click on the file you wish to edit. Click Edit from the menu.
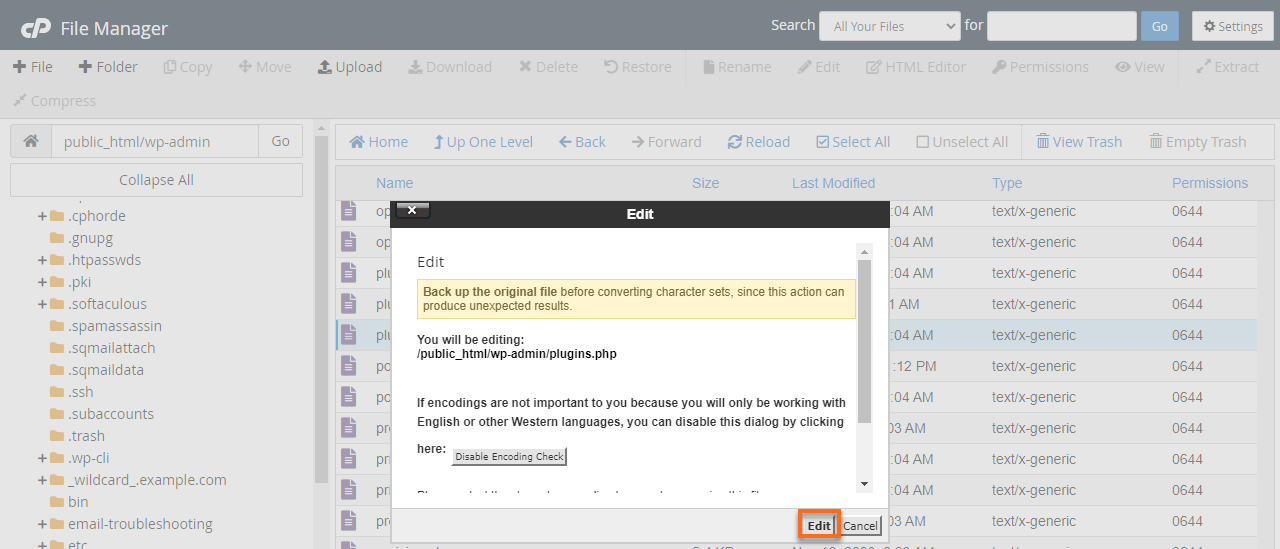
- A dialogue box may appear asking you about encoding. Just click Edit to continue. The editor will open in a new tab.
- Edit the file as suggested.
- Click Save Changes in the upper right-hand corner when done. The changes will be saved.
- Test your website to make sure your changes were successfully saved. If not, correct the error or revert to the previous version until your site works again.
- Once complete, you can click Close to close the File Manager window.
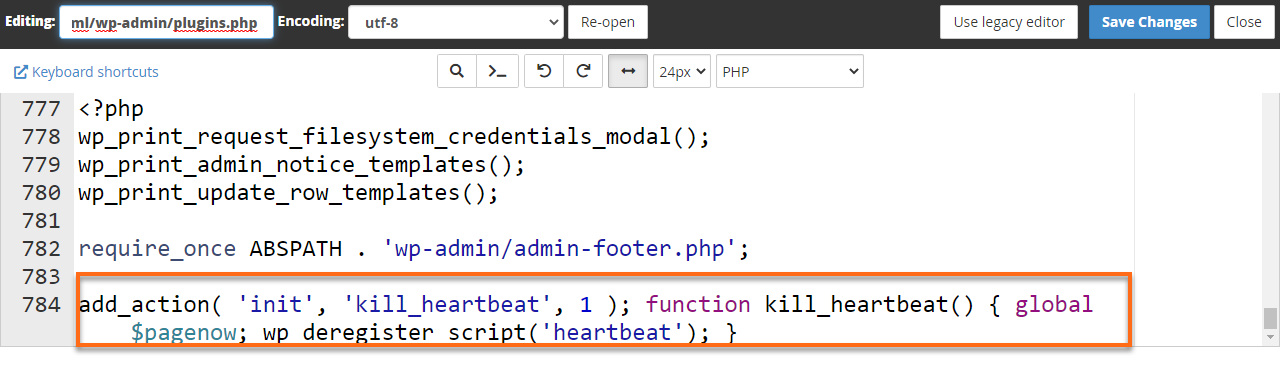
Disable Heartbeat through plugins.php file
This method of disabling the Heartbeat API is the simplest to apply and most recommended by HostGator. It will disable Heartbeat across your entire WordPress installation, even if the theme is changed at a later date. To apply, add the code provided below to the bottom of your plugins.php file, found in the wp-admin directory of your WordPress installation:
add_action( 'init', 'kill_heartbeat', 1 ); function kill_heartbeat() { global $pagenow; wp_deregister_script('heartbeat'); }
Disable Heartbeat through your Theme
If you wish to mitigate the resources used by the Heartbeat API in a more custom environment, you can do so by editing the functions.php file within your currently active theme. The following image illustrates where in this file you should input the provided code:
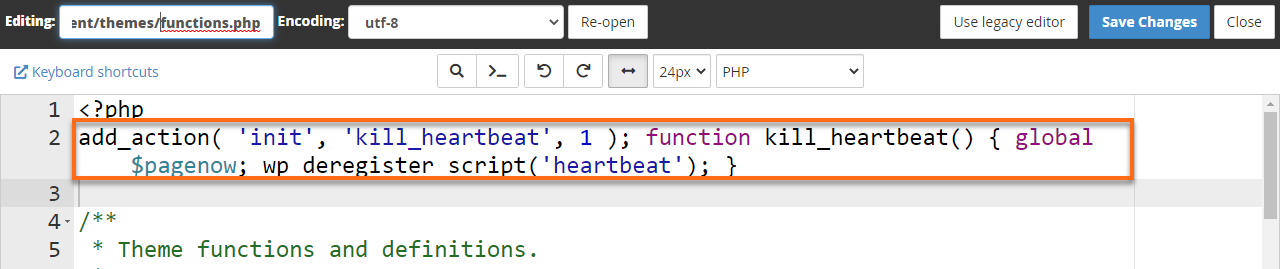
Replace cpanelusername with your cPanel username and themename with the name of your currently used WordPress Theme.
Disable WordPress Heartbeat API everywhere
When trying to save on CPU resources, it may be worth considering the benefits of the features provided and determining if you need this API active at all. For sites with multiple editors working on posts together, it may not be essential to have post locking enabled. If your posts are typically short and easily reproduced, it may not be worth consuming resources to enable autosaving.
Towards the top of the functions.php file, add the following code to disable the Heartbeat API everywhere:
add_action( 'init', 'stop_heartbeat', 1 ); function stop_heartbeat() { wp_deregister_script('heartbeat'); }
Disable WordPress Heartbeat API for WordPress Dashboard only
The Heartbeat API enables users to customize every moment of a visitor's experience on their site. This includes the ability to use behind-the-scenes server tasks to disable or enable a notice on the screen anytime a value in the database changes. If you do not want to lose this functionality but still need to trim down the resources your script is using, add the code below to disable the API on your Dashboard only.
Add the following code to your functions.php file:
add_action( 'init', 'stop_heartbeat', 1 ); function stop_heartbeat() { global $pagenow; if ( $pagenow == 'index.php' ) wp_deregister_script('heartbeat'); }
Disable WordPress Heartbeat API for WordPress everywhere except for post.php and post-new.php
The Heartbeat API for WordPress can be disabled everywhere except for posts (post.php and post-new.php). Add the code provided below. This will allow the browser to send updates to the server when writing or editing a post to maintain the autosave and post locking feature.
Add the following code to your functions.php file:
add_action( 'init', 'stop_heartbeat', 1 ); function stop_heartbeat() { global $pagenow; if ( $pagenow != 'post.php' && $pagenow != 'post-new.php' ) wp_deregister_script('heartbeat'); } wp_deregister_script('heartbeat'); }
Change the interval of WordPress Heartbeat API updates
If you would like to keep all the features of the Heartbeat API but are battling high CPU loads, you may consider changing the update rate. By default, updating happens every 15 seconds for pages that are focused and every 2 minutes for pages that are non-focused. (WordPress identifies a page as non-focused when there have been 5 minutes of inactivity within the browser.)
add_filter( 'heartbeat_send', 'my_heartbeat_settings' ); function my_heartbeat_settings( $response ) { if ( $_POST['interval'] != 60 ) { $response['heartbeat_interval'] = 60; } return $response; }