Redirects in Plesk
Use the instructions below to redirect a domain in Plesk for Windows Shared and Dedicated hosting.
Please click the links below to jump to a section.
- How To Add a New Domain Forwarder ⤵
- How To Create a Domain Forwarder With Existing Domain ⤵
- How To Add a Subdomain Forwarder ⤵
- How To Create a 301 Redirect via web.config File ⤵
How to Add a New Domain Forwarder
To add a new domain forwarder:
- If you are subscribed to several hosting packages and have access to several web spaces associated with your account, select the required webspace in the Subscription menu at the top of the screen.
- Click the Websites & Domains tab.

- Click Add New Domain.
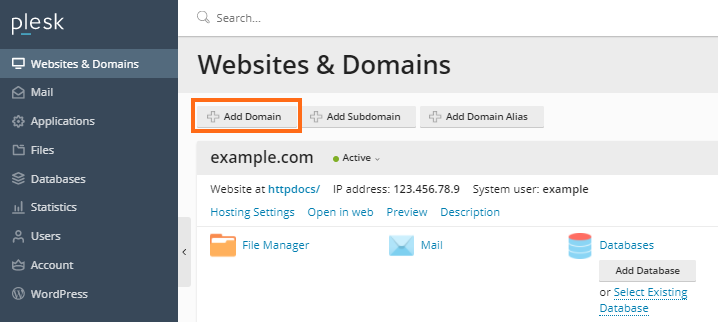
- A new window will be displayed. Specify the following:
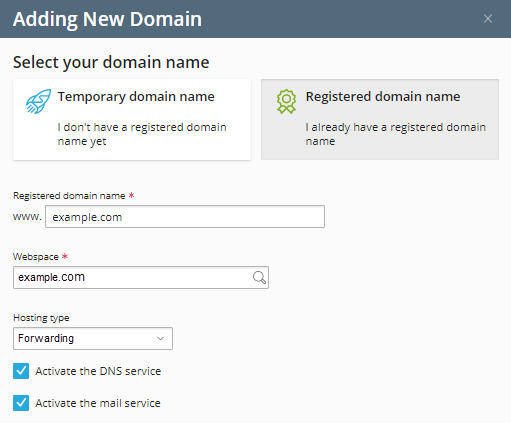
- Registered domain name: Type the domain name that you have registered with your service provider or a domain registration company.
- Hosting type: Select the Forwarding option.
- Activate the DNS Service: Put a checkmark.
- Activate the Mail Service boxes: Put a checkmark.
-
Expand the Forwarding Settings. Specify the following:
- Destination address: Type the URL to which you want to redirect visitors.
- Forwarding type: Select the preferred type of forwarding.
Standard forwarding - A user is redirected to the site, and the actual site's address is shown in the user's browser, so the user always knows that he or she is redirected to another address.
Frame forwarding - A user is redirected to the site without knowing that the site actually resides at another location; therefore, frame forwarding should be preferred.
- Click Add Domain.
Congratulations! The new domain is now added under the Websites & Domains section.
How to Create a Domain Forwarder with Existing Domain
To reconfigure an existing domain and make it a domain forwarder:
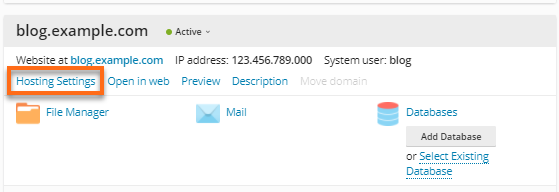
- Go to the Websites & Domains tab.
- Locate the domain you wish to modify, then click Hosting Settings under the domain.

- On the Hosting Settings page, click the [Change] link next to the Hosting type field, then select Forwarding from the dropdown.
-
You will be redirected to the Change Hosting Type section. Specify the following:
- Destination address: Type the URL to which you want to redirect visitors.
- Forwarding type: Select the preferred type of forwarding.
Standard forwarding - A user is redirected to the site, and the actual site's address is shown in the user's browser, so the user always knows that he or she is redirected to another address.
Frame forwarding - A user is redirected to the site without knowing that the site actually resides at another location; therefore, frame forwarding should be preferred.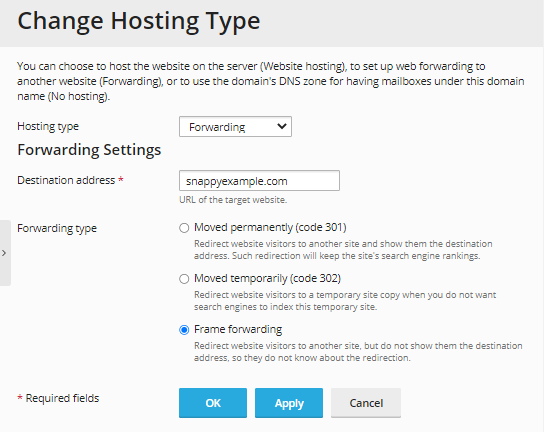
- Click OK.
How to Add a Subdomain Forwarder
To add a subdomain forwarder:
- Click Websites & Domain.
- Locate the subdomain you wish to become a forwarder, then click Hosting Settings.
If there is no subdomain yet, you will need to create a new one first.
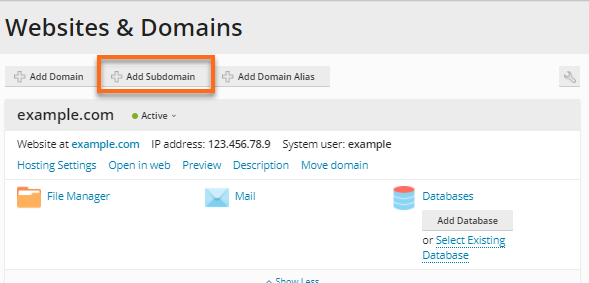
- Under the Website & Domains tab, locate the main domain where you wish to add a subdomain, then click Add Subdomain.
- On the Add a Subdomain page, enter the preferred subdomain name and document root.
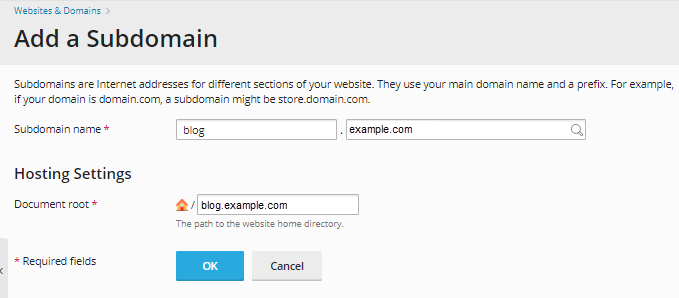
- Click OK.
- Under the Website & Domains tab, locate the main domain where you wish to add a subdomain, then click Add Subdomain.
- In the Hosting Type section, click the [Change] link.
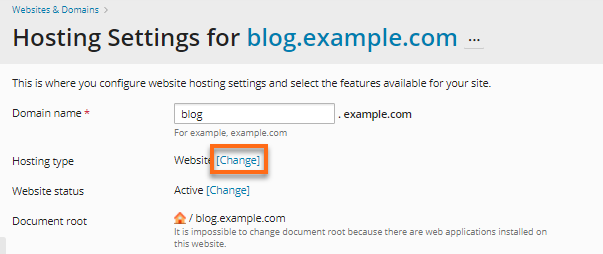
-
You will be redirected to the Change Hosting Type section. Select Forwarding from the dropdown menu.
-
Specify the following:
- Destination address: Type the URL to which you want to redirect visitors.
- Forwarding type: Select the preferred type of forwarding.
Standard forwarding - A user is redirected to the site, and the actual site's address is shown in the user's browser, so the user always knows that he or she is redirected to another address.
Frame forwarding - A user is redirected to the site without knowing that the site actually resides at another location; therefore, frame forwarding should be preferred.
- Once done, click OK.
How to Create a 301 Redirect via web.config File
There are a few options for configuring a 301 redirect via a web.config file. The web.config file is typically located in the document root folder of your website. This file can be created if one does not already exist. A basic web.config file would contain the following configuration:
<?xml version="1.0" encoding="utf-8" ?> <configuration> <system.web></system.web><system.webServer> </system.webServer> </configuration>
The following entry can be appended to your web.config file to redirect an entire site or directory to a new location. For example, if you want http://example.com/olddir/ redirected to http://domain.com/ then open, or create, a web.config file in the ‘/olddir’ folder, and add the following line of code within the <system.webServer> section:
<httpRedirect enabled="true" destination="http://domain.com/" httpResponseStatus="Permanent" />
The following example is intended for redirecting a single page to a new location. For example, important pages of your site have .html extensions, and you want the new location to be its own directory, such as http://example.com/contact.html will change to http://example.com/contact/:
<configuration>

<location path="contact.html">

<system.webServer>

<httpRedirect enabled="true"

destination="http://example.com/contact"

httpResponseStatus="Permanent" />

</system.webServer>

</location>

<location path="about.html">

<system.webServer>

<httpRedirect enabled="true"

destination="http://example.com/about"

httpResponseStatus="Permanent" />

</system.webServer>

</location>

</configuration>