Knowledge Base
How to Configure Dreamweaver for FTP
If you use Dreamweaver as your site designer, you will want to configure the software to upload your site to HostGator servers via FTP. Below are instructions on how you can configure Dreamweaver to connect to your HostGator account.
Configure a Connection
The steps below apply to both FTP and SFTP.
Note: For you to select SFTP connections, your server must be running an SFTP service.
- Click Manage Sites from the dropdown menu in the Files panel.
- Click New to add a new site, select an existing site and click on the edit icon.
-
Select the Servers category in the Site Setup box, and do one of the following:
- To add a new server, click on the Add New Server button to add a new server.
- To work on an existing server and click the Select Existing Server button.
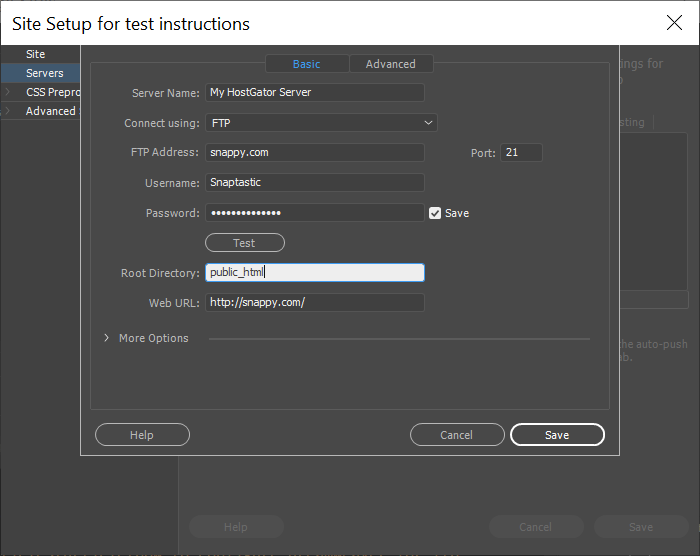
- Specify the name of the server that you like to use in the Server Name text box.
- Specify the name of the server that you like to use in the Server Name text box.
-
Select FTP or SFTP from the Connect Using pop-up menu.
- Set Connect Using FTP or SFTP.
- The FTP address will be your domain's name.
- The Username and Password will be for the FTP account associated with the domain.
- The save button next to Password allows you to save the password for future connections.
-
Choose the directory on the remote server where you store documents visible to the public in the Root Directory text box.
- It is also a good idea to provide the main directory for your website files to be moved over into the proper directory on the server from Dreamweaver.
- In the Web URL text box, enter the URL of your website (for example, http://www.hgexample.com).
- Expand the More Options section if you still need to set more options.
- Click the Test button to test out the connection.
- Select Use Passive FTP if your firewall configuration requires the use of passive FTP.
-
Select Use IPv6 Transfer Mode if you are using an IPv6-enabled FTP server.
-
Select Use Proxy if you want to specify a proxy host or proxy port.
- Click Save to close the Basic screen. Then, specify whether the server you just added or edited is remote, a testing server, or both in the Servers category.
The Files panel will now display the content of the folder setup as local.
Here is a screenshot of the Server Setup screen:

Connect to the Remote Server
To review the files on the remote server, click on the connect button. Once a connection has been established, choose the remote server option directly beside the connection button from the dropdown menu.
Dreamweaver is a popular Adobe program for creating websites and applications. It supports HTML5, CSS3, PHP, FTP, jQuery, and more, and it works with HostGator web hosting.
You can learn more about Dreamweaver by visiting Adobe's website or the Dreamweaver Tutorials learning portal.
Did you find this article helpful?