How to View the Site before the DNS has Propagated
Until a domain name is registered and fully propagated, users can view their websites using either a browser add-on or by editing their hosts file directly on their computer.
- HostGator does not endorse nor provide direct support to the browser addons or websites discussed below. These are only provided to you as options for viewing your website while your DNS is propagating.
- It is also important to note that these third-party extensions and websites use their own interface to display what your website would look like. They may or may not completely show all the features of your website. Your website will work in full capacity once your DNS records have fully propagated.
Option 1 - Website Preview via Browser Extensions
Option 2 - Website Preview via Proxy Websites
Option 3 - Website Preview via the Hosts File
Editing your hosts file is a short-term way to preview your site as it appears from your HostGator server. This allows you to make changes on a different server than the one your visitors normally use.
When finished, you will want to undo the changes you have made to your hosts file.
HostGator recommends changing your hosts file for development. It provides a stable environment for editing a website to work correctly with your domain. Other methods can cause configuration issues after development is complete.
Editing your Hosts File
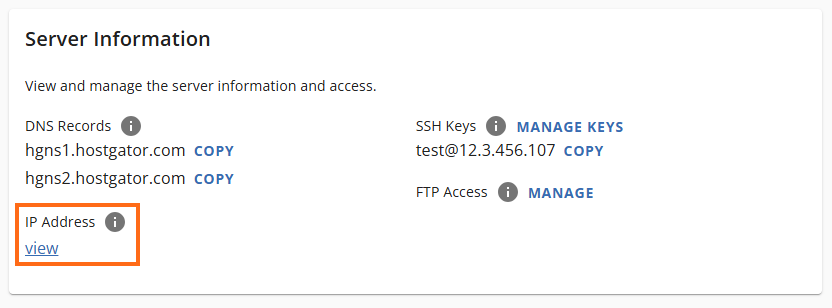
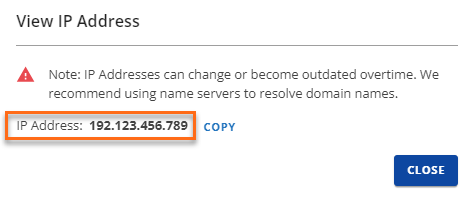
If you want to change the host your domain uses, you need the correct IP address for your server. For HostGator servers, use the IP address shown in your Customer Portal.
You can view your Site IP by accessing your Customer Portal and looking within the Server Information section in your Hosting Package:
Editing System Files
Finally, you can change which host your computer uses to load your website by editing your system's hosts file. This approach is simpler if you are already familiar with your computer's operating system.
All operating systems will have a hosts file like our example:
- 127.0.0.1 localhost
- 123.45.67.89 www.example.com
- 98.76.54.32 www.another-example.com
Add the second line in this example to your hosts file, with the following edits:
- Replace 123.45.67.89 with the IP address from your Customer Portal.
- Replace www.example.com with your actual domain name.
You may deactivate a line to undo this change by prefacing it with a # (as in the third line above). This will cause the line to be ignored.
Below are the specific instructions on how to make this change on your operating system.
WINDOWS
Windows 8 and Windows 10
- Press the Start key and look for Notepad. If you don't see it on your Start page, start typing 'Notepad.' A search box will show up on the right with a list of programs. Notepad should appear at the top.
- Right-click on Notepad. You will see options appear on the bottom portion of the Start Page.
- Select Run as administrator.
Note: Performing this action may cause Windows User Account Control to prompt you with a warning, or if you are logged in as another user, a request for the Administrator password. You need to do this step to change system files like the hosts file.
- At the top of Notepad, click File in the menu bar, then choose Open.
- Click the drop-down box in the lower right-hand corner that is set to Text Documents (*.txt) and select All Files (*.*)
- Browse to C:\Windows\System32\Drivers\etc and open the hosts file.
- Make the changes as shown above, then close Notepad.
- Save when prompted.
Windows 7 or Vista
- Browse to Start > All Programs > Accessories.
- Right-click Notepad and select Run as administrator.
- Click Continue on the UAC prompt.
- Click File > Open.
- Browse to C:\Windows\System32\Drivers\etc.
- Change the file filter drop-down box from Text Documents (*.txt) to All Files (*.*).
- Select hosts, and click Open.
- Make the needed changes, as shown above, and close Notepad.
- Save when prompted.
Windows XP and Earlier
- Browse to Start > Find > Files and Folders.
- Select the hosts file in your Windows directory (or WINNT\system32\drivers\etc).
- To check if the file is read-only, right-click it and select Properties.
- Open the file for editing with Notepad.
- There should already be an entry for localhost. Earlier versions of Windows have different formats for host file entries. Be sure to follow the same format as you find in your file when inserting the HostGator IP and the domain name:
On Windows 2000 and Windows ME, the order is IP address, hostname.
- Make the needed changes and close Notepad.
- Save when prompted.
You may also need to reboot for the change to take effect. When you visit your domain again, your browser will use the saved IP address to find it, rather than look it up in DNS.
Mac OS X
If you use macOS, follow the steps below to edit your hosts file.
- Open the Terminal app. You can find it by typing Terminal in Spotlight search or by going to Applications, then Utilities, and selecting Terminal.
- Next, in the Terminal window you just opened, type the following command to open the hosts file:
sudo nano /private/etc/hosts.Note: On some versions of Mac OS X, the hosts file may be locked and marked as immutable. If this happens, use this command instead:sudo chflags nouchg /private/etc/hosts - Type your user password when prompted.
- The hosts file includes comments, which are lines that start with the # symbol, and some default hostname mappings like 127.0.0.1 localhost. To add your own mappings, place them below the default entries. Use the arrow keys to move through the file.
123.45.67.89 domain.com www.domain.com
- Replace 123.45.67.89 with the server IP that HostGator provided you in your cPanel.
- Replace domain.com with your actual domain name.
- Additional domains, subdomains, or addon domains (such as www.domain.com) can be added at the end of the line, separated by spaces.
- When done editing the hosts file, press Control-o to save the file.
- Press Enter on the filename prompt, and Control-x to exit the editor.
UNIX
On Unix-based systems, you can find the hosts file at /etc/hosts. Most distributions of Unix will have a terminal located in the same location.
To open the terminal:
- Go to Menu.
- Select Applications.
- Choose Accessories.
- Select Terminal.
- To open the hosts file, enter this command to open the hosts file::
sudo nano /etc/hosts. - Type your user password when prompted.
- The hosts file has some comments that start with the # symbol and a few default hostname mappings, like 127.0.0.1 localhost. Add your new mappings below the existing ones. Use the arrow keys to move around the file.
123.45.67.89 domain.com www.domain.com
- Replace 123.45.67.89 with the server IP that HostGator provided you in your cPanel.
- Replace domain.com with your actual domain name.
- Additional domains, subdomains, or addon domains (such as www.domain.com) can be added at the end of the line, separated by spaces.
- After you finish editing the hosts file, press Control-o to save your changes.
- When the filename prompt appears, press Enter. Then press Control-x to close the editor.
DNS Flush
After you change your hosts file, flush your DNS cache to ensure the new changes take effect right away. DNS flushing must be done using the command line. Depending on your computer's OS, there will be different commands.
For more information on Flush DNS, please see the following related article: