Gmailify
Managing your email accounts efficiently is essential for both security and convenience. This article explains the concept of Gmailify and why it is a preferred alternative to traditional email forwarding, especially for legacy email setups. You’ll learn how Gmailify helps prevent blacklisting issues, how to set it up, and what to consider when importing and managing your email securely.
Why Should I Use Gmailify Instead of an Email Forwarder?
Unfortunately, it is very common for mail forwarding to cause blacklisting with many large email providers. This most commonly occurs when large amounts of mail are forwarded and then marked as spam after it has been received in the end user's inbox. This results in your server's sending reputation being penalized since it was the last server to send the mail. Ultimately, your server will become blacklisted with the email provider, and it will affect all of the users on the server.
A solution to this is to stop mail forwarding altogether. Using a mail fetcher, like Gmailify, you can access mail in a remote system without having the mail routed through that system's server. This way, you can mark a message as spam without it affecting your email server's reputation.
In order to successfully fetch mail with another mail provider, you must first create an email account within your HostGator control panel. For additional information on how to create an email account, please refer to the following article:
For instructions on how to fetch mail using specific mail providers, please click the links below:
About Gmailify
Gmailify is a feature of Google that allows users to manage their non-Gmail email accounts. It basically links your non-Gmail account to your Gmail. It uses POP3 to pull all the contents of an email box into Gmail and then parses the emails for spam.
Once Gmailify is set up, Google will check those accounts on a regular basis, and new mails will appear automatically in Gmail.
The email accounts from which you would like to fetch mail must support POP access.
How To Set Up Gmailify
To set up Gmailify:
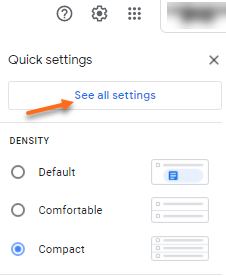
- Log in to your Gmail account.
- Click the gear icon in the upper right corner of the page and select See all Settings.
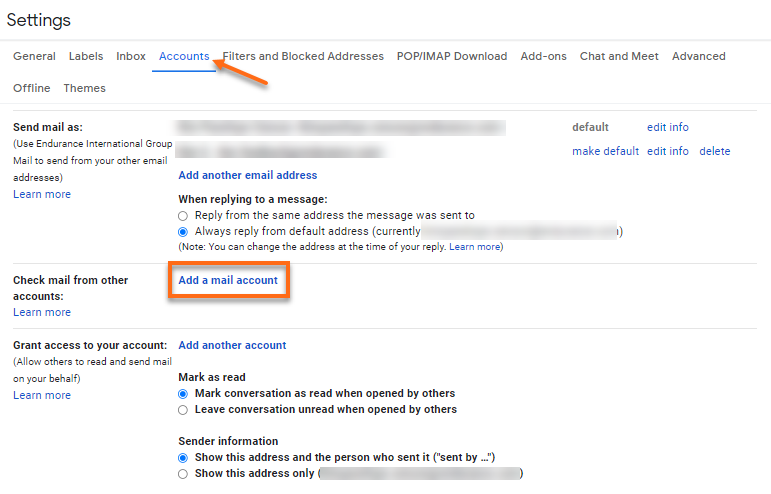
- Select the Accounts tab.

- Locate the Check mail from the other accounts section, then click Add an email account.
- Enter the full email address of the account where you would like the mail fetched from.
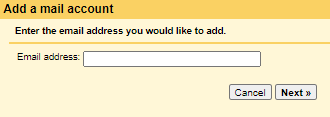
- Click Next.
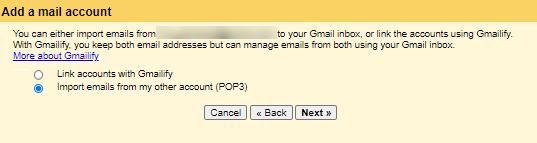
- Select Import emails from my other account (POP3).
- On the next page:
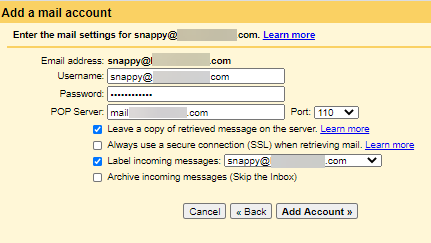
- Username: Enter your full email address.
- Password: Enter the password for the email address you provided.
- POP Server: Enter either mail.example.com or your server name. Please replace example.com with your actual domain name.
- Port: Please keep 110. If you have an SSL, use Port 995 for a secure connection.
- You will see the following options:
- Leave a copy of retrieved messages on the server: This setting leaves a copy of the email Google retrieves on your server. It is only recommended for advanced users as it requires maintenance of the email account on your server to remove old emails.
- Always use a secure connection (SSL) when retrieving mail: This setting is not recommended unless you have an SSL installed for your domain. If you select this option, you will need to use port 995.
- Label incoming messages: This setting labels mail that Google fetches with the email address it is fetched from and is recommended for most users.
- Archive incoming messages: This causes emails that Google fetches to skip your inbox, which may cause you to miss the email. It is only recommended for advanced users.
- Make sure to select Leave a copy of the message on the server.
Example with recommended settings:
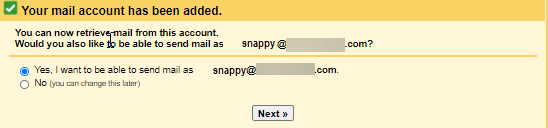
- A confirmation page will appear, notifying you that the email account was successfully added.
- After successfully adding your account, you may select No (you can change this later) and click the Finish button at this time, or select Yes, I want to be able to send mail as [email protected] and click the Next button for further configuration. This will allow you to compose messages in Gmail but have them appear to be sent from your added email account.
- On the new page, enter the following information:
- Name: The name you wish to display in the messages you send.
- Treat as an alias: It is recommended that this box is checked for the most common preference. Click the Learn more link next to this option if you would like more information about this decision.
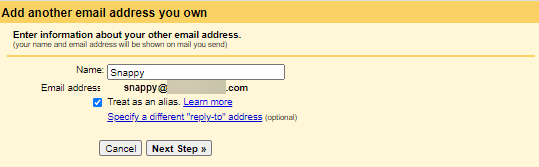
- Click the Next Step button.
- On the next page, use the following information:
- SMTP Server: Change the server to mail.example.com and use Port: 587. Please replace example.com with your actual domain name.
- Username: Edit the username to be the full email address.
- Password: Enter the password for the email address on the server.
- Leave Secured connection using TLS (recommended) selected.
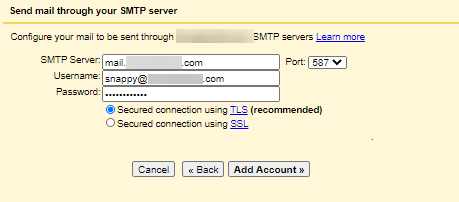
- Click the Add Account button.
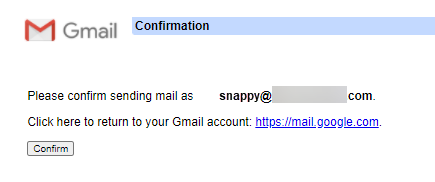
- Your email address will be sent a verification message. Click the link included in the email to verify.
If you aren't able to access the link, please log in to your Gmail account and click Settings at the top of any page. Open the Accounts tab and locate the email address you'd like to add in the Send mail as: section. Then, click Verify and enter the confirmation code from your email.
- Click Confirm.
- Once verified, select which email address you send from when you compose a new message from your Google Inbox via a dropdown in the To: field. You should see your other email account on the Account and Imports page.
-
If you have an SSL installed for your domain name, you may use Port 995 and check Always use a secure connection (SSL) when retrieving mail. If you know your server name, you may use these settings with your server name instead of mail.example.com without your own SSL.
Example:

- On the new page, enter the following information:
Additional Resources
The following external references explain how to fetch mail for other services and are for reference only. Please note that HostGator cannot offer direct support for the information provided below.