Enable SiteLock SMART Scan
SiteLock is a website security service that uses a SMART scan (SiteLock Secure Malware Alert and Removal Tool) to identify and proactively fix vulnerabilities that hackers could exploit. This helps protect your website from malware, data breaches, and other online threats, ensuring a safer experience for your visitors.
The SMART File Scan (previously known as "SMART Scan") automatically scans your website for malicious code daily and removes it from your site files. The SMART File Scan will require FTP credentials for your website's document root to set it up.
Note that enabling SMART File Scan is no longer required, as it is automatically activated on the new SiteLock plans released on February 13, 2020. However, if you have an older SiteLock plan or have migrated your website to a different server, you may need to manually reconfigure your SMART File Scan to ensure the tool functions optimally.
This article walks you through enabling the SMART File Scan in your SiteLock Dashboard.
SMART File Scan
The SMART File Scan detects and removes malware infections from your file system if your website supports FTP, SFTP, or FTPS. By default, this page will display the latest scan data.
Key Features:
- Malware detection and remediation
- Easily viewable and searchable scan history
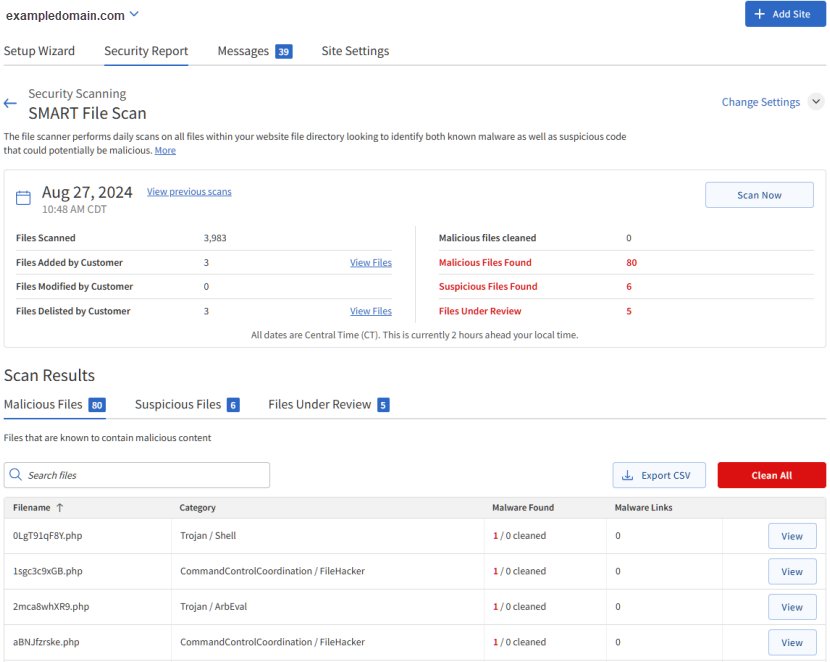
Scan Summary:
This SMART File Scan section will display the following scan details:
- Scan time - This is the latest scan date (found in the Summary tab) in Central Time Zone (UTC-6).
- Status - This shows the current scan status: either Good or Issues Found.
- Files Scanned - The number of files last scanned.
- Files Added by Customer - The number of files you've added since the last scan. If changes are detected, you will see a View Files link that displays the differences.
- Files Modified by Customer - The number of files you've modified since the last scan. If changes are detected, you will see a View Files link that displays the differences.
- Files Delisted by Customer - The number of files you deleted or removed since the last scan. If changes are detected, you will see a View Files link that displays the differences.
- Malicious files cleaned - The number of malicious files remediated.
- Malicious files found - The number of malicious files detected but not remediated.
- Suspicious files found - The number of suspicious files detected.
- Files Under Review - The number of files being reviewed by SiteLock.
Scan Results:
- Malicious Files Tab - This section shows the malicious files that were found and cleaned. If any files still need cleanup, a "Clean All" button will appear for the next scan. This option usually appears in detect mode or when a previous problem prevented the SMART File Scan from fixing the files.
- Suspicious Files Tab - This section displays results of detected suspicious files that may require further attention.
- Files Under Review Tab - This section shows the results for files currently under review by SiteLock.
How to Configure the SMART File Scanner
To configure the SMART File Scan on your website:
Step 1: Launch your SiteLock Dashboard
If you purchased the SiteLock service directly from SiteLock, please go to https://www.sitelock.com/ and click LOG IN in the top menu. Use the email address you signed up with as the username. You may need to request a password reset if you're unable to sign in.
If you purchased SiteLock from HostGator, please launch the SiteLock Dashboard via the Customer Portal. See the instructions below.
There are several ways to go to your SiteLock Dashboard.
Websites tab
- Log in to your Customer Portal.
- Go to Websites from the left navigation menu.
- Click Settings next to the website you want to manage.
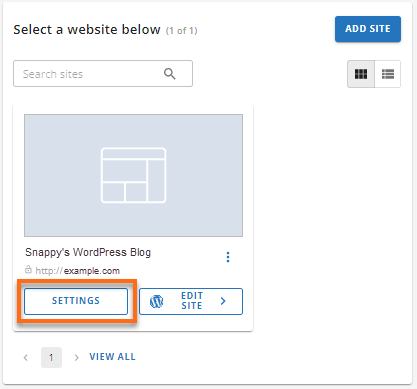
- Go to the Backups section and click Manage Codeguard.
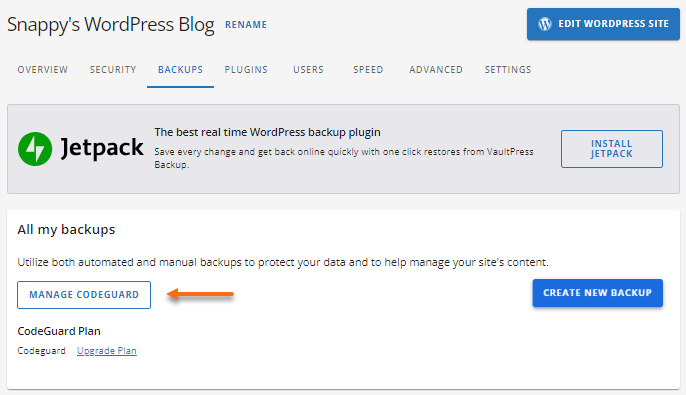
The SiteLock Dashboard will open in a new tab.
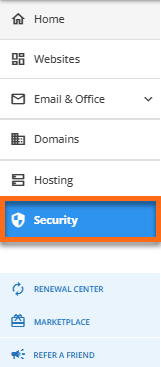
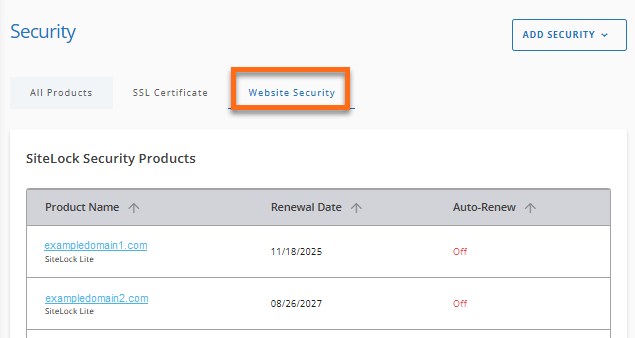
Security tab
- Log in to your Customer Portal.
- Click Security on the left-hand menu.
- To manage a website using SiteLock, you can either select the website listed under your products in the All Products tab or filter your websites by navigating to the Websites Security tab. After filtering for SiteLock, click on the website you wish to manage.
Step 2: Configure SMART File Scan
- Once you have logged into your SiteLock Dashboard, click on the Site Settings tab.
- Make sure you're on the Server Access tab on the left menu.
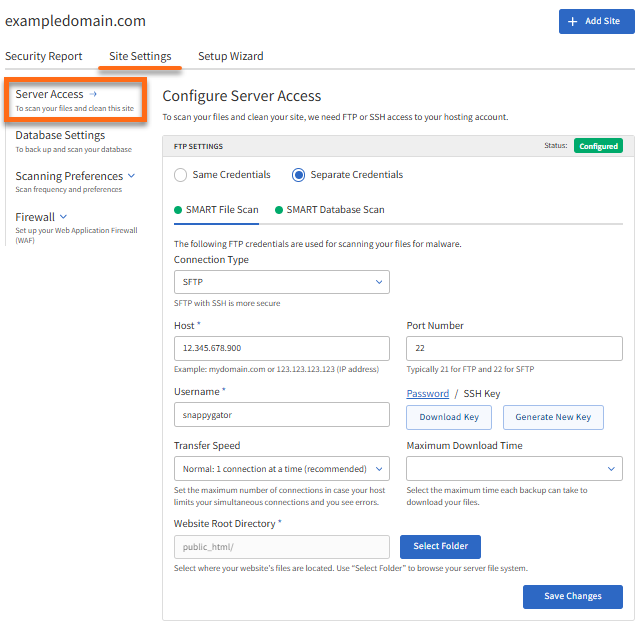
- Set up your FTP Settings.
- Once done, click on Scanning Preferences, then select SMART File Scan on the left-hand menu.
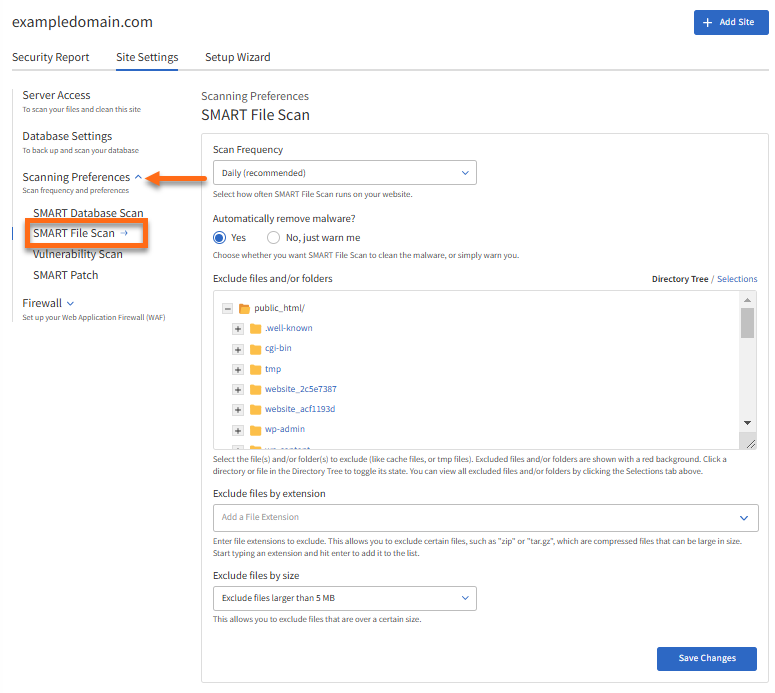
- Select Daily from the Scan Frequency dropdown.
- Select Yes for Automatically remove malware?
- Click on the Save Changes button.
Once the setup is complete, your SMART File Scan will run daily and remove any malware it finds.