Knowledge Base
Categories: Email Client
Setting Up Email for the Motorola DROID
Follow the steps below to configure an email account on a Motorola device running the Android OS. To get started, go to Settings > Email > Account Settings > Add Account.
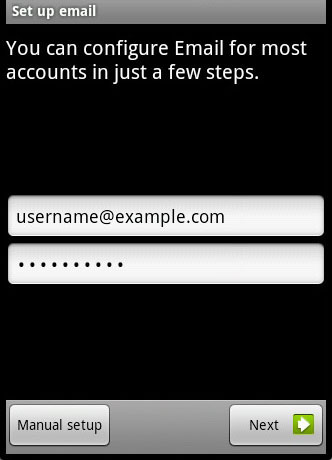
Step 1: Create a New Email Account
- Enter your full email address.
- Enter the password for the email address.
- Tap the Next button.
- Choose the type of email account that will be used.
- POP3 will download the emails from the server and store them on your phone.
- IMAP will store the emails on the server and show a cached copy on your phone.
- Exchange is not supported as it requires a Microsoft Exchange server.
Step 2: Incoming Server Settings
- Username: Enter your full email address
- Password: Enter the password for your email address.
- IMAP server: This is typically your domain name preceded by the prefix mail. This can be found in the Email Accounts section of the cPanel, under More > Configure Mail Client.
- Port Settings:
- Non Secure (No SSL): 143
- Secure (SSL): 993
- Note: Using SSL (Accept all certificates) will be more compatible.
- IMAP path prefix: Please enter INBOX (all caps). This will allow for you to store your sent, drafts, and deleted emails on the server.
- Tap Next.
Step 3: Outgoing Server Settings
- SMTP server: This is typically your domain name preceded by mail. This can be found in the Email Accounts section of the cPanel, under More > Configure Mail Client.
- Port Settings:
- Non Secure (No SSL): 25 or 26
- Secure (SSL): 465
- Note: Using SSL (Accept all certificates) will be more compatible.
- Require sign-in: Check this as you will need to authenticate with the SMTP server.
- Username: Enter your full email address.
- Password: Enter the password for your email address.
- Tap Next.
Step 4: Account Options
- Email Checking Frequency: Set how often you would like your device to check for new emails.
Note: The more often you check your email, the more it may drain your battery.
- Send email from this account by default: Check this option if this will be your default email address.
- Notify me when email arrives: Leave this checked if you would like to be notified of new email messages.
- Tap Next.
Step 5: Name the Account
If you prefer, you can name the email account. This can be helpful if you have multiple accounts on one device.
- Enter the name you would like to be shown on all outgoing emails that you send from the device.
- Tap Done.
Did you find this article helpful?