E-Commerce in Weebly
While E-Commerce in Weebly is easy to understand and use, it is complex enough to ensure that you will be able to provide your customers with an attractive and secure shopping environment. This article will show you how to:
How to Create a Store
To create a store on your website:
- Log into your Weebly Dashboard.
- Click the Store tab from the top menu.
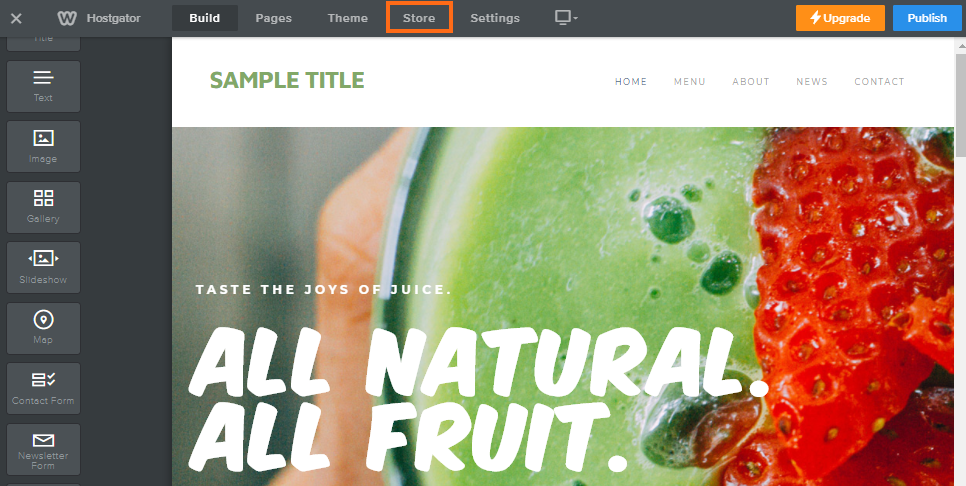
- The Overview section will be displayed.
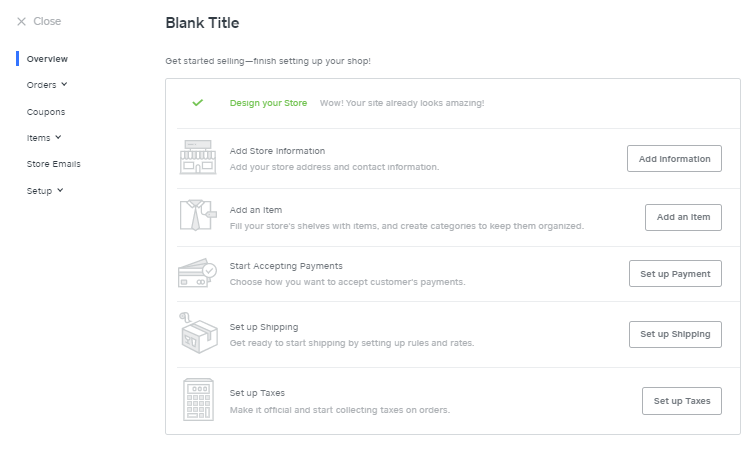
- To complete the creation of the store, click the following settings for more information.
How to Configure Your Store
Once you're logged into your Weebly Dashboard, the Store section will provide you with different options to configure and customize your website. You will see features and options under the Store menu.
Orders
The Orders tab will show any orders placed through your site. The orders can be exported for certain date ranges and either as a CSV or Quickbooks file.
Orders can be searched via the customer's name, phone number, city, zip code, or order number. The filter next to the search will allow you to show only certain order statuses. The following is a listing of all of the statuses an order can have:
| Status | Item Type | Description |
|---|---|---|
| Pending | Physical Goods | New order default status once an item has been purchased. |
| Canceled | Services and Physical and Digital Goods | The order has been marked as canceled. |
| Shipped | Physical Goods | Once the order has been prepped for shipping and tracking information has been logged. |
| Paid | Services and Non-Physical Goods | The default status for new orders with non-physical items. |
| Sent | Digital Goods and Services | For an item or service that was paid for. Digital goods have been emailed. |
| Ready | Physical Goods | Optional status informing customers that they can pick up their purchased items. |
| Completed | Physical Goods and Services | Service has been rendered. |
| Refunded | Services and Physical and Digital Goods | A refund has been issued to the customer. |
Coupons
To provide customers with a discount, you can create a coupon to apply a percentage discount, price discount, or free shipping (shipping rates must be set up first). All discounts are applied to pre-tax and pre-shipping rates.
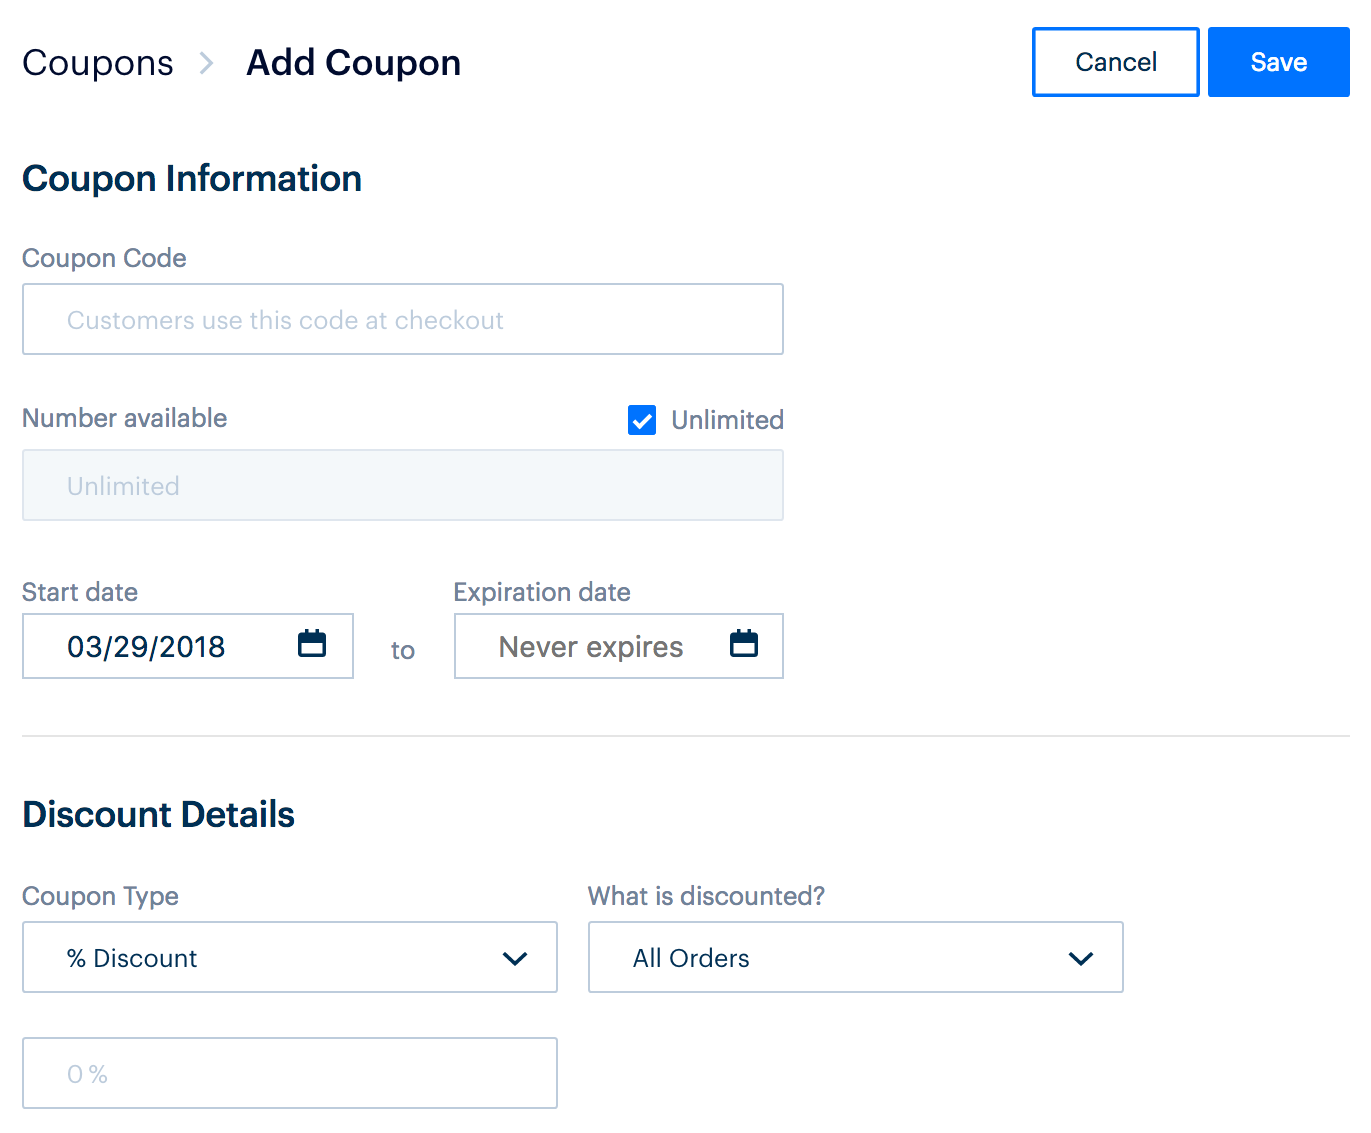
To add coupons to your store:
- In the Coupon Code field, enter a unique code for your coupon. This will be what customers use to apply the discount at checkout. You can use a combination of letters, special characters, and numbers. What's great is that it's not case-sensitive!
- In the Number available field, you can set how many coupons are available and how long the coupon is active.
- Set if the coupon has an end date or if it will never expire. When an end date is added, the coupon will be valid until midnight of that date.
- Select the Coupon Type – percentage (%) discount, price ($) discount, or Free Shipping and then set the amount in the field below.
- Choose what will be discounted,
- All Orders - Applies the coupon to any order that meets the date constraints.
- Orders over a certain amount - Applies the coupon to orders to the specified amount. For example, if the discount amount is set to $50, any orders that are $50 will be able to use the coupon.
- Specific Categories - Applies the coupon to orders.
- Specific Items - Applies the coupon to orders that have certain item(s). The coupon cannot be selected for SKUs or items with an item's options.
- Click Save.
Items
The Items tab allows you to manage your store's items. Here are the submenus found in this tab.
Item Library
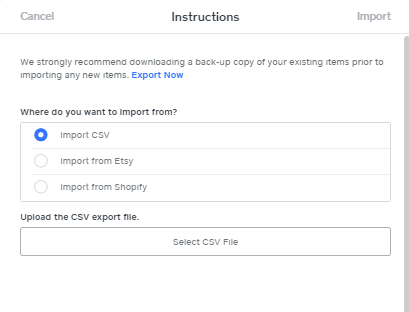
- Import Items - This allows you to import items via a CSV file, Etsy, or Shopify Store.
- Add Item - This allows you to enter your item's information.
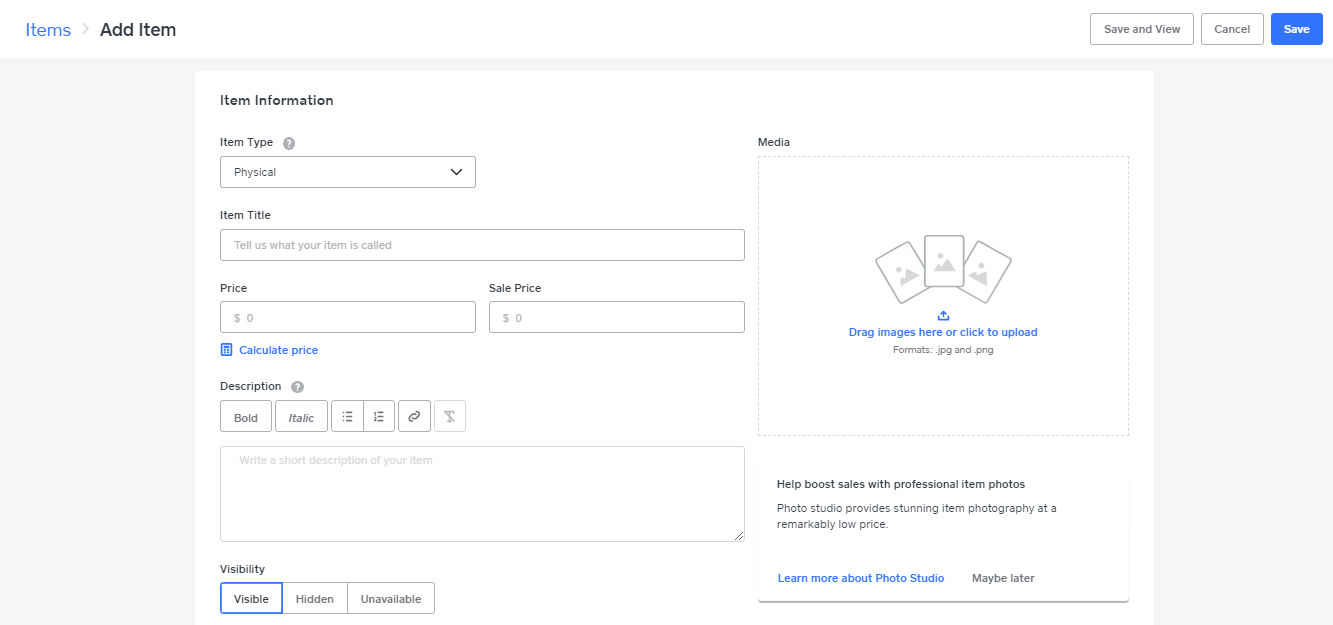
- To add items to your store:
- Click Add Item.
- Enter a name for your Item.
- Provide a description of the item.
- To the right-hand side, the option to add photos of the item is displayed.
- Scroll down to select the type of item, Physical, Digital, or Service. Define the settings below:
- Price
- Sale Price (Optional)
- Visibility
- Shipping Weight (Optional - Only available for Physical)
- Sales Tax
- SKU (Optional)
- Track Inventory
- Download Limit (Only available for Digital)
- Add the item to any category.
- Next, add in any Item Options.
- For Digital Items, an Uploader will appear at the bottom.
- Configure the Search Engine Optimization (SEO) for an item:
- Item Permalink (Optional)
- SEO Title
- SEO Description
Categories
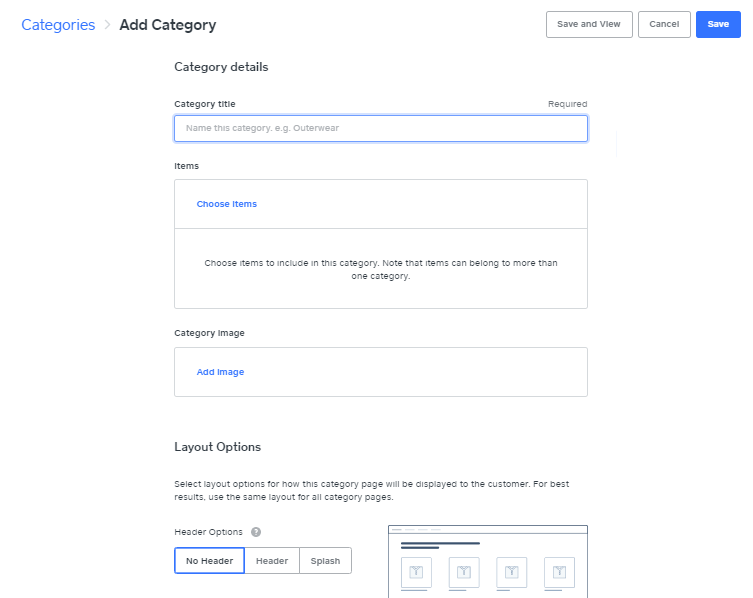
To add new categories to your store:
- From the Items tab on the right-hand menu, select Categories.
- Click the Add Category button.
- On the next page, give the category a name, add an image, and add any items.
- Select a layout for the category page. SEO information can be added to the category (optional).
Gift Cards
This is a great marketing tool that allows you to advertise your store more.
Note: To enable the Gift Cards feature, your Weebly plan must either be Pro or Business.
To use the Gift Card feature:
- Under the Items section, click Gift Cards.
- Click the Enable button found in the top right corner.
- Input the name of the gift card, custom amounts, description, categories, and images.
- Once done, republish your site to see the new gift card option.

Reviews
This section allows the customers to leave ratings and reviews of items.
To enable this feature:
- From the Items tab, select Reviews.
- Click Enable in the top right-hand corner.
- Next, you can set how long of a timeframe passes before the request for review email is sent to the customer.
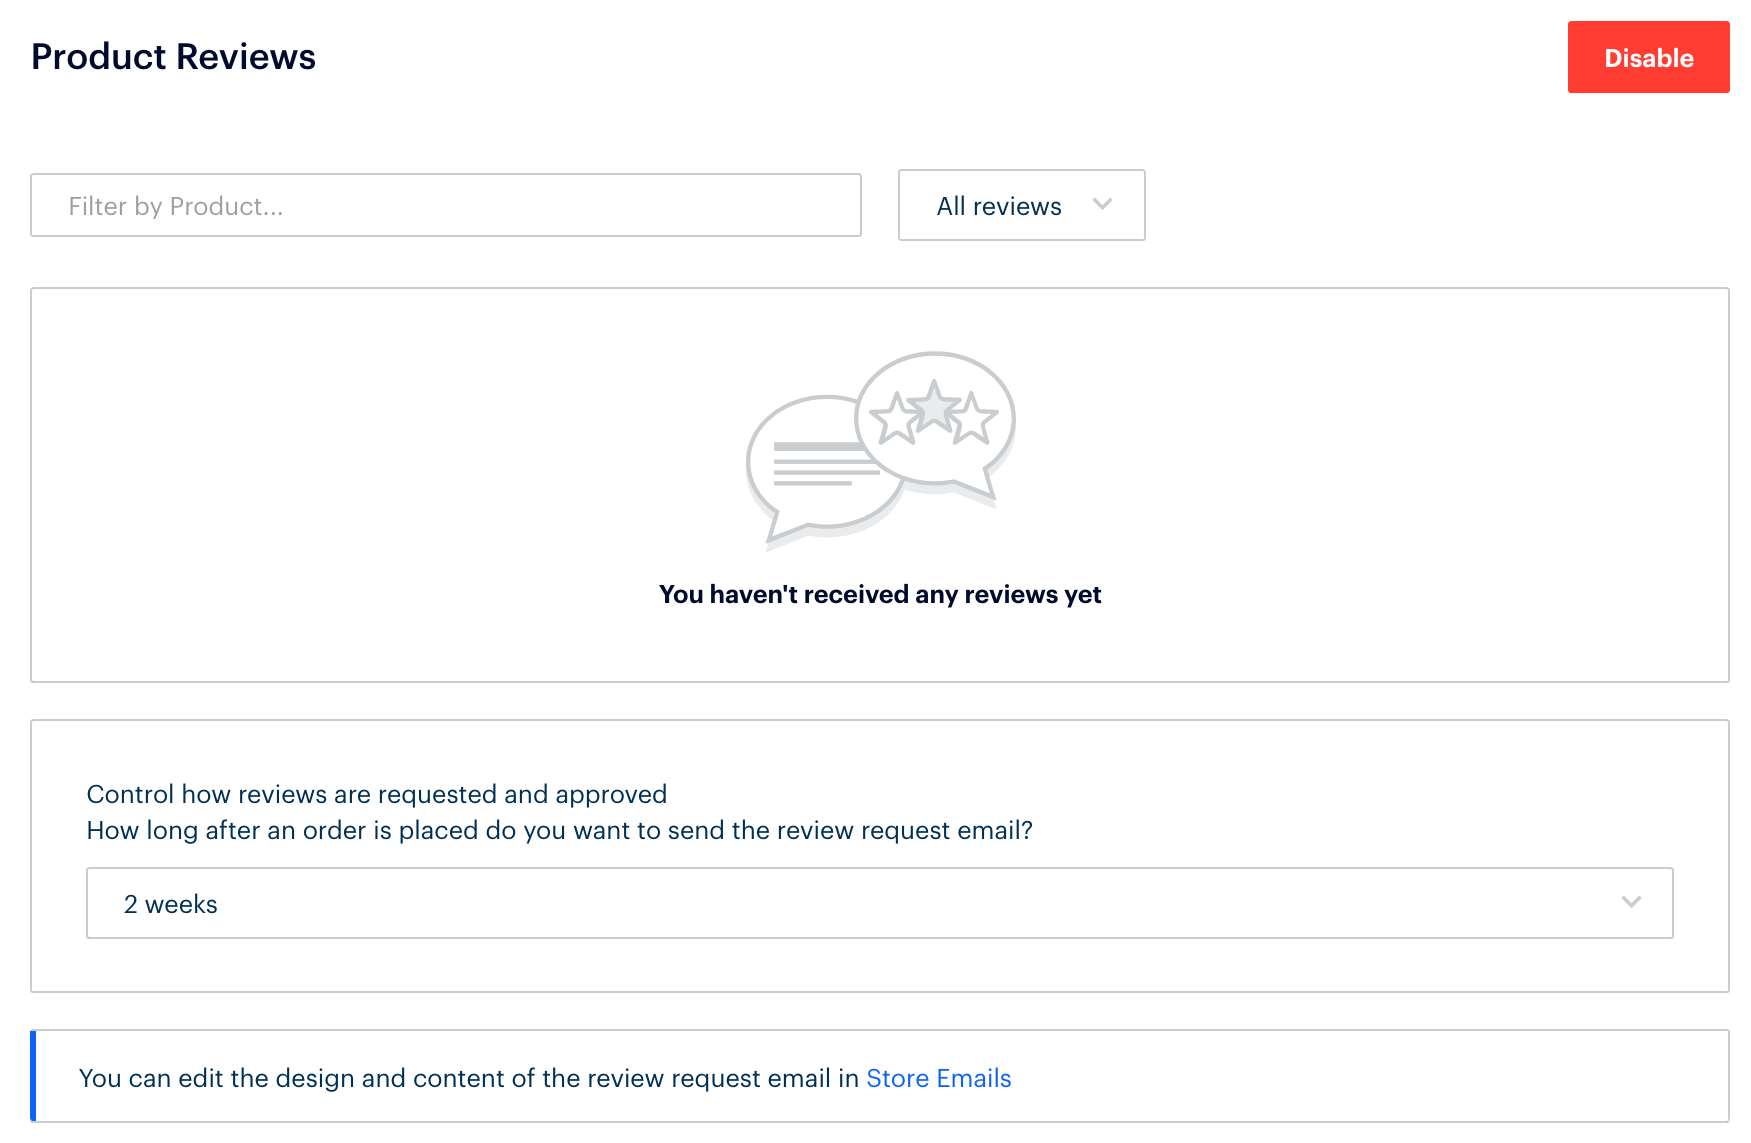
To change the look of the review email, navigate to the Store Emails tab.
Store Emails
The Store Emails tab allows you to specify what email address Weebly should show to your customers when they receive an email from the store and what email address you should be notified of upon any new orders.

To edit the store emails:
- Under the Email Previews section, click the ellipsis icon (…) on the right side of the order or item status.
- Select Edit Email from the options.
- You will have options to Add a Footer Message or Add a Header Message and also to Send a Test Email.
Setup
The Setup tab will let you configure your Weebly store, its' settings, and how it looks. The submenus can be found under the Setup tab.
Item Settings
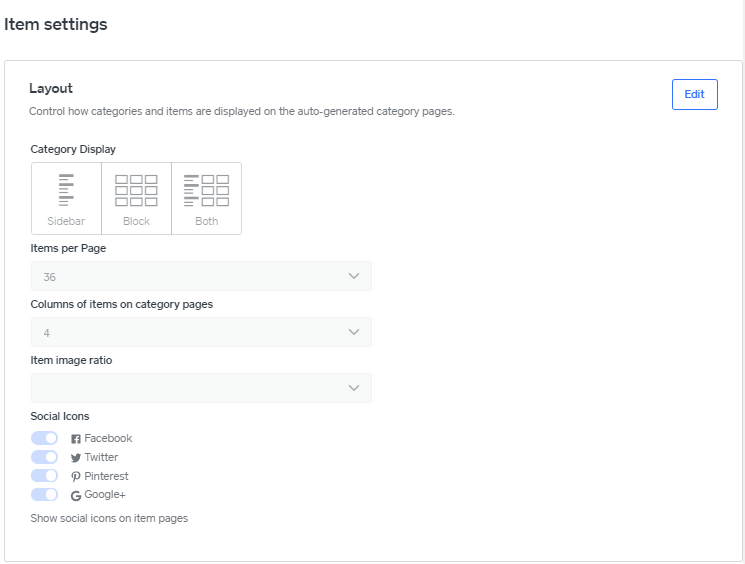
- Layout - This is the section where you can customize the appearance of your Weebly store.
- Item Status - This is where you can set up the status of your items.
- Stock Settings - This serves as an inventory tool that tracks the changes in your inventory that are not related to sales.
- Gift Options - This allows the customers to add gift messages and gift wraps.
Checkout
To associate your merchant processor account with Weebly:
- Navigate to Setup, then click the Checkout tab.
- Click Connect to the right of your preferred merchant.
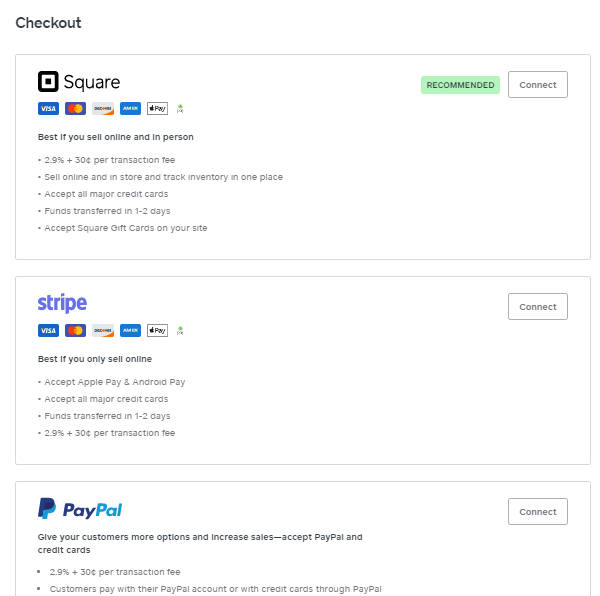
- Next, you will be prompted to either create a new account or log in to an existing account with the selected merchant.
- The next sections will allow you to set up Store Policies for returns and shipping and then Checkout Options to toggle fields on the checkout page.
Shipping
The Shipping tab allows you to set up your shipping address and add your own shipping rules. Please follow the steps below to complete your Shipping Setup.
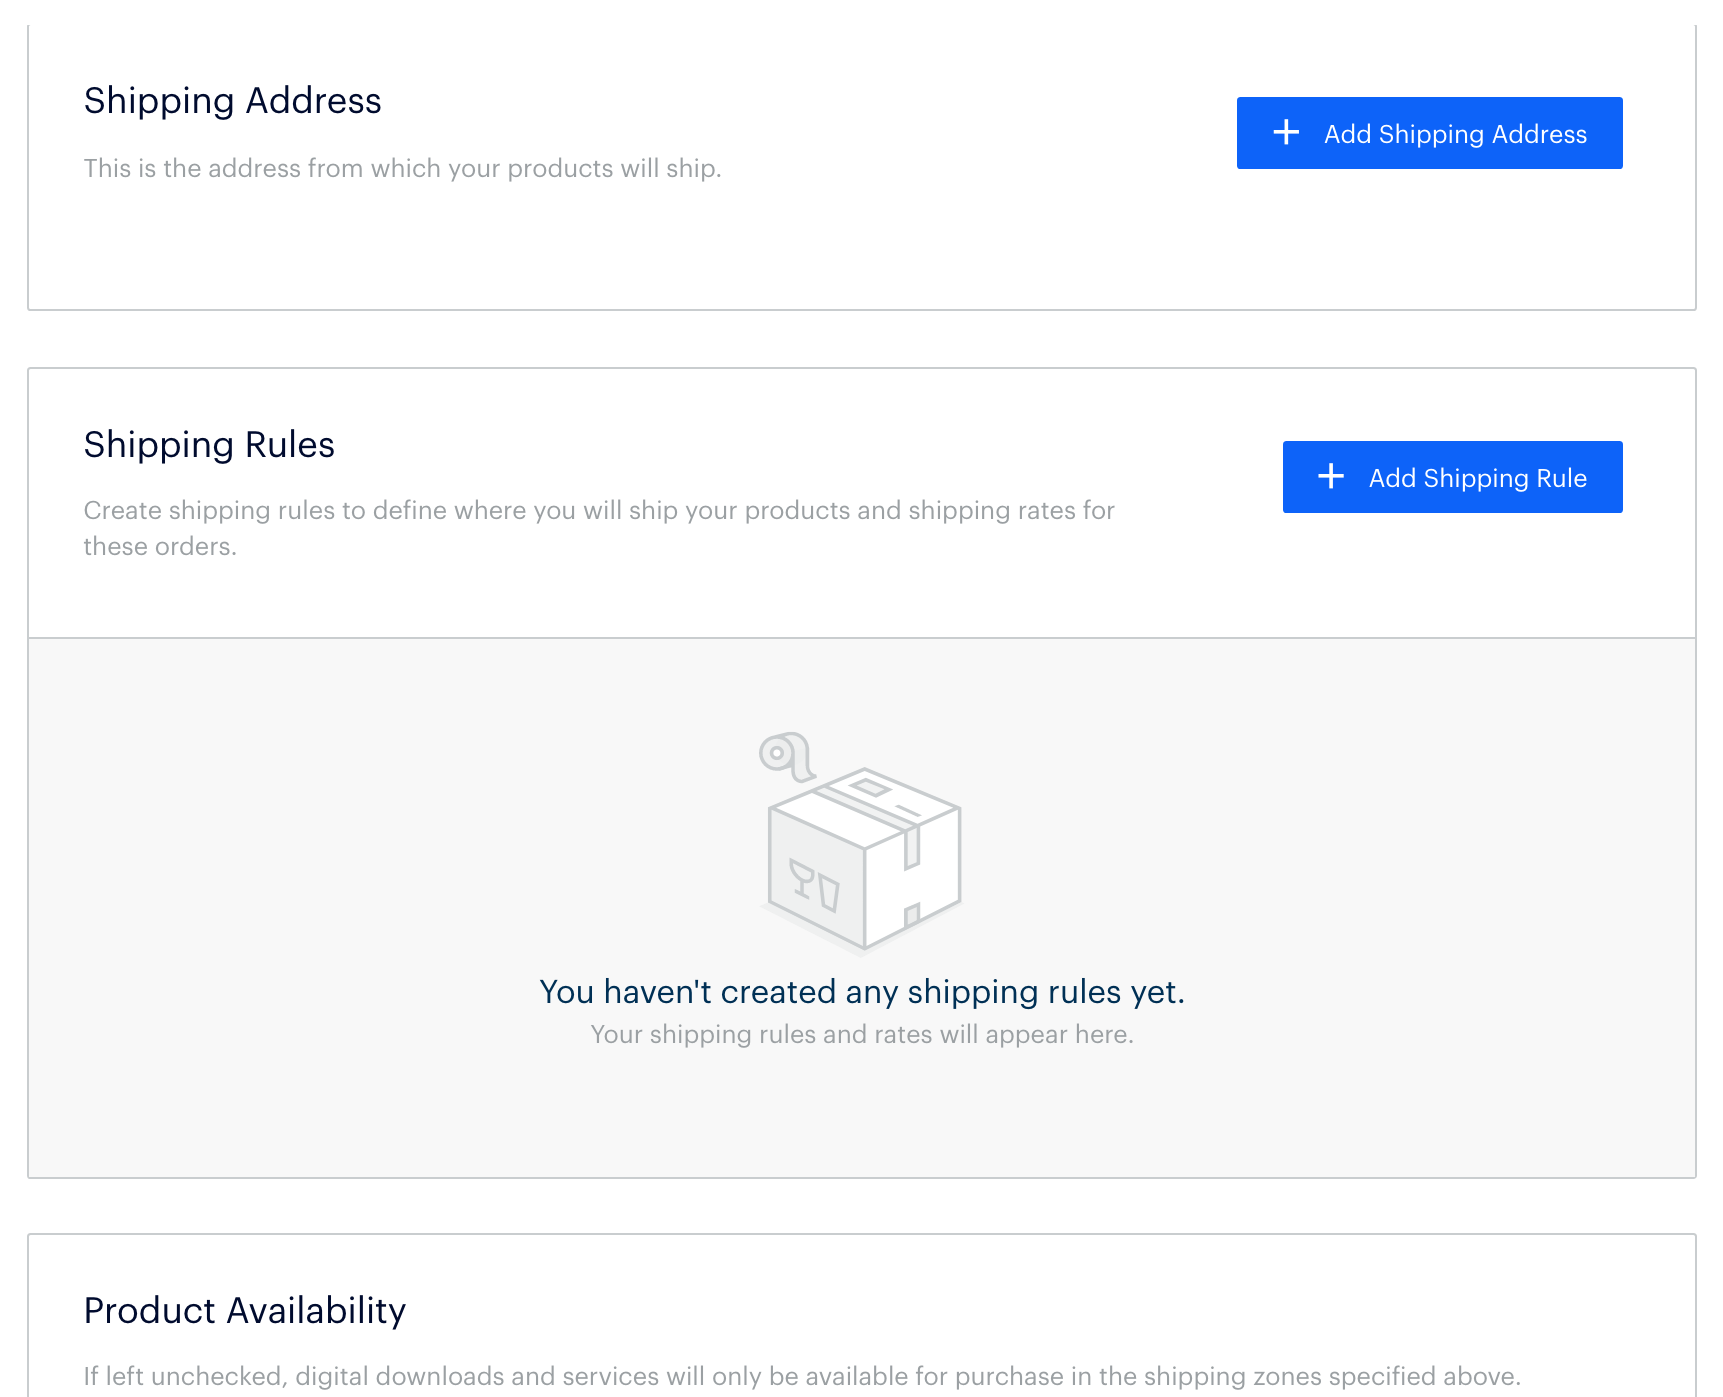
Step 1:
To set up your store's shipping address:
- Go to the Shipping Address section.
- Click Add Shipping Address on the right-hand side.
- Fill up the necessary fields. Here, you can select to use the address listed in the setup or add a new address.
- Click Save.
Step 2:
To set up your store's shipping rules:
- Go to the Add Shipping Rule section.
- Select the country or continent from the dropdown menu.
- Once the selection has been added, click Edit to expand or narrow down the shipping area. Repeat the process to add more countries to the listing.
Step 3:
- Once the shipping area has been defined, click Add Rate at the top right of the pop-up to specify how the shipping rates will be calculated and applied.
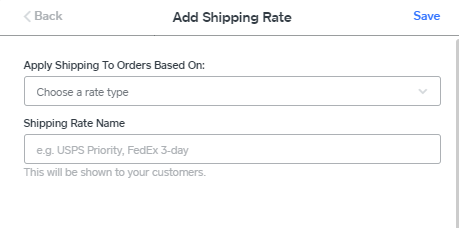
- Select one of the following shipping rate options from the dropdown.
- Order Price - Set a minimum and maximum order price range and its shipping rate.
- Order Weight - Set a minimum and maximum order weight and its shipping rate.
- Quantity - Set a minimum and maximum order quantity and its shipping rate.
- Flat Rate - Set shipping rate per item or order.
- Free Shipping - Set free shipping by price or weight.
Taxes
This is the section where you can add your tax rate to calculate your store's taxes. Important Note: Please make sure that your physical store address is correctly listed. You can check that out in the Store Information ⤵ section.
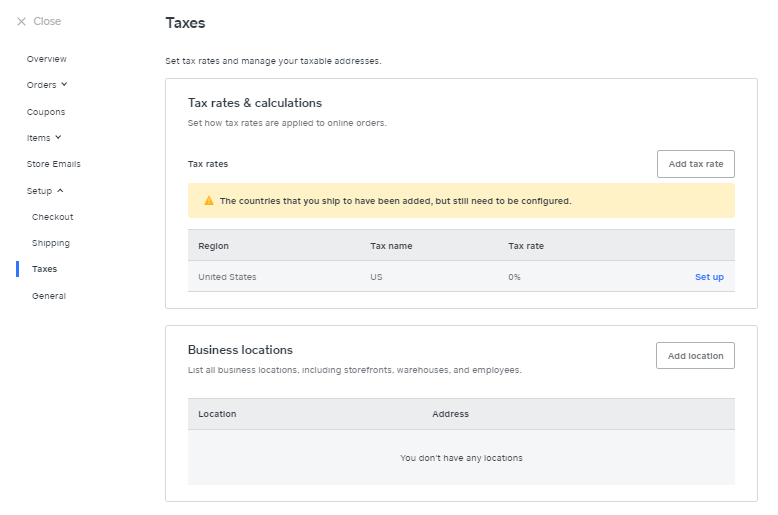
To add the tax rates for each country that you will ship to:
- Click the Add Tax Rate button.
- Select the country from the dropdown menu.
- Manually add in the country tax rate and tax name to be displayed.
- For the United States, automatic tax calculations are available.
- Click Save in the right-hand corner of the pop-up.
Note:
Tax calculation settings are used to determine if taxes are included in the item price and if taxes should be charged on shipping rates.
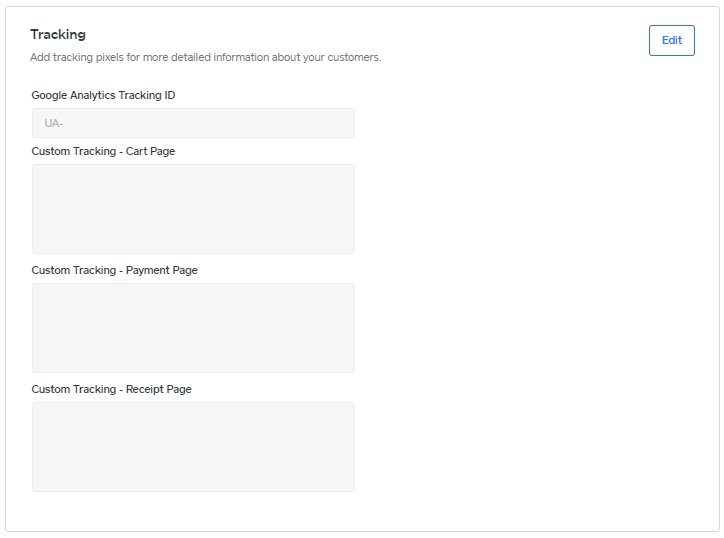
General
- Store Information - Add your company information here to be used for shipping and to be displayed in store emails.

- General - Defaults for the store, such as currency, units, and shopping cart options.
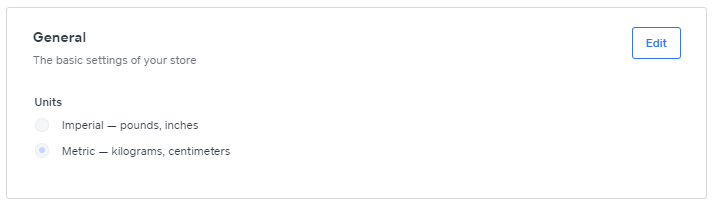
- Tracking - Add Google Analytics code to track visitors.
E-Commerce Elements
The Weebly Build tab has several different elements to use to display items on the site. Here are the elements under the E-commerce section.

Products (Multiple Items)
To display several store items on the website's page:
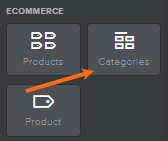
- Under the Build tab, locate the Products icon under the Ecommerce menu.
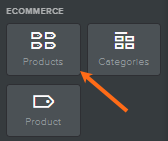
- Drag and drop the Products element on the page.
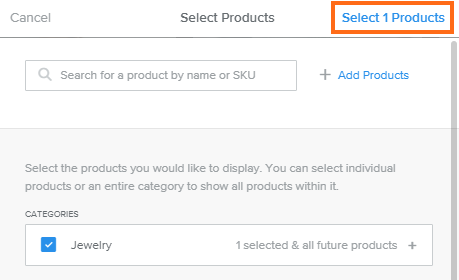
- In the selection window, select the item(s) by clicking its checkbox.
- Once your preferred items are selected, click Select Products in the top right corner of the pop-up window.
 Note: If there are no saved items yet, you will be prompted to add new items first. Please do so by clicking the Add Products to Store button.
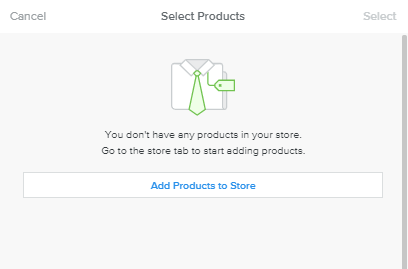
- Once you click the Select Products link, a new pop-up window will appear for the layout options.
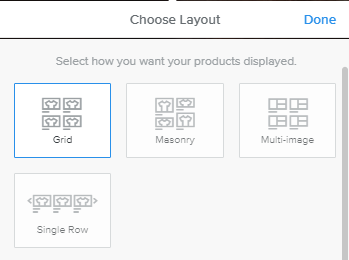
- Select your preferred layout, then click Done.
To manage the products:
- Click the Products element in your workspace.
- A pop-up window will appear, showing you different options to customize your products.

- Manage Products- Add or remove items from showing. Change the priority of the items and view the item in the store.
- Change Layout - Select a different layout for the items.
- Columns - Change how many columns are shown.
- Display Options - Use this to change the following settings:
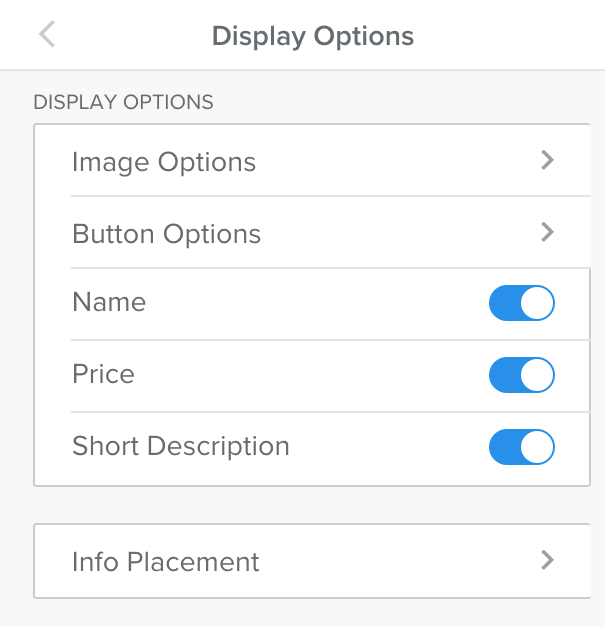
- Image Options - Use to toggle the item image display and the aspect ratio.
- Button Options - Use to toggle the button display and modify the button text and the style of the item button.
- Name - To toggle the display of the item name.
- Price - To toggle the display of the item price.
- Short Description - To toggle the display of the item name.
- Information Placement - Use to change how the item text displays.
- Pagination - Update what is displayed for multiple item pages and how many items are sown per page.
Categories
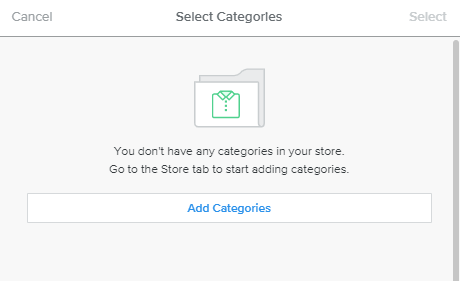
The Categories store element will display all of the categories that are selected from the pop-up.
To display the categories on the website's page:
- Under the Build tab, drag and drop the Categories element on your workspace.
- In the selection window, all current Categories and subcategories will be displayed.
Note: If there are no saved categories yet, you will be prompted to add new categories first. Please do so by clicking the Add Categories button.
- Select the preferred category by clicking its checkbox.
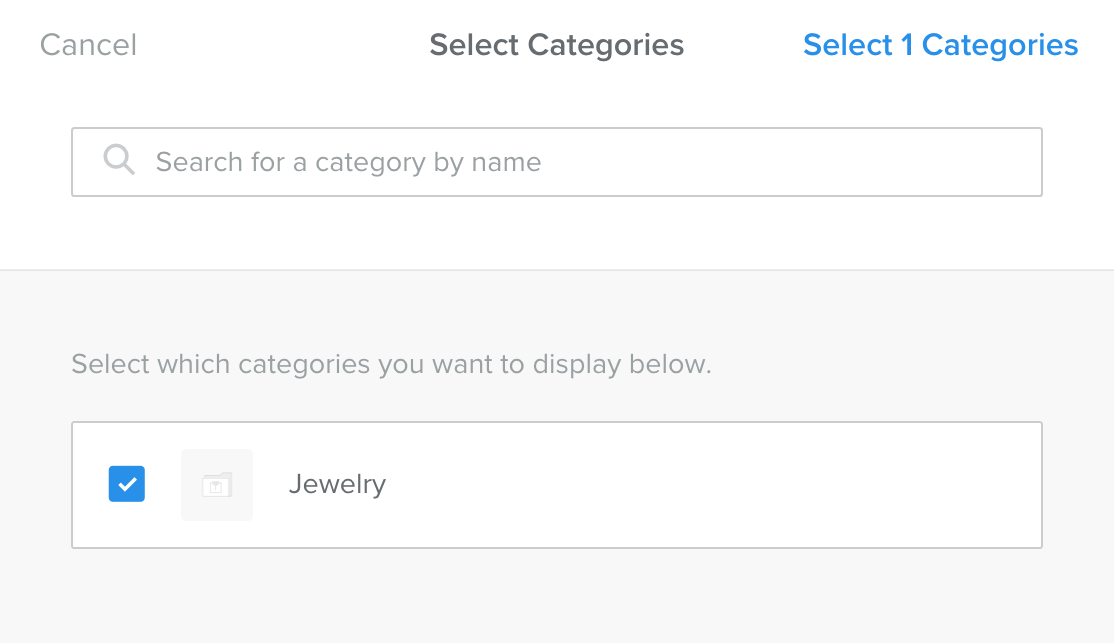
- Once done, click Select Categories in the top right corner of the pop-up window.
- After the categories are added, choose a layout for the category display.
- Click Done once the preferred layout is selected.
To manage the categories:
- Click on the Category element in your workspace for the settings pop-up.
- A pop-up window will appear where you can manage the item categories, change the layout, modify the columns shown, update the display options for images, buttons, information, and the pagination for multiple category pages.

Product (Single Item)
Placing the Product element in your workspace will show only a single item.
To manage your product:
- Click the Product element in your workspace.

- A pop-up window will appear, providing you with options to make several changes to your product element.
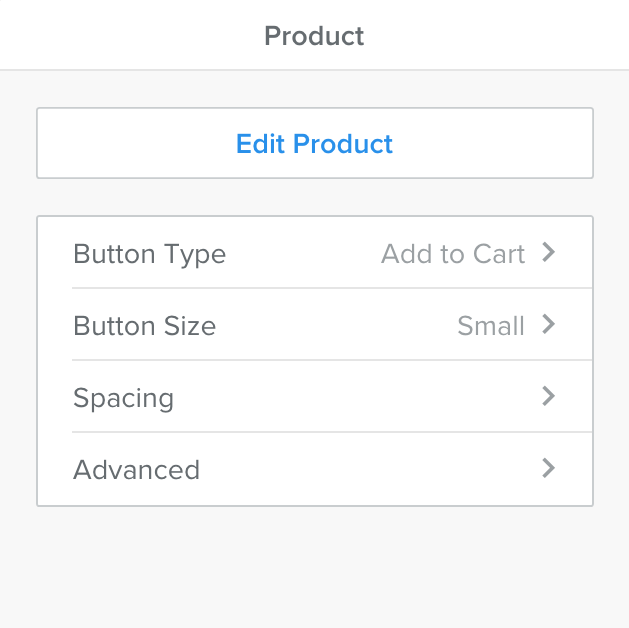
- Button Type - Allows you to change the button in the element to either "Add to Cart" or "Buy Now."
- Button Size - Allows you to change the button size to large or small.
- Spacing - This allows you to change the padding above and below the item.
- Advanced - Allows you to select whether or not your item image, description, or price will be displayed in this element.
Once you publish your changes, the elements will start to function, and the buttons in the elements will allow your customers to add items to a cart or purchase immediately.