Knowledge Base
Categories: Modification
Customer Portal - Add Packages
The Customer Portal allows you to add new hosting packages — Shared, VPS, Dedicated, or WordPress hosting packages — to your existing HostGator account. Once the order is completed, your new hosting package will be listed within your Customer Portal.
How to Add a Hosting Package
To add a hosting package to your HostGator account:
- Log in to your Customer Portal.
- There are several ways to add a hosting package within the Customer Portal.
- Via the Hosting tab
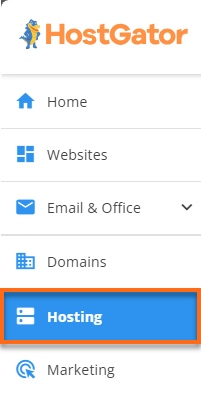
- Once logged in, click Hosting on the left-hand menu.
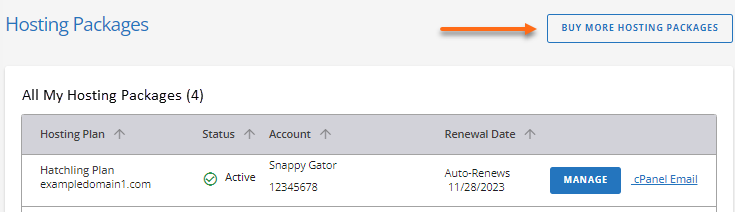
- In the top-right corner, click the Buy More Hosting Packages button.
- Once logged in, click Hosting on the left-hand menu.
- Via the Marketplace tab
- Click Marketplace on the left-hand menu.
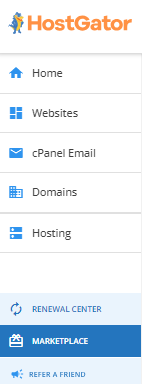
Alternatively, you can click your profile icon in the top-right corner of your dashboard and then select Marketplace.

- Scroll down to the Hosting section.

- Select your preferred hosting package, then click its Shop Now button.
- Click Marketplace on the left-hand menu.
- Via the Hosting tab
- You will be redirected to HostGator's front-of-site, where you can continue your purchase by filling out our order form.
- Please complete the required fields on the order form. The domain you provide in the Choose a Domain section will be used as the primary domain of your new hosting package.
- Register a New Domain tab - If you want to register a new domain, provide the domain name you want to purchase in the Enter Your Domain field. Ensure your domain's spelling, as we cannot edit it once it's registered.

- I Already Own This Domain tab - If you have an existing domain or would like to transfer a domain to HostGator, enter your domain in the Enter Your Domain field.

- Register a New Domain tab - If you want to register a new domain, provide the domain name you want to purchase in the Enter Your Domain field. Ensure your domain's spelling, as we cannot edit it once it's registered.
- Under the Choose a Hosting Plan section, select your preferred Package Type and Billing Cycle. Please note that the package type you will see in the dropdown menu will depend on what hosting package you've selected.

- (If available) Add Promo Code.
- Continue to Checkout.
- Review your order information and the total amount due. You can also check out our Auto-Renewal Terms, Terms of Service, Cancelation Policy, and Privacy Notice.
- Click the Submit Payment button to finalize your order.
Did you find this article helpful?